
Test 1
First layer and Z offset
A single layer: a chain of eight hexagons in the middle of the bed. While it prints, you lower the nozzle a little at each hexagon with your printer's own Z buttons, so every hexagon is printed at a different height. Then you compare them side by side and keep the best one. A second file checks that value over the whole bed.
A few minutes and about 1 g of filament, with no changes to your profiles. The file never moves the nozzle by itself: every change is yours.
More
The first layer carries everything printed on top of it. Too high, and the lines stay round and separate: the part lets go, and every test that follows is read on a weak base. Too low, and the plastic has nowhere to go: ridges, waves, a scraped bed. Judging one patch on its own is hard; judging eight neighbours that differ by 0.025 mm each is easy.
You make every change. The file contains no G-code at all. Never start much lower than your current value, and stop going down as soon as the surface turns wavy or ridged.
What you need
To print
- The ladder file, and the map for your bed
- PrusaSlicer 2.9 (2.7 is the minimum that opens the project)
- Your own printer, print and filament profiles, already working; a clean bed
- A way to change Z while printing: the Z offset buttons in Mainsail or Fluidd, *Live Adjust Z* on a Prusa, babystepping on Marlin
- About 1 g of filament (the map 1 to 2.5 g)
To read it
- The table on this page, on screen or on paper
- A lamp you can move, or a phone torch
- A fingernail
Before printing
Step 1 What it is for, and when to run it
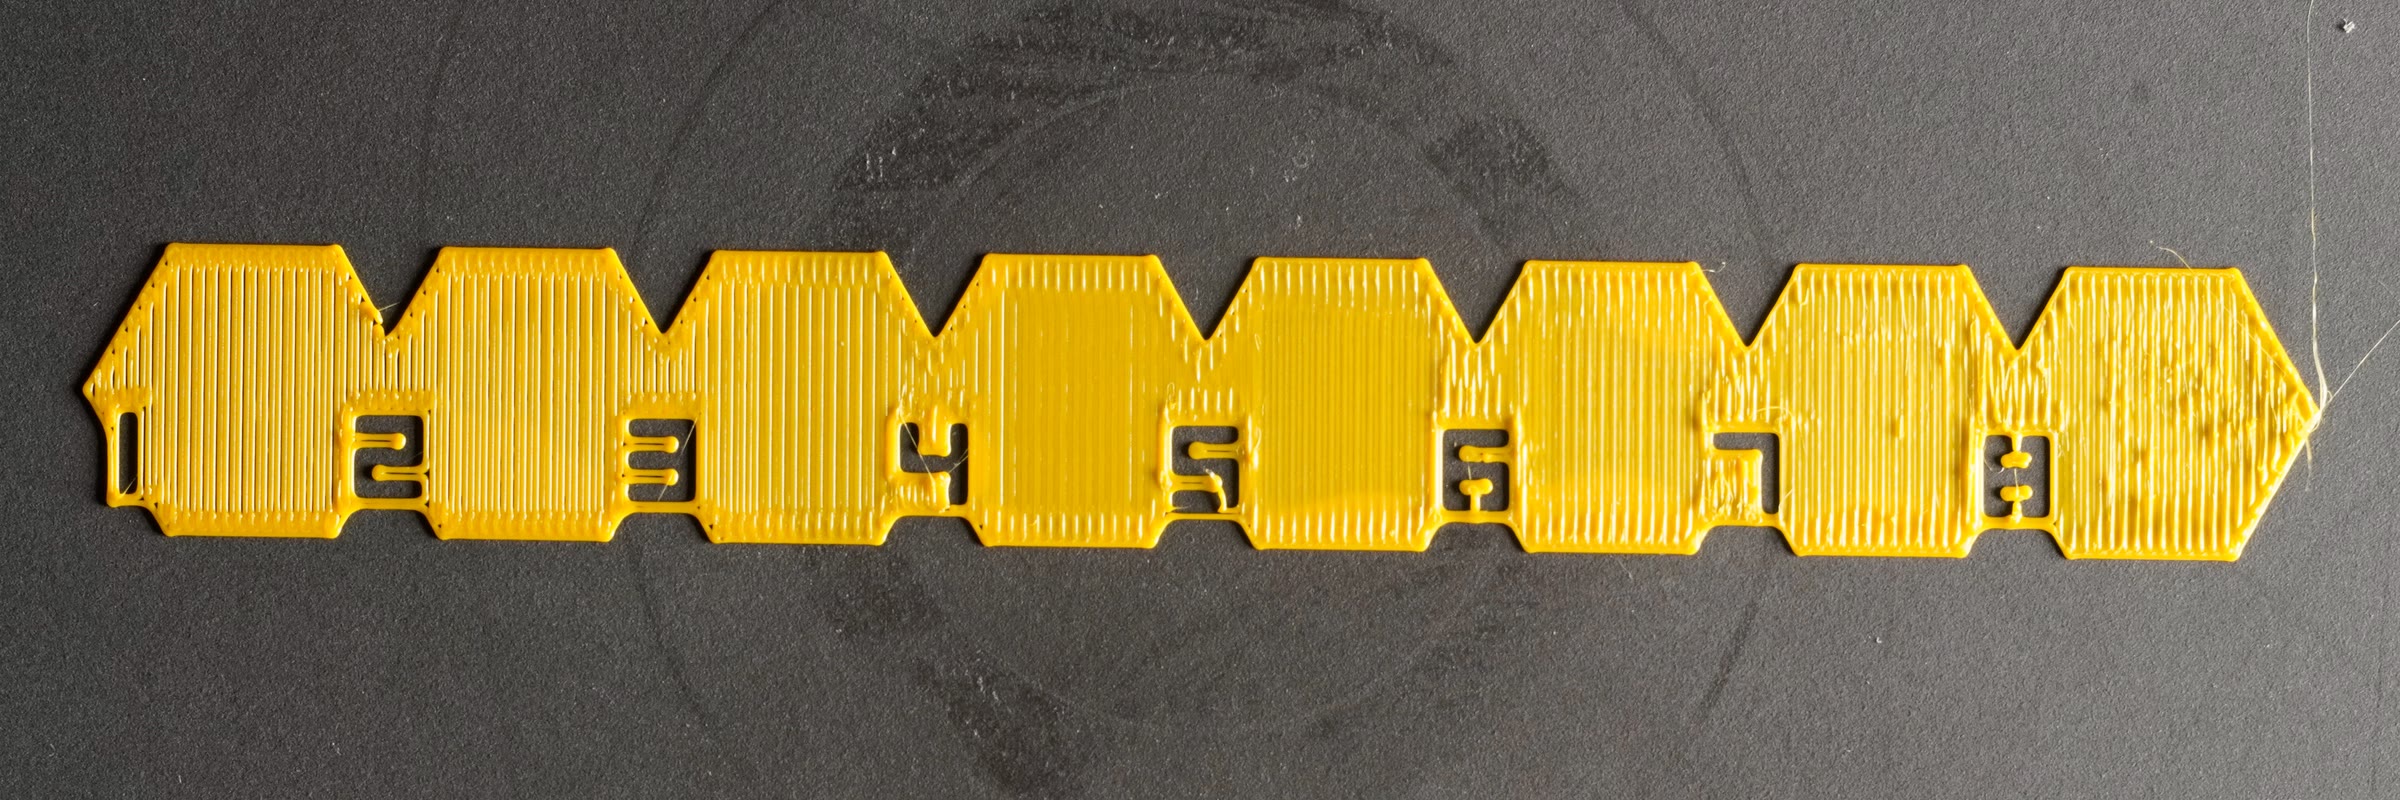
- It finds the Z offset: how far the nozzle sits from the bed on the first layer, so that the lines are pressed flat and joined, without being scraped.
- Run it first, before any other test, and again after changing the nozzle, the bed sheet or the probe.
More
- The Z offset belongs to the printer (probe, nozzle, bed sheet), not to the filament. PETG usually likes a little less squish than PLA: if you print both, check it with PETG too.
- A bed mesh corrects a bed that is not flat; it does not set the height. If the first layer is good in the middle and bad in a corner, the problem is the mesh, not the Z offset: that is what the map file shows.
- BeginnerThe paper test under the nozzle gets you close, within about 0.1 mm. This test finishes the job.
Step 2 Which file
| File | What it is | Bed |
|---|---|---|
first-layer_ladder.3mf | The ladder: 8 hexagons, 152 mm long, one layer | Any bed from 180 mm |
first-layer_ladder_T1.3mf | The same, printed by the second tool (IDEX, toolchangers) | Any bed from 180 mm |
first-layer_map_<bed>.3mf | The map: 5 or 9 numbered cells and a thin web across the bed | Pick your bed size: 180, 250, 300, 350, 400, 500, xl, mk4, coreone, j1 |
- Print the ladder first. Print the map afterwards, at the value you chose.
Step 3 Before you start
- Write down the Z offset your printer shows now. It is the starting point. Type it into the table below.
- Find the Z buttons you will use while printing. Mainsail has a ±0.025 button: one click per hexagon. A Prusa's *Live Adjust Z* moves in small steps: turn it until the value has changed by 0.025.
- Clean the bed. A greasy spot looks like a wrong Z offset.
More
- The model is 0.2 mm high on a 0.4 nozzle: it slices to one layer for any first-layer height from 0.1 to 0.39 mm. Keep your usual first-layer height and speed.
- Elephant foot compensation is forced to 0 on the object: the whole test is the first layer, and the compensation would shrink it.
- ExpertOn Klipper the Z buttons send
SET_GCODE_OFFSET Z_ADJUST=… MOVE=1. The adjustment lasts until a restart: save it afterwards (see Save the value).
Print and step down
Step 4 Open, slice and check the order
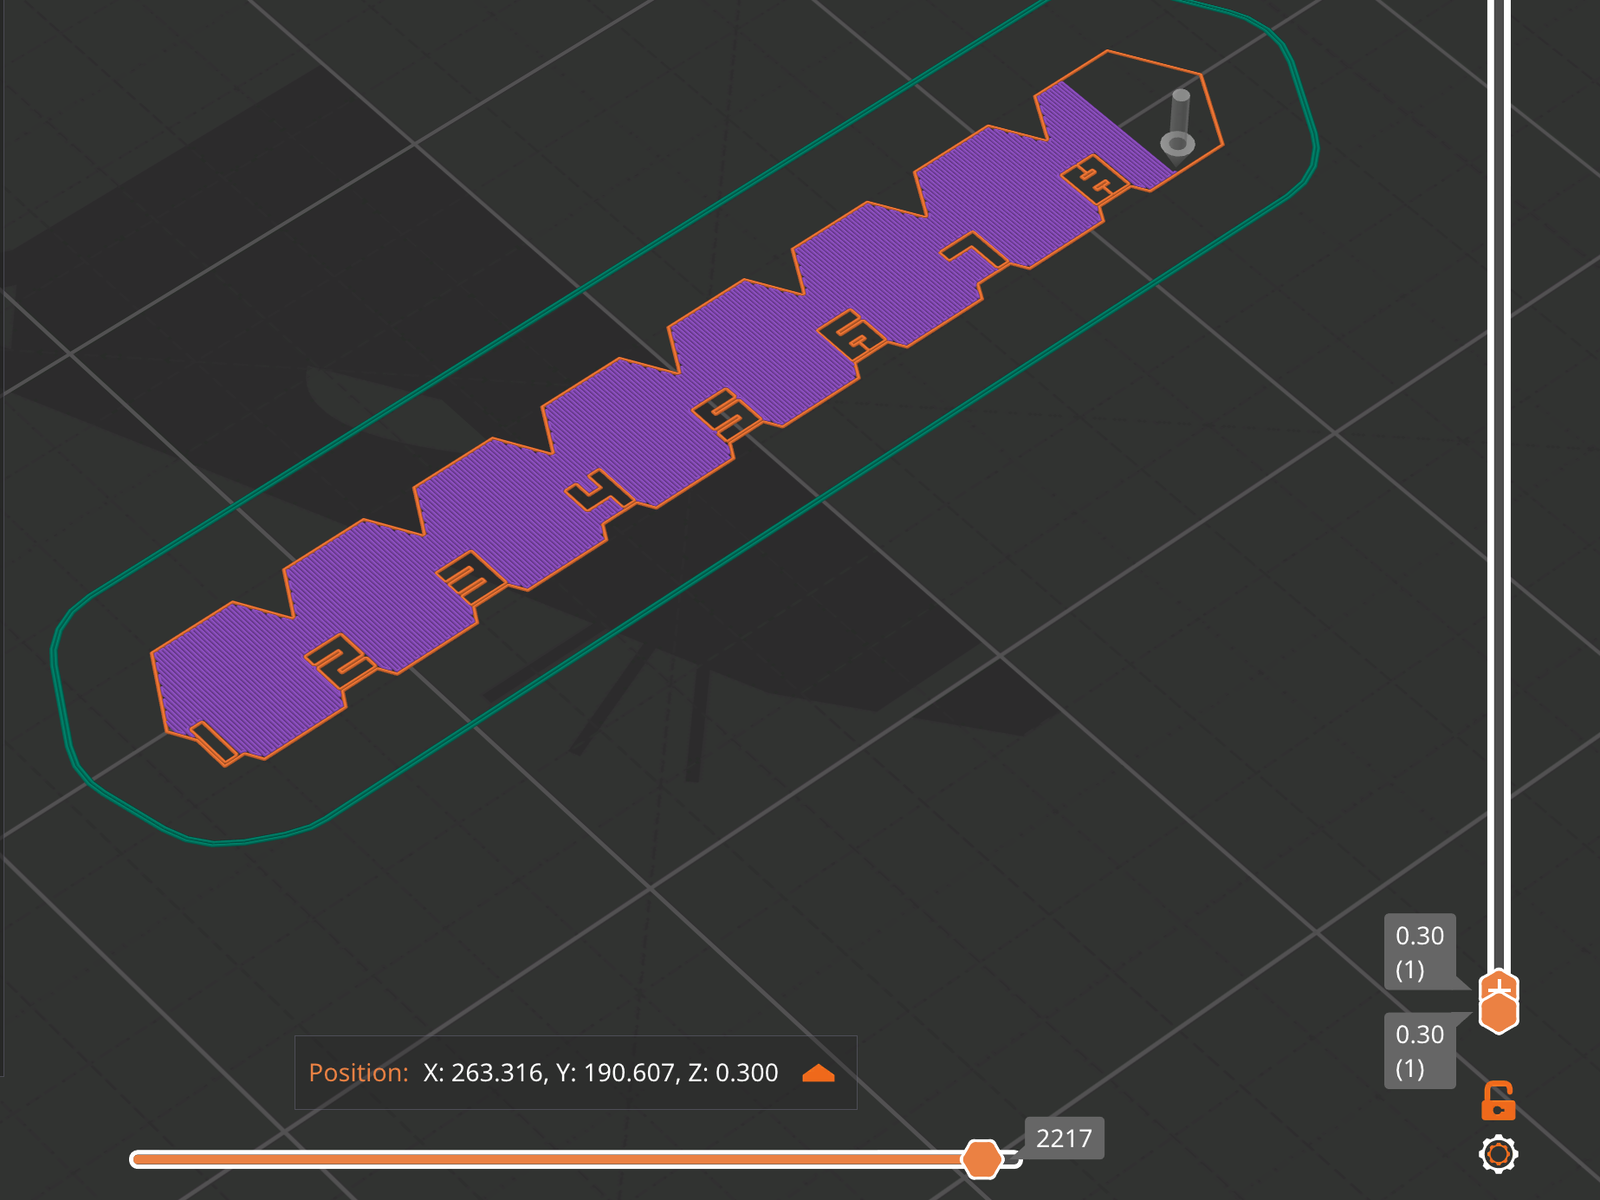
Open it with File › Open project, never with Import: an import drops the settings that make the nozzle sweep the chain in order.
- File › Open project, then Slice now.
- In the preview, play the first layer with the horizontal slider: after the outline, the nozzle fills hexagon 1 first, then 2, and so on up to 8. That is what makes the steps work.
Step 5 Step down at every number
- While the skirt prints, raise Z by +0.075 from your starting value (on Mainsail: +0.05, then +0.025). The outline and hexagon 1 are printed at that height.
- Every time the nozzle reaches a number, lower Z by 0.025, one click on Mainsail. Nothing to write while it prints.
- Stop going down early if the surface already turns wavy, ridged or scraped: you have found the bottom.
More
- Each hexagon takes about 10 to 35 seconds, depending on your first-layer speed: enough to press a button and look.
- At the end, check the value the printer shows against the one under the table. If they differ, a click was missed or doubled: look at the hexagons to see where the step is missing, and shift the values after it.
- ExpertThe numbers sit in small flags in the notches below the chain, so the whole hexagon is free for reading. The flag of each hexagon is on its left, where the nozzle arrives.
Read the result
Step 6 Compare the hexagons
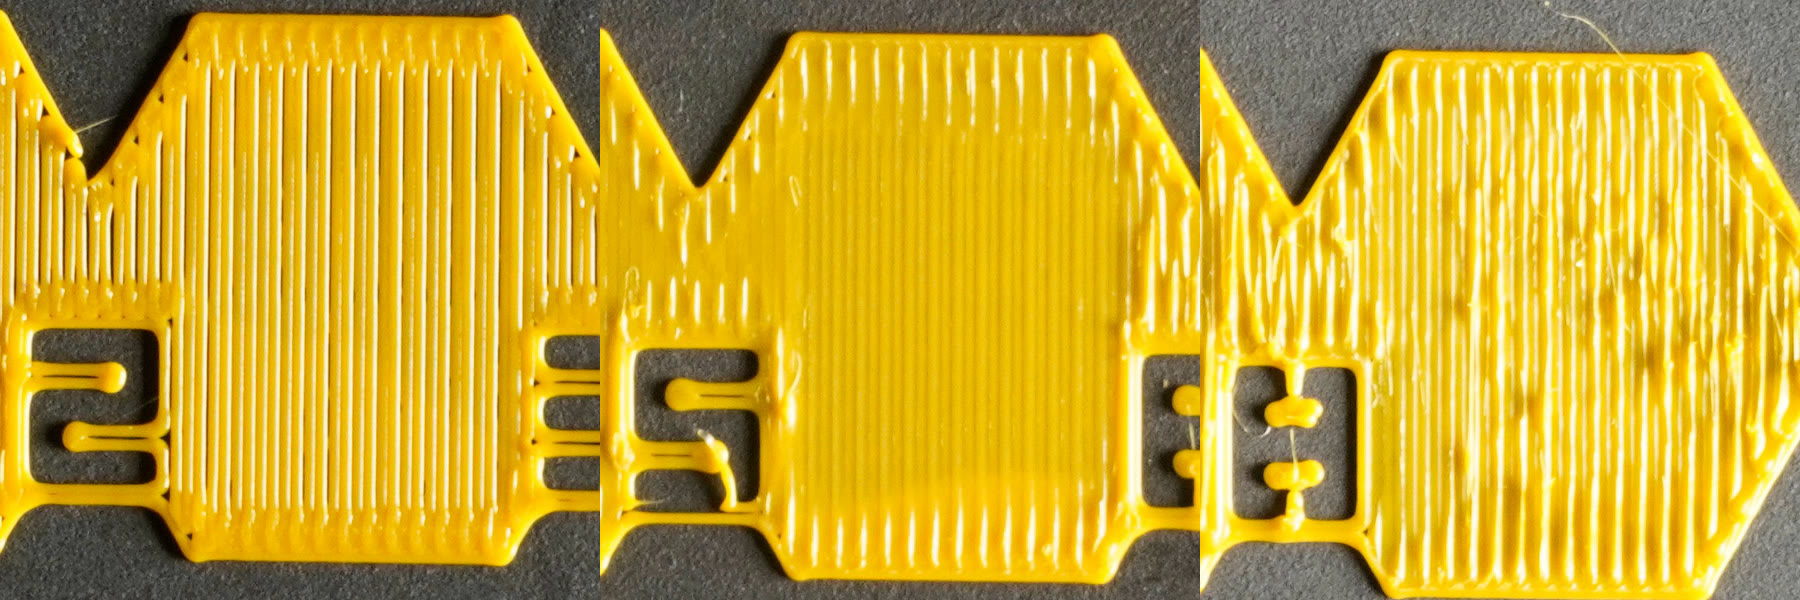
- Look at the hexagons side by side, with the light low and raking along the lines.
- Too high: round, separate lines, gaps you can see the bed through, edges that lift.
- Right: flat lines, joined with no gaps, still visible; smooth under a fingernail.
- Too low: lines that vanish into a shiny, wavy or ridged surface, plastic pushed up at the edges, marks on the bed.
- Tick the best hexagon in the table. If two look equally good, take the higher one.
More
- Peel and fold the hexagon you chose (and its neighbours if in doubt): a good one comes off as one sheet and folds without splitting; one that splits into lines was too high; a sheet with waves or drag marks was too low.
- Common misreadingA glassy, perfectly smooth surface is often too low, not perfect: the lines should still be visible.
- Common misreadingGaps only at the edges: a flow (extrusion multiplier) or speed effect, not Z. Judge the middle of each hexagon.
Step 7 Save the value
| Printer | How to keep the value |
|---|---|
| Klipper (Mainsail, Fluidd) | After the print, Z_OFFSET_APPLY_PROBE (probe) or Z_OFFSET_APPLY_ENDSTOP (Z endstop), then SAVE_CONFIG |
| RatOS | As on Klipper: the save icon next to the Z offset in Mainsail (checked on a RatRig V-Core 4 IDEX) |
| Prusa (Buddy: MK4, Core One, XL, MINI) | *Live Adjust Z* keeps the value for the sheet in use; on load-cell printers set *Printer Settings › General › Z offset* in PrusaSlicer instead |
| Marlin | M851 Z… (probe) or babystep, then M500 |
- Set the Z offset to the value the table gives, then save it the way your printer does.
Check the whole bed
Step 8 Print the map
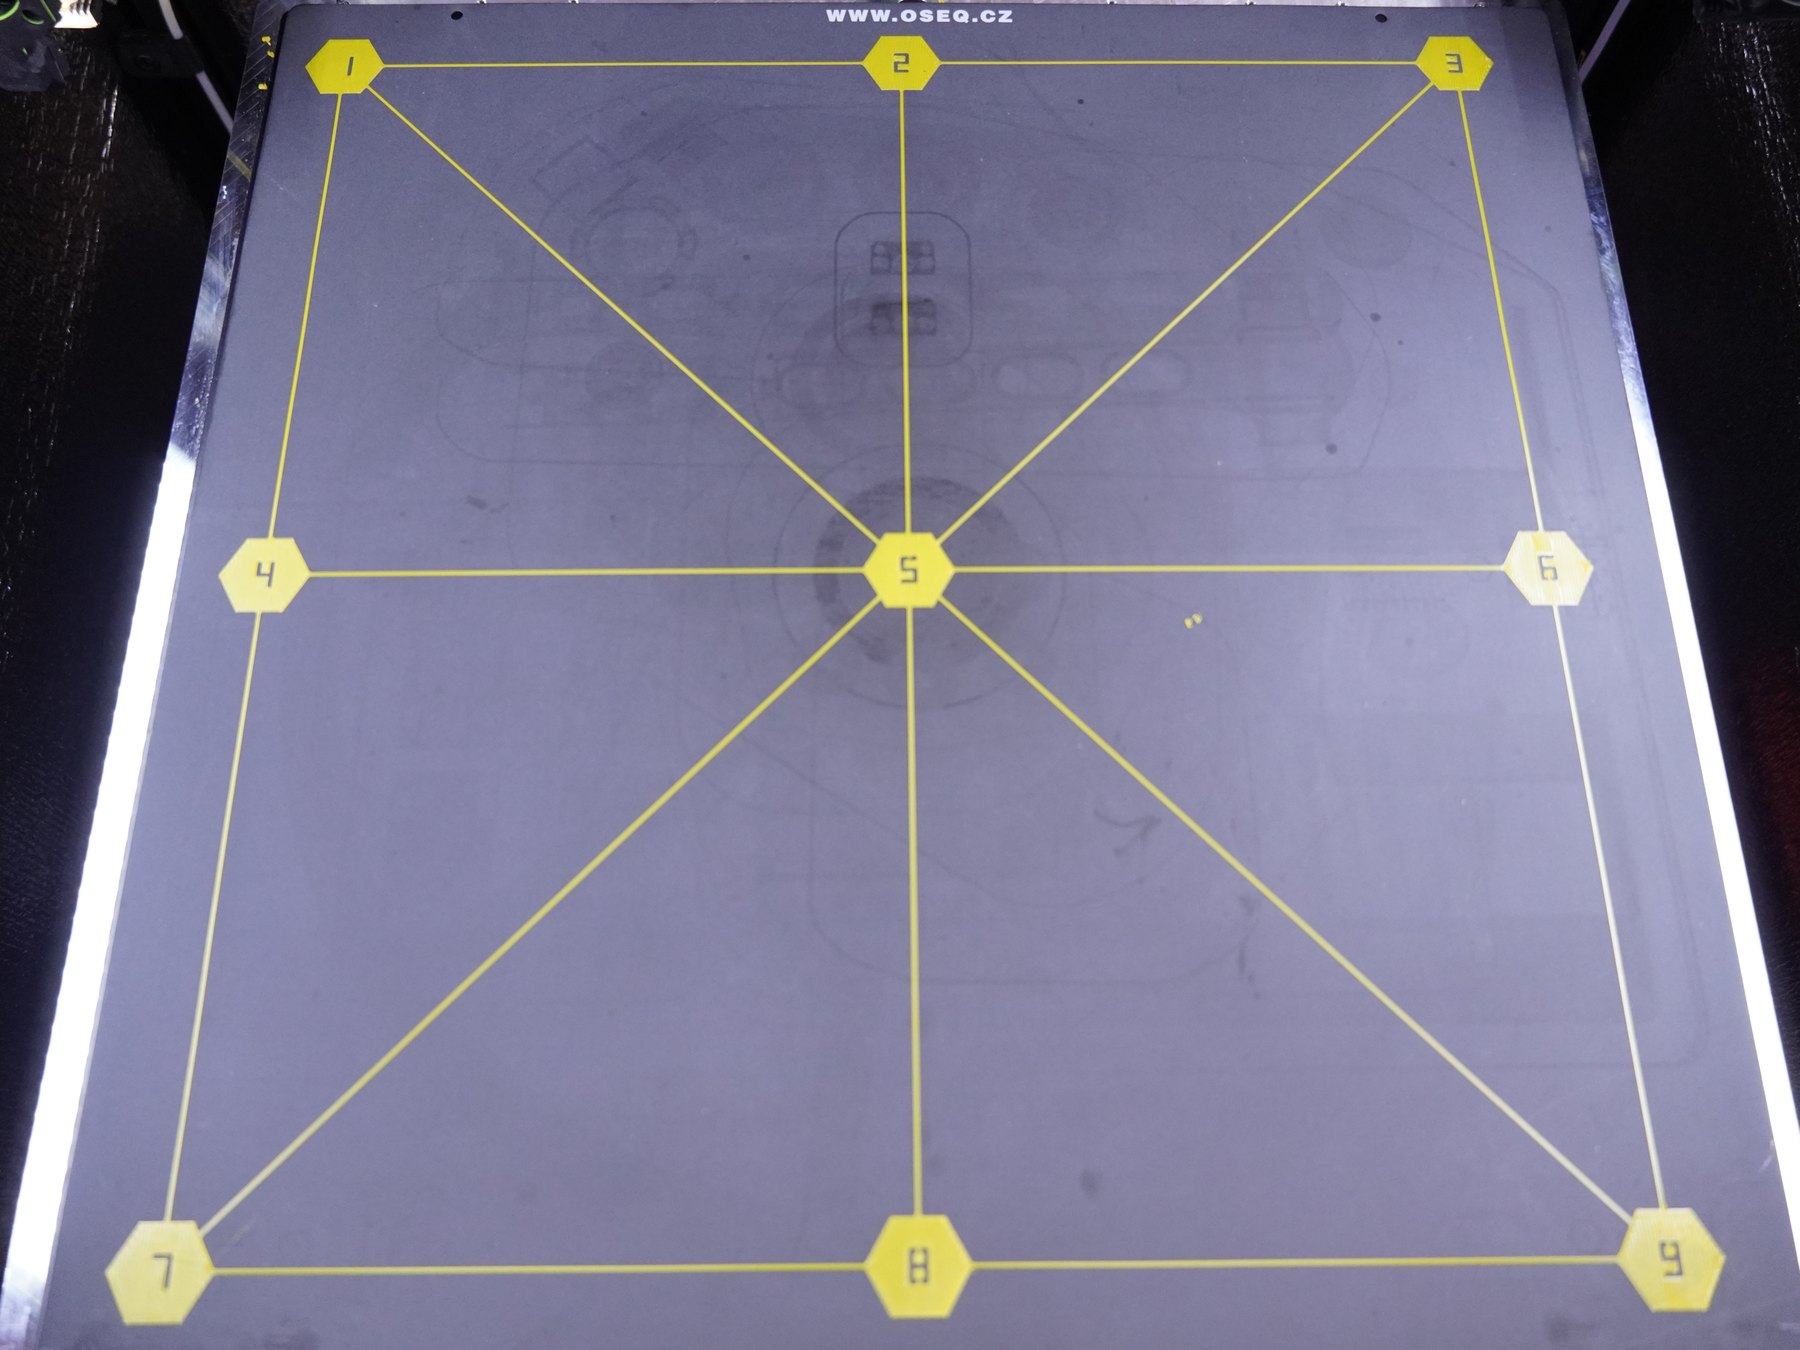
- Print the map for your bed without touching Z.
- Every cell should look like the hexagon you chose. The web between them shows the zones in between.
- One corner different from the rest points to the bed mesh, not to the Z offset: re-run the mesh and check that it is applied.