
Test 3
Maximum volumetric flow
A thin wall printed in bands, each one faster than the one below: a small hex column with a long wedge, whose two straight walls keep the nozzle at full speed long enough for the hotend to show its real limit. The number on the column beside each band is its flow in mm³/s. Find the last band that is still clean on the long straights, and put 80–90 % of it into your filament profile.
9 to 25 minutes and 16 to 45 g of filament, with no changes to your profiles.
More
The wall is one thick line (1.75 × the nozzle wide, 0.75 × the nozzle high: 0.70 × 0.30 mm on a 0.4 nozzle), so the same flow needs half the speed of an ordinary line. A speed factor sent at each band (M220) makes the printer run faster; the slicer itself sees a slow, steady print and never slows it down. The numbers are the flow in the middle of the two long straights.
The result is the Max volumetric speed of the filament profile: PrusaSlicer then caps every speed it writes so that the hotend is never asked for more plastic than it can melt.
Open the file with File › Open project. Never with Import, never as a ZIP: an import keeps the shape but drops the per-band speed factors, and the whole tower would print at a crawl.
What you need
To print
- The file for your hotend and nozzle
- PrusaSlicer 2.9 (2.7 is the minimum that opens the project)
- Your own printer, print and filament profiles, already working
- The temperature from the temperature tower
- The filament to test, dry: 16 to 45 g of it
- A bed at least 180 mm wide (the
uhf-0.4file needs 200 mm: a MK4, a Core One or larger)
To read it
- Your ears and the hotend temperature graph, during the print
- A lamp you can move, or a phone torch
- The scorecard, printed or on screen
Before printing
Step 1 What it is for, and when to run it
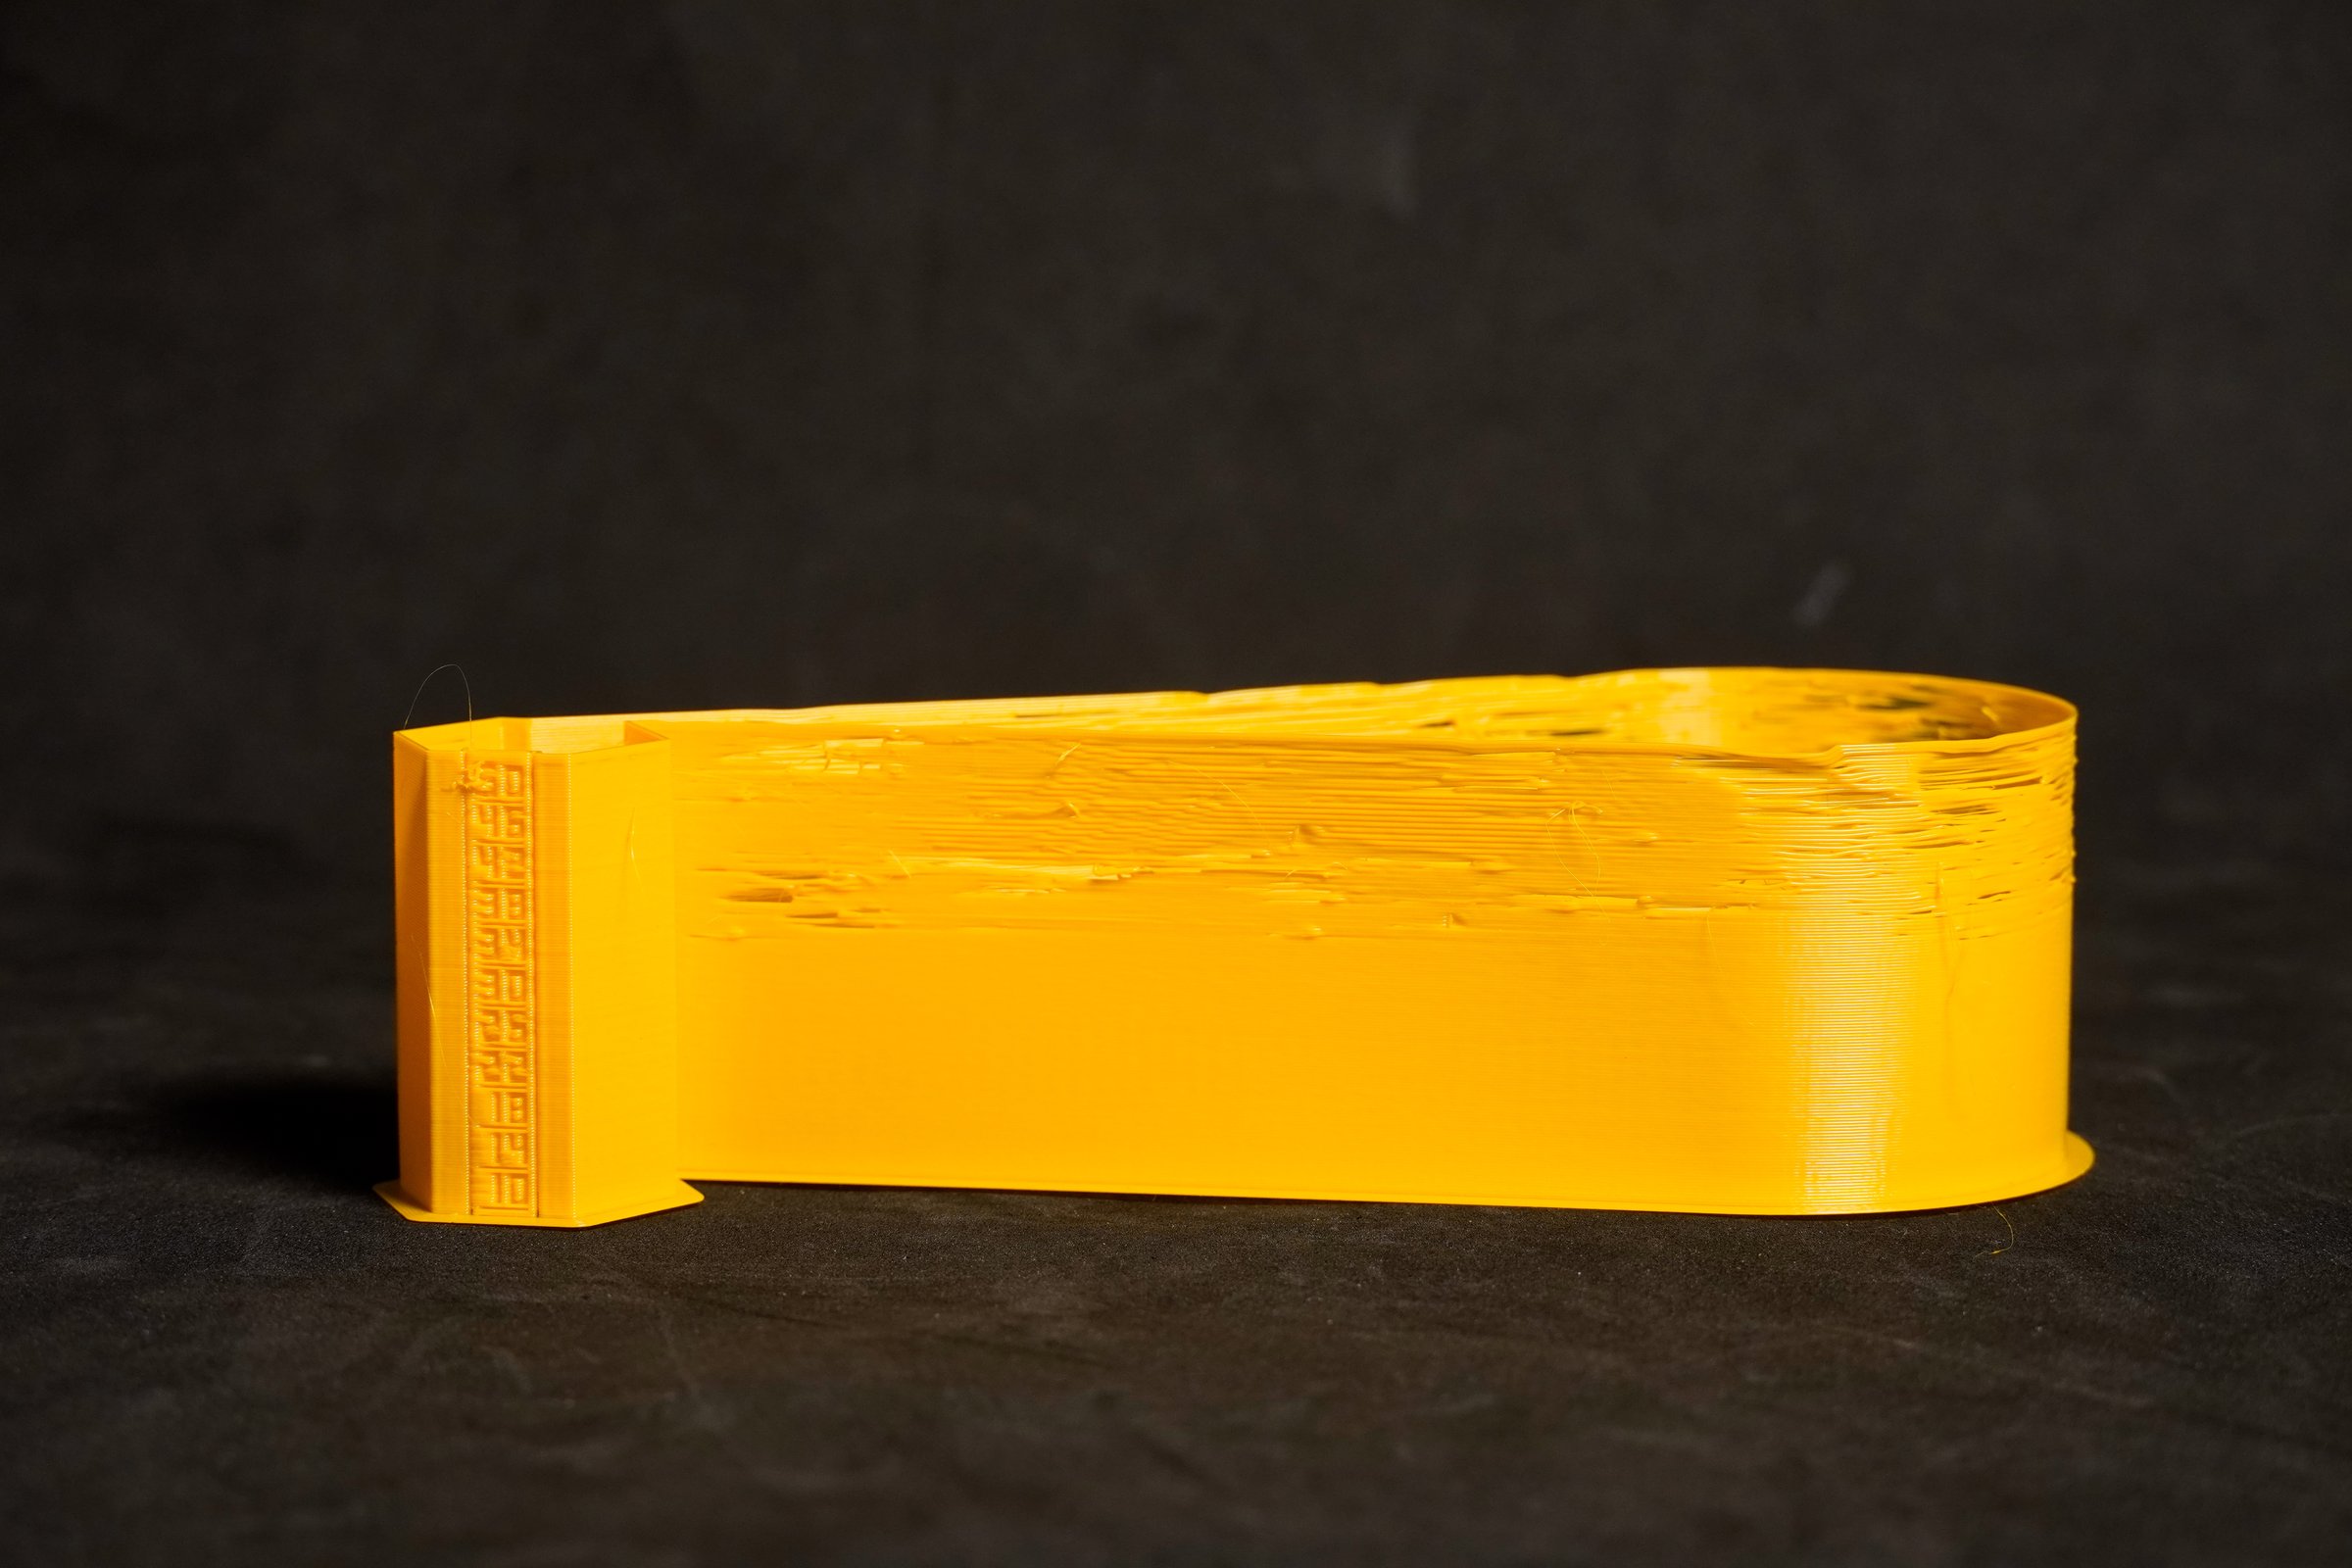
- It finds the maximum flow your hotend can melt for this filament at this temperature, before the wall starts to starve.
- Run it after the temperature tower and before pressure advance. The result goes into Filament Settings › Advanced › Max volumetric speed, at 80–90 %.
More
- Every speed PrusaSlicer writes is capped by the filament's Max volumetric speed. Too high, and fast perimeters and infill under-extrude; too low (or left at the profile's default), and the printer never runs as fast as it could.
- The limit belongs to the filament and the hotend, nozzle, temperature and extruder. Hotter plastic melts faster: that is why it comes after the temperature tower, at the temperature you chose there.
- It comes before pressure advance: PA depends on the flow you print at.
- BeginnerThe number on the spool box or in a generic profile is a guess for an average hotend. This test measures your own.
- Why long straights. Max flow is a steady limit: the hotend must melt the plastic as fast as it leaves. The melt zone keeps a little hot plastic in reserve, so a short burst above the limit can still come out right. Each long straight holds the top band's speed for 0.3–0.5 s, and the nozzle keeps most of its speed through the round end, so the reserve runs out and the wall shows the real limit. Our earlier hexagon held full speed for only about 0.1 s per face and could read too high.
- ExpertCompared with OrcaSlicer's test. Orca prints a continuous vase-mode spiral and raises the flow smoothly with height; you measure the height where the wall fails. Here each band has one flow and its number printed beside it, and the long straights hold full speed about as long as Orca's spiral does on a part of the same size.
Step 2 Which file
| Hotend | Claim (mm³/s) | Measured independently | 0.4 nozzle | 0.6 nozzle | 0.8 / 1.0 nozzle |
|---|---|---|---|---|---|
| E3D V6 | – | 10–15 (CNC Kitchen) | standard-0.4 | standard-0.6 | – |
| E3D Revo, Revo High Flow | HF 0.4: 16–27, HF 0.6: 22–31 | 14 / 23.5 at 0.4 (CNC Kitchen) | standard-0.4 | standard-0.6 | hf-0.6 (not yet confirmed on a 0.8 nozzle) |
| Prusa MK4S / Core One (HF nozzle) | 24 (PLA); HF 0.6: 31–36 | – | standard-0.4 | hf-0.6 | – |
| Bambu Lab X1 / P1, A1 | ≈ 32 / ≈ 28 (ABS, 280 °C) | profiles: 21 (PLA) | hf-0.4 | hf-0.6 | – |
| Bambu Lab H2D / H2S | ≈ 40; High Flow hotend ≈ 65 | – | hf-0.4 | hf-0.6 (High Flow hotend: uhf-0.6) | – |
| Creality K1, K1C, K1 Max, K2 Plus | ≈ 32 (K2 Plus: 32 or 40, sources disagree) | – | hf-0.4 | hf-0.6 | – |
| Slice Mosquito / Magnum | 35 / 40 | 15–25 / 35 at 280 °C (CNC Kitchen) | hf-0.4 | hf-0.6 | – |
| E3D Volcano, Bondtech CHT | – / +25–65 % | Volcano 0.6: 30; CHT 0.6: 40, 1.0: 60–90 (CNC Kitchen) | hf-0.4 | hf-0.6 | uhf-0.8; CHT 1.0: extreme-1.0 |
| Phaetus Rapido 2 HF, Dragon HF | ≈ 52 / ≈ 62+ | Rapido HF 0.4: 24 (Ellis) | hf-0.4 | uhf-0.6 | uhf-0.8 |
| Phaetus Rapido UHF, Rapido 2 UHF, Dragon UHF; Trianglelab Dragon ACE | ≈ 75 / ≈ 75 / ≈ 70.5; 74 | Rapido UHF 0.4: 30 (Ellis) | hf-0.4, then uhf-0.4 | uhf-0.6 | uhf-0.8 |
| Mellow / VzBot Goliath, Chube Conduction | ≈ 50+ / none (about 80 reported) | – | uhf-0.4 | uhf-0.6 | uhf-0.8 |
| Slice Magnum+, E3D SuperVolcano, Phaetus Rapido X | ≈ 88–91 / ≈ 110 / ≈ 100+ | – | – | uhf-0.6 | extreme-0.8 / extreme-1.0 |
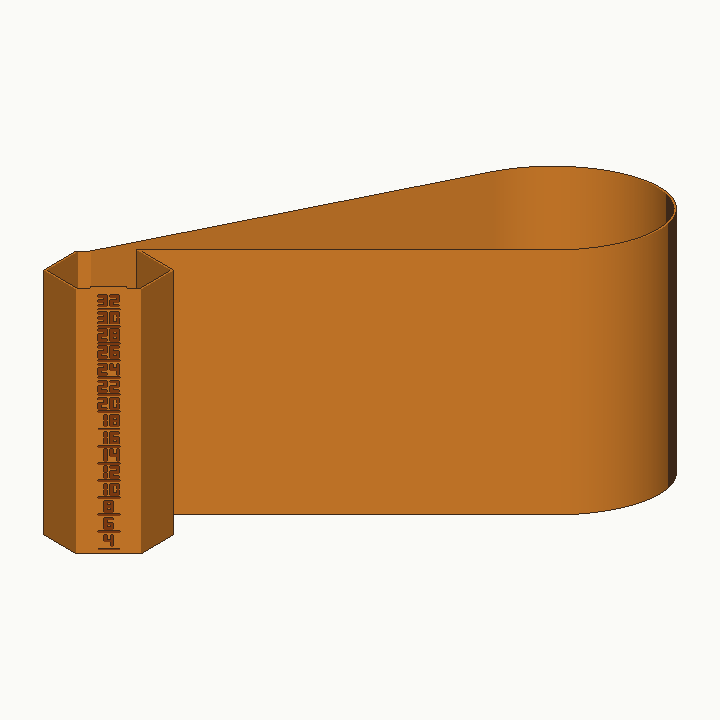
- Find your hotend in the table, then take the file for your nozzle. Not listed? Use the row with the closest claim.
- IDEX: test each tool on its own:
_T0and_T1files (see below). - The code in the table is the middle of the file name:
hf-0.4ismax-flow_hf-0.4_10-50.3mf(the numbers are the flow range). Get that single .3mf from the HexCalibr page on Printables (below), never "Download all" as a ZIP.
More
Nine files in four tiers. The tier comes from your hotend, the file from your nozzle. Each file's top band is at least 120 % of the highest claim of its tier, so a hotend that really reaches its claim still shows a failing band.
| File | Bands (mm³/s) | Line × layer | Top speed | Footprint | PETG | Time |
|---|---|---|---|---|---|---|
max-flow_standard-0.4_ | 4, 6 … 32 (15 bands) | 0.70 × 0.30 mm | 168 mm/s | 146 × 61 mm | 18.6 g | ≈ 25 min |
max-flow_standard-0.6_ | 6, 9 … 36 (11) | 1.05 × 0.45 mm | 84 mm/s | 95 × 40 mm | 18.4 g | ≈ 21 min |
max-flow_hf-0.4_ | 10, 14 … 50 (11) | 0.70 × 0.30 mm | 262 mm/s | 169 × 70 mm | 15.8 g | ≈ 14 min |
max-flow_hf-0.6_ | 12, 20 … 60 (7) | 1.05 × 0.45 mm | 140 mm/s | 132 × 53 mm | 16.0 g | ≈ 11 min |
max-flow_uhf-0.4_ | 16, 20 … 64 (13) | 0.70 × 0.30 mm | 336 mm/s | 193 × 80 mm | 21.0 g | ≈ 14 min |
max-flow_uhf-0.6_ | 28, 40 … 100 (7) | 1.05 × 0.45 mm | 233 mm/s | 169 × 69 mm | 20.5 g | ≈ 9 min |
max-flow_uhf-0.8_ | 28, 40 … 100 (7) | 1.40 × 0.60 mm | 131 mm/s | 134 × 53 mm | 25.2 g | ≈ 12 min |
max-flow_extreme-0.8_ | 30, 55 … 180 (7) | 1.40 × 0.60 mm | 236 mm/s | 170 × 68 mm | 30.8 g | ≈ 12 min |
max-flow_extreme-1.0_ | 30, 55 … 180 (7) | 1.75 × 0.75 mm | 151 mm/s | 154 × 60 mm | 45.0 g | ≈ 17 min |
- Claims are not measurements. Makers state their figure with different filaments, temperatures, nozzles (often 0.8–1.2 mm) and failure criteria; on a 0.4 nozzle every hotend reaches far less. ≈ marks a figure we found only through a retailer or a search excerpt, not on the maker's own page: treat it as approximate.
- Times are estimates at 4000 mm/s²; PrusaSlicer shows the real time after slicing. Grams are PETG, 1.75 mm filament. The footprint includes the 3 mm brim.
- Seven wide bands on the bigger files.
hf-0.6,uhf-0.6,uhf-0.8and bothextremefiles go up in larger steps (8, 12 and 25 mm³/s, about 12–14 % of the top band) to save a third or more of the filament. Each band is as tall as on the other files, so it is just as easy to judge; the limit is simply less precise (what that changes). - Bed fit. Every file fits a 180 × 180 mm bed (Prusa MINI, Bambu Lab A1 mini) with room for a skirt, except
uhf-0.4: it is 193 mm long, because holding 336 mm/s for 0.3 s needs it. It fits a MK4 (250 × 210), a Core One (250 × 220) and any larger bed. - Nothing failed? Print the next tier for your nozzle (standard → hf → uhf → extreme). Everything failed? Print the tier below.
- IDEX and multi-tool:
max-flow_hf-0.4_10-50_T0.3mf/_T1.3mfandmax-flow_uhf-0.4_16-64_T0.3mf/_T1.3mfare assigned to that tool, object and speed codes. Per-tool versions of the other files are not published yet. - ExpertWorked example, the author's RatRig V-Core 4 IDEX (Klipper): Phaetus Rapido UHF and an LDO Orbiter 2.5 on both tools; T0 has an "Alpha" PCD 0.4 nozzle, T1 a Phaetus PS M6 copper 0.4. Files:
max-flow_hf-0.4_10-50_T0.3mfand_T1.3mf. T0, PETG at 240 °C: band 30 is the last clean wall, band 34 the onset; the heater held within ±0.8 °C (72 % power at most) and the extruder never clicked, so the hotend's melt was the limit, not the extruder. Set 25 mm³/s (85 %). T1 has the same V6 bore: expect a band or two either way, and give it its own number. - Common misreadingTaking the 0.6 or 0.8 file for a 0.4 nozzle because the hotend is UHF. A 0.4 nozzle caps even a UHF hotend: Ellis measured about 30 mm³/s on a Rapido UHF with a 0.4 brass nozzle against the 75 claimed. Pick the file for the nozzle you print with.
Print it
Step 3 Open it as a project and check the preview
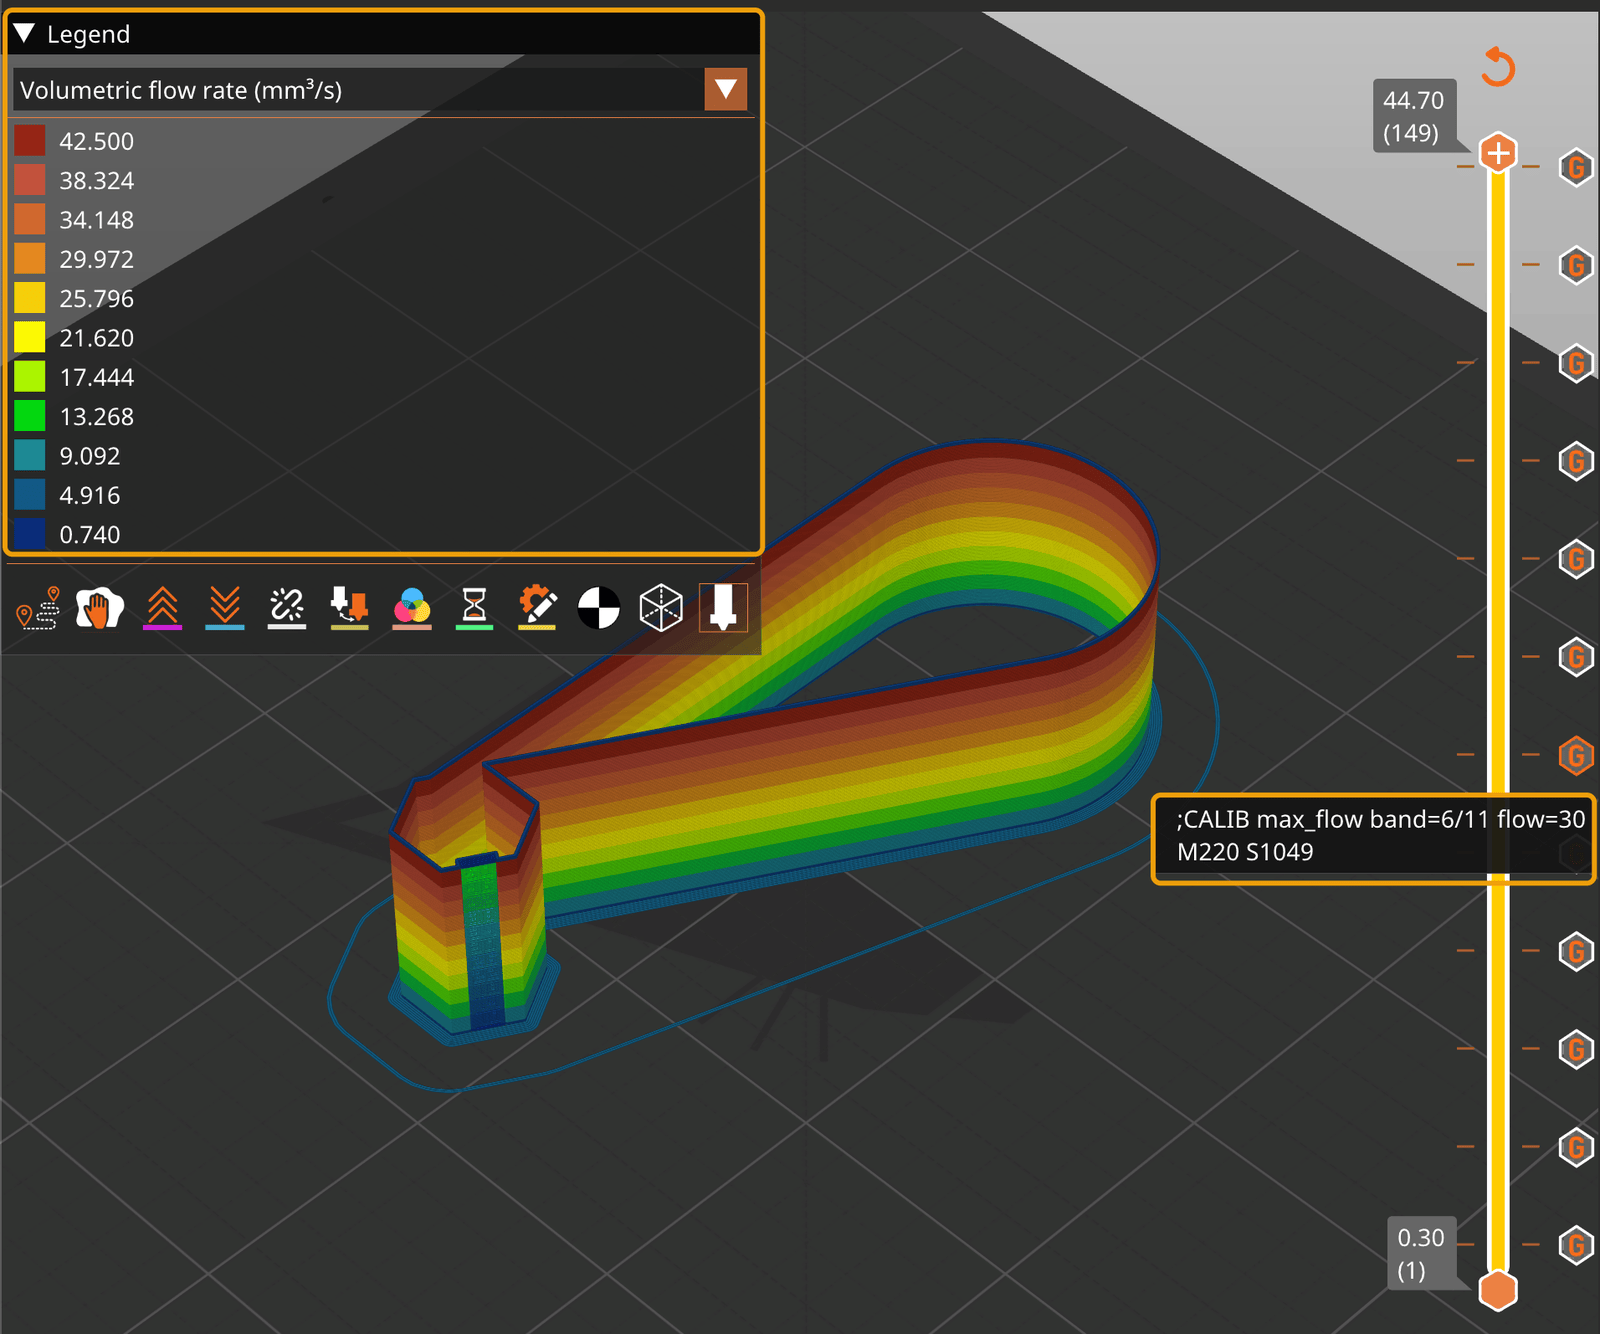
- File › Open project (Ctrl+O, ⌘O on macOS), pick your profiles, slice.
- Leave it as it opens: the long side along X (left to right). Every file but
uhf-0.4fits a 180 mm bed. - In the Preview legend choose Volumetric flow rate and hover each band on a long straight: it must show the number on the column.
- The print time shown is the real one.
More
- Dragging the file in? Choose Open as project, never Import 3D models only.
- Volumetric flow rate is the check that nothing in the slicer capped the test: on the long straights band 1 shows the lowest number, the top of the legend the highest (32.0 on standard-0.4). On the fast files the top of the legend can stay below the top label (on the screenshot above, 42.5 instead of 50 on hf-0.4): read each band's value from its marker on the slider (
flow=…), and make sure the printer itself allows the top speed (firmware limits). The numbers on the column print at half speed and show lower values: that is intended. Speed shows the band speeds (21–168 mm/s on standard-0.4). The layer height is 0.75 × the nozzle (0.30 mm on the 0.4 files), whatever your profile says. - Feature type: one External perimeter line per layer, and nothing inside the wedge: no infill, no floor, no gap fill. The numbers face is a small solid block on the column. The seam sits on the column's rear corner on every layer, never on the long straights or the round end.
- The vertical slider shows one marker per band; hovering shows
M220 S…. In the G-code each band starts with;CALIB max_flow band=N/M flow=X, where M is the file's number of bands (15 on standard-0.4, 11 on hf-0.4). - The print time is reliable with Klipper, Marlin and Prusa printer profiles: PrusaSlicer's preview and time estimate apply
M220. - RepRapFirmware printer profiles: the preview ignores
M220. The legend shows the slow base speed (5–17 mm/s; 13.5 on standard-0.4) and the time is several times too long; the printer still prints the real bands. - All bands lower than the engraved numbers, by the same ratio? Your filament profile slowed the base speed down. For this slice only: in Filament Settings › Cooling set Slow down if layer print time is below and Enable fan if layer print time is below to 5 s, and/or raise Max volumetric speed above 6.5 mm³/s; slice, export, then discard the change (never save it).
- Spiral vase and Sequential printing must be off. Gap fill or infill must not appear: if it does, the file was imported.
- ExpertWhy along X. On a bed slinger, X moves only the toolhead, the lighter axis. On CoreXY either axis is fine; keep X so results compare.
Step 4 No profile changes: how the speed rises
If you cancel the print, send M220 S100
The top of the tower sets the speed back with M220 S100. If you cancel before the top, type M220 S100 in the printer's console: Klipper, Marlin and RepRapFirmware keep the factor, and your next print would run up to 8–29 times too fast, up to the firmware's limits. Prusa Buddy printers reset it at the next print start.
- Leave your profiles as they are, including the filament's max volumetric speed: the slicer cannot cap what the printer adds.
More
- The file asks PrusaSlicer for one slow speed (13.5 mm/s on standard-0.4). At the start of each band,
M220 S<percent>tells the printer to run everything that many times faster:M220 S1010is 10.1 ×. - Flow = speed × line area. standard-0.4, band 26: 13.5 mm/s × 10.10 × 0.1907 mm² = 26.0 mm³/s.
- PrusaSlicer's cooling logic (*Slow down if layer print time is below*, *Enable fan if below*) and the filament's max volumetric speed only see the slow speed: they never slow the bands down, and the fan stays at your filament's normal setting.
M220works on Marlin, Prusa firmware (MK4/MK4S, MK3.9/3.5, Core One, XL, MINI, MK3), Klipper and RepRapFirmware: one file for every printer.M220also speeds up travel and retraction moves. Your firmware limits cap them.
Step 5 Check your firmware limits
| File | Top band (mm³/s) | Top speed: max velocity ≥ | Acceleration for 0.3 s at full speed | Marlin M203 E ≥ (filament) |
|---|---|---|---|---|
| standard-0.4 | 32 | 168 mm/s | 540 mm/s² | 13.3 mm/s |
| standard-0.6 | 36 | 84 mm/s | 280 mm/s² | 15.0 mm/s |
| hf-0.4 | 50 | 262 mm/s | 1960 mm/s² | 20.8 mm/s |
| hf-0.6 | 60 | 140 mm/s | 470 mm/s² | 24.9 mm/s |
| uhf-0.4 | 64 | 336 mm/s | 3840 mm/s² | 26.6 mm/s |
| uhf-0.6 | 100 | 233 mm/s | 1340 mm/s² | 41.6 mm/s |
| uhf-0.8 | 100 | 131 mm/s | 430 mm/s² | 41.6 mm/s |
| extreme-0.8 | 180 | 236 mm/s | 1670 mm/s² | 74.8 mm/s |
| extreme-1.0 | 180 | 151 mm/s | 490 mm/s² | 74.8 mm/s |
- Klipper:
max_velocityin[printer]at least the top speed in the table,max_accelat least the acceleration (orSET_VELOCITY_LIMITfor this session). - Marlin:
M203X/Y at least the top speed andM203 Eat least the filament speed. Prusa: Printer Settings › Machine limits. - Above a limit the speed stops rising: the band prints below its label and looks better than it should.
More
Read the middle of the two long straights. The nozzle leaves the column, speeds up along the first straight, goes round the end, runs back along the second and brakes into the column. The engraved number is the flow at full speed on the straights. The test runs at your profile's external perimeter acceleration (*Print Settings › Speed › Acceleration control (advanced)*).
| Top band of the file | 1000 mm/s² | 3000 mm/s² | 4000 mm/s² | 10000 mm/s² |
|---|---|---|---|---|
| standard-0.4 (32) | 0.43 s | 0.49 s | 0.50 s | 0.52 s |
| standard-0.6 (36) | 0.48 s | 0.50 s | 0.51 s | 0.51 s |
| hf-0.4 (50) | 0.20 s (Klipper: peak 49) | 0.34 s | 0.35 s | 0.39 s |
| hf-0.6 (60) | 0.45 s | 0.49 s | 0.50 s | 0.51 s |
| uhf-0.4 (64) | 0.09 s (Klipper: peak 53) | 0.28 s | 0.30 s | 0.35 s |
| uhf-0.6 (100) | 0.26 s | 0.37 s | 0.39 s | 0.41 s |
| uhf-0.8 (100) | 0.46 s | 0.50 s | 0.51 s | 0.52 s |
| extreme-0.8 (180) | 0.23 s | 0.35 s | 0.36 s | 0.39 s |
| extreme-1.0 (180) | 0.45 s | 0.50 s | 0.50 s | 0.52 s |
- The table shows how long the top band holds full speed on the shorter straight, after speeding up and before braking. Every file reaches its label on the straights from 1000 mm/s² up; the lower bands hold it much longer.
- Klipper's
minimum_cruise_ratio(default 0.5,[printer]; formerlymax_accel_to_decel) limits the peak speed of a short move. The straights are long enough that it changes nothing at 4000 mm/s²; at 1000 mm/s² the fast 0.4 files peak a little below their top label (table). - The round end: the nozzle keeps the band's speed through it up to about 140–170 mm/s and slows to that on faster bands (Klipper's default
square_corner_velocity5). Do not read it; read the straights. [extruder] max_extrude_cross_sectionneeds no change: the tower's line is 0.30 × nozzle², the default limit 4 × nozzle². Klipper has no extruder speed limit on printing moves;max_extrude_only_velocityonly matters for the extrude-in-air check.- Marlin:
M203 Ecaps the whole move, printing moves included (filament speed = flow ÷ 2.405).M201 Ecaps the extruder acceleration. Prusa: with *Emit to G-code*, the machine limits in the printer profile are what the printer uses; standard-0.4 fits every Prusa profile, hf-0.4 needs 262 mm/s (MK4/Core One normal mode, not stealth). - Bed slingers at 1000–3000 mm/s²: the straights reach the label, but hold it for less time on the fast 0.4 files. Prefer the larger-nozzle file of your tier if you have that nozzle: the same flow at a lower speed.
Step 6 Temperature and safety
- Print at the temperature you will print with: the one from the temperature tower.
- Stay below your hotend's maximum temperature (and the filament's). Never raise it, or a firmware limit, to chase a higher band.
- Hotends with a PTFE (Teflon) tube down to the nozzle are not safe above about 250 °C: the tube degrades and gives off harmful fumes.
- Watch the hotend temperature graph during the top bands. A heater that cannot keep up sags; Klipper may stop the print with "Heater extruder not heating at expected rate".
More
- Max flow rises steeply with temperature (CNC Kitchen: a V6 that skipped at 15 mm³/s at 215 °C ran 15 mm³/s cleanly at 275 °C). If you change the temperature later, the result is no longer valid: test again.
- At 50–180 mm³/s the heater melts several grams per minute; a 40–60 W cartridge can fall behind. A sag of more than a few °C is itself a failure of that band (heater sag).
- The uhf and extreme files move at up to 336 mm/s: check that the toolhead, the belts and the part's grip on the bed are fine at that speed before leaving it alone.
Step 7 Slice and print
- Start the print and stay with it: listen to the extruder and watch the hotend temperature during the upper bands.
- Note the number on the column at the nozzle height when the extruder clicks or the temperature sags.
- If the extruder grinds hard for several bands, stop the print and send
M220 S100.
More
- A thin, wavy or broken line on the straights, seen at the nozzle, is the onset. The printer's console also shows the band being printed (
;CALIB max_flow band=N). - Let the part cool before taking it off. Keep the brim on until you have read it: it holds the thin wall straight.
- BeginnerWrite the filament, the temperature, the nozzle and the tool on a piece of tape on the brim.
Read it
Step 8 How to read it
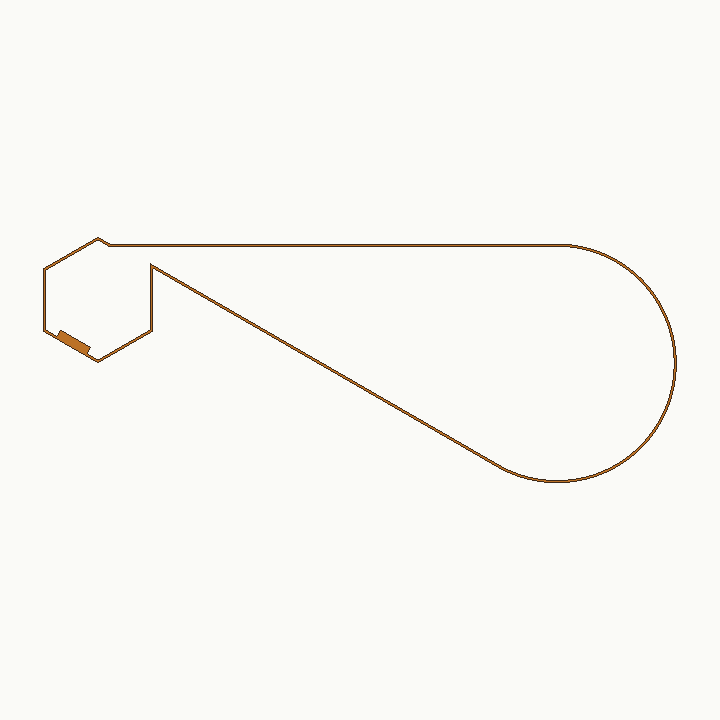
- Read from the bottom up, on the middle of the two long straights, both walls, in the upper two thirds of each band.
- On the scorecard, mark the wall of each band ✓, ◐ (degrading), ✕ (fail) or –, and tick Heater sag and Clicks where you noted them.
- Do the squeeze test last.
More
- The numbers are on the column's front-left face, which is doubled (thicker): the flow of each band in mm³/s. The seam is on the column's rear corner, away from the straights you read.
- Both walls: the 30° straight faces the front, like the numbers; the straight along X faces the back. Turn the part round, or look at it from inside the wedge. They must agree.
- Primary signals: the long straights, the see-through test, extruder clicks and heater sag. Any one of them failing makes the band fail. The sheen, the column and the squeeze test confirm and explain.
- The steps below show what each looks like. Then choose the value; the on-screen card does it for you.
- Common misreadingJudging the column or the round end. The nozzle nearly stops at the column's corners and slows in the round end on fast bands, so they look good longer than the straights. Read the middle of the straights.
- Common misreadingReading the transition layers. The first layers of each band are still settling at the new flow; judge above them.
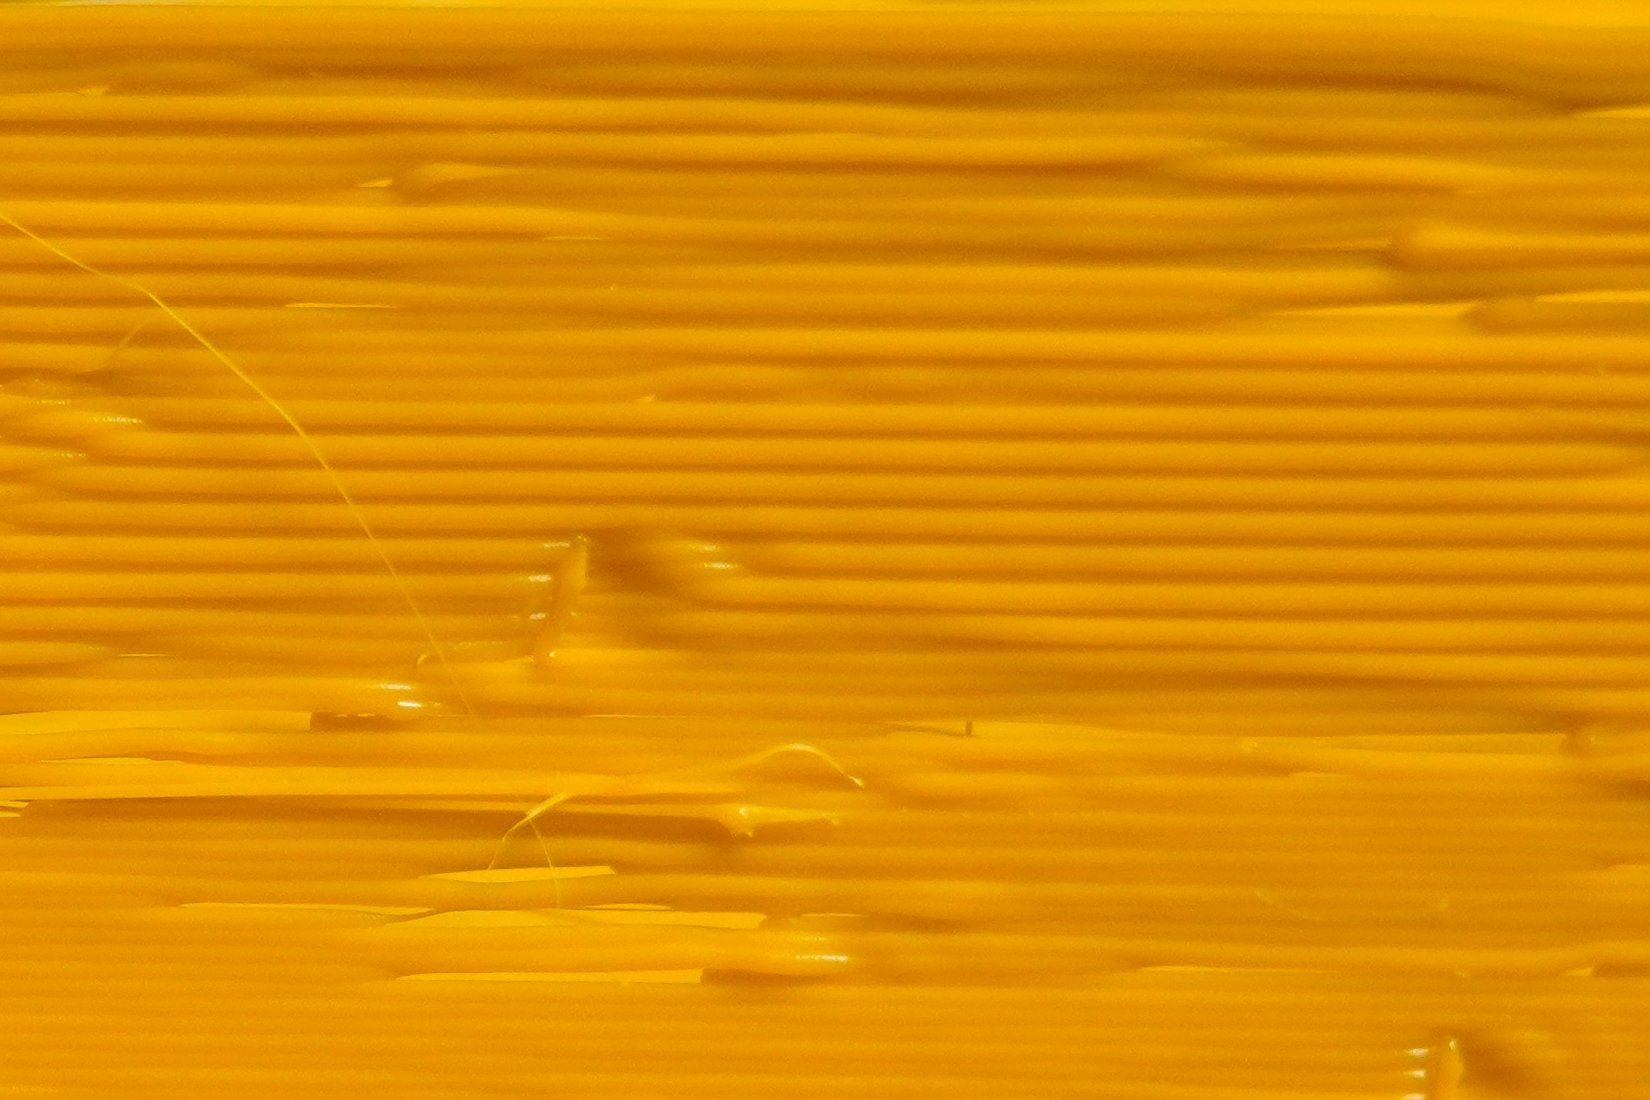
Step 9 Middle of the long straights

Decides
The middle third of both long straights, outside and inside, where the nozzle holds full speed. The column and the round end do not count.
- Hold the part at arm's length first, then close up with a light raking along each straight. The straight along X faces the back: turn the part round.
More
The engraved number is the flow on the long straights: the nozzle speeds up out of the column, holds full speed along the straight, keeps most of it through the round end and brakes back into the column. So judge the middle third of each straight, in the upper two thirds of each band: the first layers of a band are the transition while the hotend settles at the new flow.
- BeginnerFind the lowest band that fails, not the worst-looking one. The band just below it is your limit.
- Common misreadingThe divider groove is not a defect. At the bottom of every band a groove runs across the numbers face, and the first layers change. Judge each band above it.
- Common misreadingThe seam is not a failure. The seam is on the column's rear corner, away from the straights you read: a small zit or gap there means nothing here.
- Common misreadingWavy lines near the start of a straight are ringing (vibration) after the corner, not flow. They fade along the straight and look the same in many bands.
Step 10 See-through test
Decides
Hold the part against a lamp or a bright window, or shine a phone torch inside the wedge, at one straight at a time.
More
The wall is a single line, so under-extrusion lets light through long before it is obvious from outside. In a dark room the failing bands light up.
- Common misreadingDark filament shows little; a light colour works best. With black filament, rely on the straights and the squeeze test.
Step 11 Sheen (early cue)
Confirms only
The gloss of the long straights, band by band. PETG is glossy when the flow is fine.
More
As the flow rises, the plastic leaves the nozzle colder, and the surface loses its gloss. It is an early cue: mark that band ◐ degrading on the card.
- Common misreadingSome filaments (matte PLA, silk, carbon-filled) never shine: skip this cue for them.
Step 12 Column vs straights (diagnosis)
Confirms only
The hex column, compared with the long straights of the same band.
More
- ExpertOn a slow-accelerating printer (1000 mm/s² and below) the fast 0.4 files hold the top band's speed for only 0.1–0.2 s on the straights. Print the larger-nozzle file of your tier if you can: same flow, lower speed.
- The round end slows the fastest bands a little (above about 140–170 mm/s). It is not read; if it looks better than the straights, that is why.
Step 13 Extruder clicks (listen while printing)
Decides
Listen to the extruder while the upper bands print, and note the number on the column at the nozzle height.
- Tick Clicks on the card for that band.
More
- BeginnerStay close to the printer during the top bands. A phone held close to the extruder records the sound if you want to check it later.
Step 14 Heater sag (watch the temperature)
Decides
The hotend temperature graph (Mainsail, Fluidd, OctoPrint or the printer's screen) during the upper bands.
- Tick Heater sag on the card for the first band where it sags.
- Never raise the temperature above the hotend's or the filament's rated maximum to chase a higher band.
More
Melting 50 mm³/s and more takes a lot of heater power. When the heater cannot keep up, the hotend cools, and the melt with it: the wall fails a band or two later.
Step 15 Extruder or hotend? (diagnosis)
Confirms only
Compare the clicks with the wall of the same band and of the band below.
- Either way, the band below is your usable limit.
More
- Expert1 mm/s of 1.75 mm filament is 2.4 mm³/s. Above about 50–70 mm³/s, pancake-motor extruders (Orbiter, Sherpa Mini, Galileo 2, LGX Lite) often slip before a UHF hotend gives up. More motor current (within its rating), a stronger extruder or a hotter melt that needs less force can raise the extruder limit; nothing on the extruder helps a hotend limit.
Step 16 Layer bond (squeeze test)
Confirms only
After printing, squeeze a long straight gently between thumb and finger, band by band, from the bottom up.
More
- Do it last, after every other reading and after any photo: a cracked band cannot be looked at again.
Step 17 Flow numbers on the column
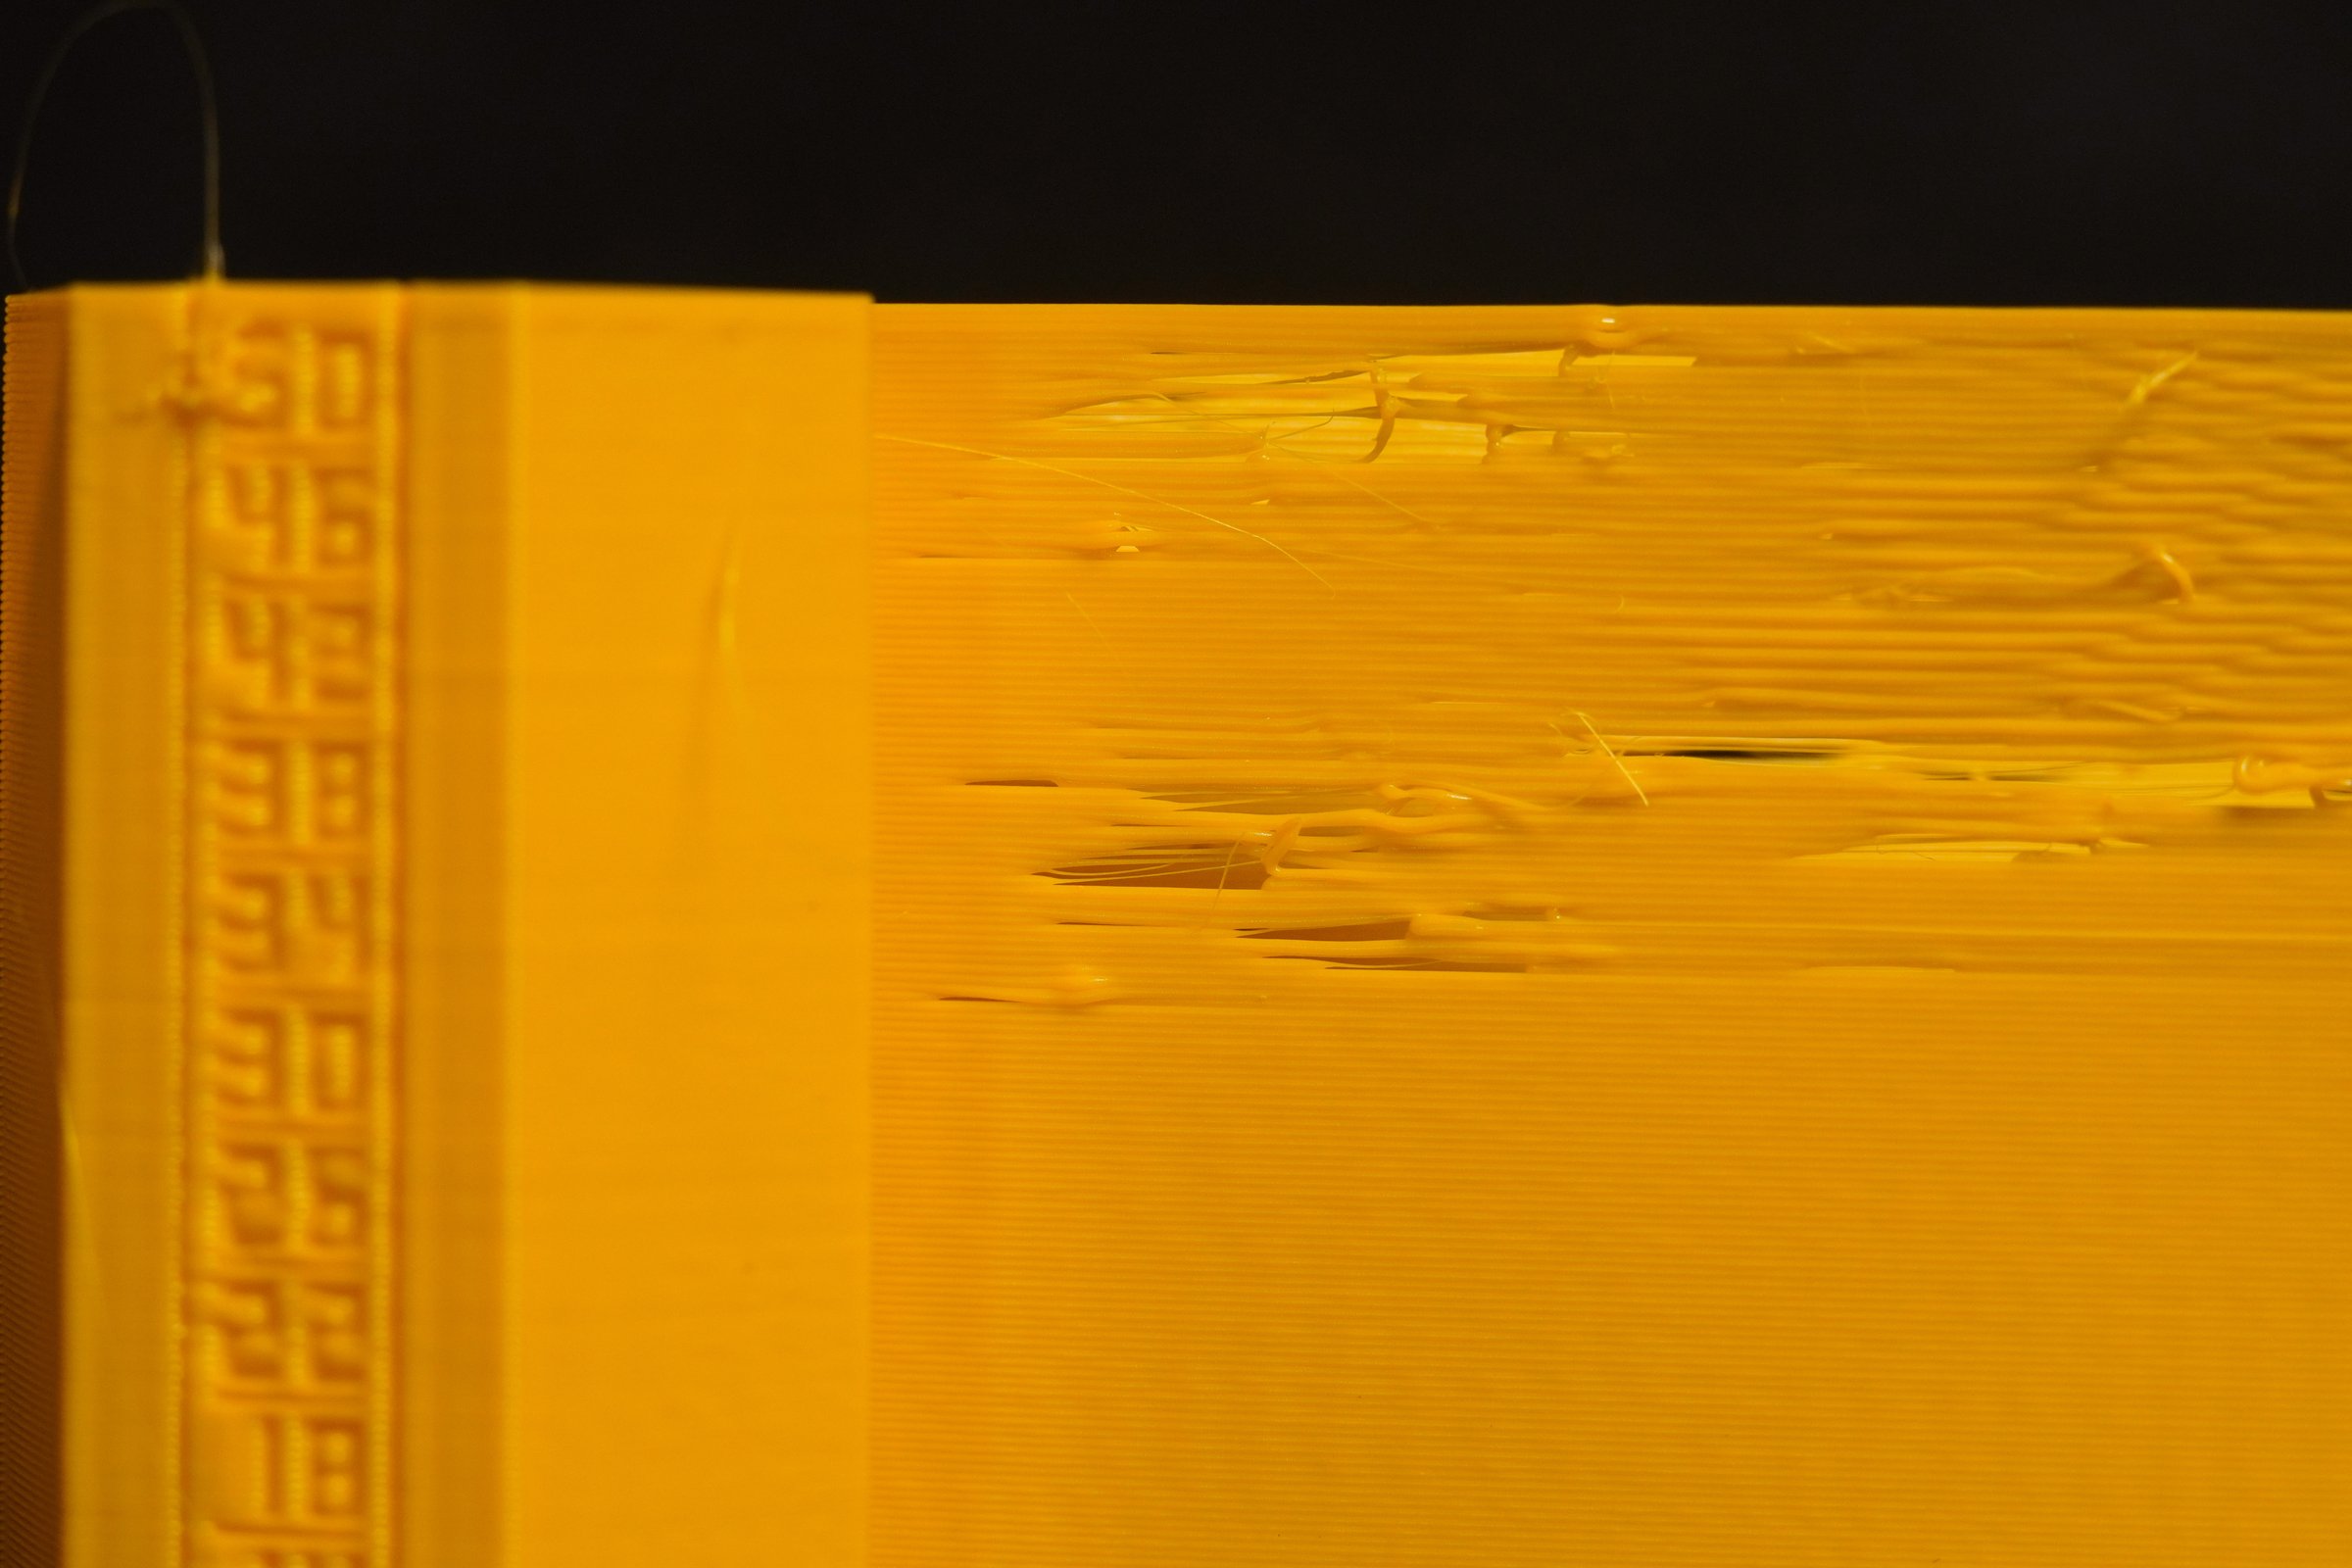
The column's front-left face is doubled (thicker) and carries one number per band: its flow in mm³/s on the long straights.
Step 18 Choose the value
The on-screen card does this for you.
- The onset is the lowest band that fails (wall ✕, light through it, clicks or heater sag). The limit is the band just below it.
- Use 80–90 % of the limit: 85 % as a rule, 80 % if the limit band was already degrading.
- IDEX: each tool gets its own result.
More
- Example, the author's PETG on hf-0.4 (T0, PCD 0.4 nozzle, 240 °C): band 30 is clean, band 34 shows the first gaps, the heater stays within ±0.8 °C and the extruder is silent. Onset 34, limit 30: the hotend's melt capacity. 25 mm³/s (85 %).
- Example, standard-0.4: band 18 fails, band 16 is clean. Limit 16: 13–14 mm³/s.
- Band 1 already fails: not a flow problem. Check the temperature, a partial clog, wet filament and the filament diameter in the profile.
- Nothing fails: print the next file up for your nozzle, or a custom range above the top band.
- Seven-band files (
hf-0.6,uhf-0.6,uhf-0.8,extreme): one step is 12–14 % of the top band, so your real limit lies somewhere between the last clean band and the onset. 80–90 % of the last clean band is still a safe setting: you only leave part of one step unused. Example, PETG on uhf-0.6: band 64 is clean, band 76 shows gaps. Limit 64: 51–58 mm³/s. - The jump between two wide bands is large, so a degrading band is rarer and the loss of gloss may show up on the onset band itself. Judge each band just as on the other files.
- IDEX: T0 and T1 may differ by a band or two, even with identical hotends: nozzles, extruders and thermistors differ. Write both down and use each on its own tool.
- Common misreadingUsing the onset band itself, or 100 % of the limit. The limit is the edge of a cliff: real prints have longer moves, bridges and infill that heat the hotend differently. The 10–20 % margin keeps them clear.
Apply the result
Step 19 Put it in your filament profile
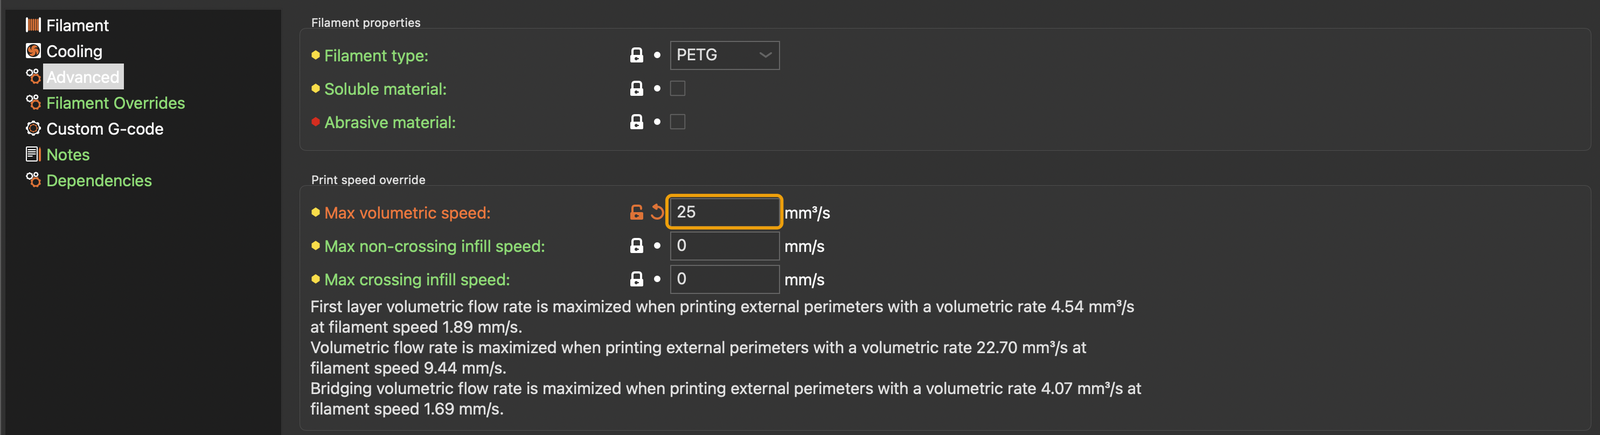
- Filament Settings › Advanced › Max volumetric speed = your value. Save the profile, e.g.
Brand PETG – 240 °C – 25. - Leave Print Settings › Speed › Autospeed (advanced) › Max volumetric speed at 0.
- IDEX: one filament profile per tool, each with its own value, selected on its extruder.
More
- This is the one change you keep. PrusaSlicer then slows down any move that would need more plastic than this.
- The print-wide Autospeed (advanced) › Max volumetric speed is a second cap that applies to every filament and every tool: keep it at 0 (off), or at least at the filament value.
- IDEX and multi-tool: PrusaSlicer has no per-extruder max volumetric speed in the printer settings; each extruder uses its own filament profile. Make one per tool (for example
PETG T0 ALPHA 0.4andPETG T1 PS 0.4) and select each on its extruder in the plater. - The value belongs to this filament at this temperature, with this hotend, nozzle and extruder. After any temperature change, test again.
- Then re-check pressure advance: it depends on the flow you print at.
Step 20 When to run it again
- A new filament, or a new printing temperature for it.
- A new hotend, heater, nozzle (size or material) or extruder.
More
- Two spools of the same brand and type usually agree; a different colour can differ by a band.
- Then, in the sequence: pressure advance, then flow.
Step 21 Optional: the extrude-in-air check
- For a precise number without a tower, or to confirm a borderline band: extrude a fixed length of filament in the air at each flow and weigh (or measure) what came out.
- The tower's result is the one to use for printing: it is usually a little lower.
More
In the printer's console: M83 (relative extrusion), a short prime, then one G1 E45 F… per flow: a 2 mm³/s reference, then each band of your file. With 1.75 mm filament, F is the flow × 24.95 (2 mm³/s: F50; 20 mm³/s: F499). Pause after each step to cut the blob. There is no X or Y move.
- Heat the hotend to your printing temperature and park the nozzle at least 50 mm above the bed.
- Send the commands one step at a time. After each step, cut the blob with tweezers and put it on a numbered paper.
- Weigh it (a 0.01 g scale): each blob should weigh 0.137 g in PETG (45 mm of 1.75 mm filament). Efficiency = blob ÷ the 2 mm³/s reference blob. The limit is the last flow above about 97 %.
- Or measure it (Ellis' method): before each step, mark the filament 65 mm above the extruder inlet; after it, 20 mm should remain. More than 21 mm left means more than 2 % lost.
- 45 mm per step stays under Klipper's
max_extrude_only_distance(50 mm by default) and Marlin'sEXTRUDE_MAXLENGTH. Klipper'smax_extrude_only_velocityand Marlin'sM203 Ecap these steps. - ExpertAt UHF flows a 45 mm step lasts under 2 s: prefer the tower there.
Troubleshooting
Step 23 The bands do not get faster
- The tower printed at a crawl, no markers on the slider: open the single .3mf with File › Open project, not Import.
- The upper bands all look the same, too good: a firmware limit capped them (check).
- The next print runs far too fast: send
M220 S100(Klipper: orRESTART).
More
- The legend shows lower flows than the engraved numbers on the straights: your filament's cooling slowdown or max volumetric speed capped the base speed; see the session-only fix.
- The time shown is several times too long and the legend shows the slow base speed (5–17 mm/s): a RepRapFirmware printer profile. The printer still prints the real bands.
- Klipper stops with "Move exceeds maximum extrusion":
max_extrude_cross_sectionwas lowered below its default. The tower needs 0.30 × nozzle².
Step 24 Other problems
- Band 1 already fails: too cold, a partial clog, wet filament, or the wrong filament diameter.
- The column fails with the straights: the extruder is skipping or something slows the whole layer; not a melt limit.
- Klipper: "Heater extruder not heating at expected rate": the heater could not keep up. The band where it stopped is above your limit.
More
- The thin wall came loose or bent at speed: keep the brim, clean the bed, check the first layer. A wobbly wall makes the straights hard to read.
- PrusaSlicer says the object is outside the print area: the
uhf-0.4file is 193 mm long; use a bed of 200 mm or more. On a 180 mm bed, turn off the skirt or move it closer, and keep the long side along X. - Clicks in every band, from the start: extruder tension, a worn gear, or a bowden tube with too much friction. Fix that first.
- IDEX: the other tool heats or prints: the object is assigned to the wrong extruder. Use the
_T0/_T1file for the tool you test, or set the object's extruder. - PrusaSlicer 3.x: these files are made for PrusaSlicer 2.9 (2.7 is the minimum). For 3.x the tests will be prepared as Lua plugins, once its plugin system is stable.