
Test 2
Temperature tower
A hexagonal tower printed hot to cold, one step colder per 7 mm block. Score each block, let a few fixed rules pick the winner, and type that temperature into your filament profile.
16 to 24 minutes and 7 to 10 g of filament, with no changes to your profiles.
More
Each block is printed one step colder than the one below: 10 °C on the coarse file, 5 °C on the fine one. Every block carries the same features, one group per face: four that decide (the snap flag, the string ladder, a steep overhang ramp and a 22 mm bridge), two that only confirm (the engraved temperature and a smooth face), and a round hole you look through that is not counted. Each fails in a recognisable way when the plastic is too hot or too cold.
The tower prints at a fixed flow of 10 mm³/s (TPU: about 40 minutes). Times and grams are our estimates, ±30 % for the time; PrusaSlicer shows the real figures after slicing.
Open the file with File › Open project. Never with Import, never as a ZIP: an import keeps the shape but silently drops the temperature changes, and you would print a whole tower at one temperature.
What you need
To print
- The tower file for your material
- PrusaSlicer 2.9 (2.7 is the minimum that opens the project)
- Your own printer, print and filament profiles, already working
- The filament to test, dry
- 7 to 10 g of it
To read it
- A lamp you can move, and a dark card or cloth
- The scorecard, printed or on screen
- A lamp or a bright window to look through the string ladder
- Optional: a phone camera, to zoom on fine text
Before printing
Step 1 What it is for, and when to run it
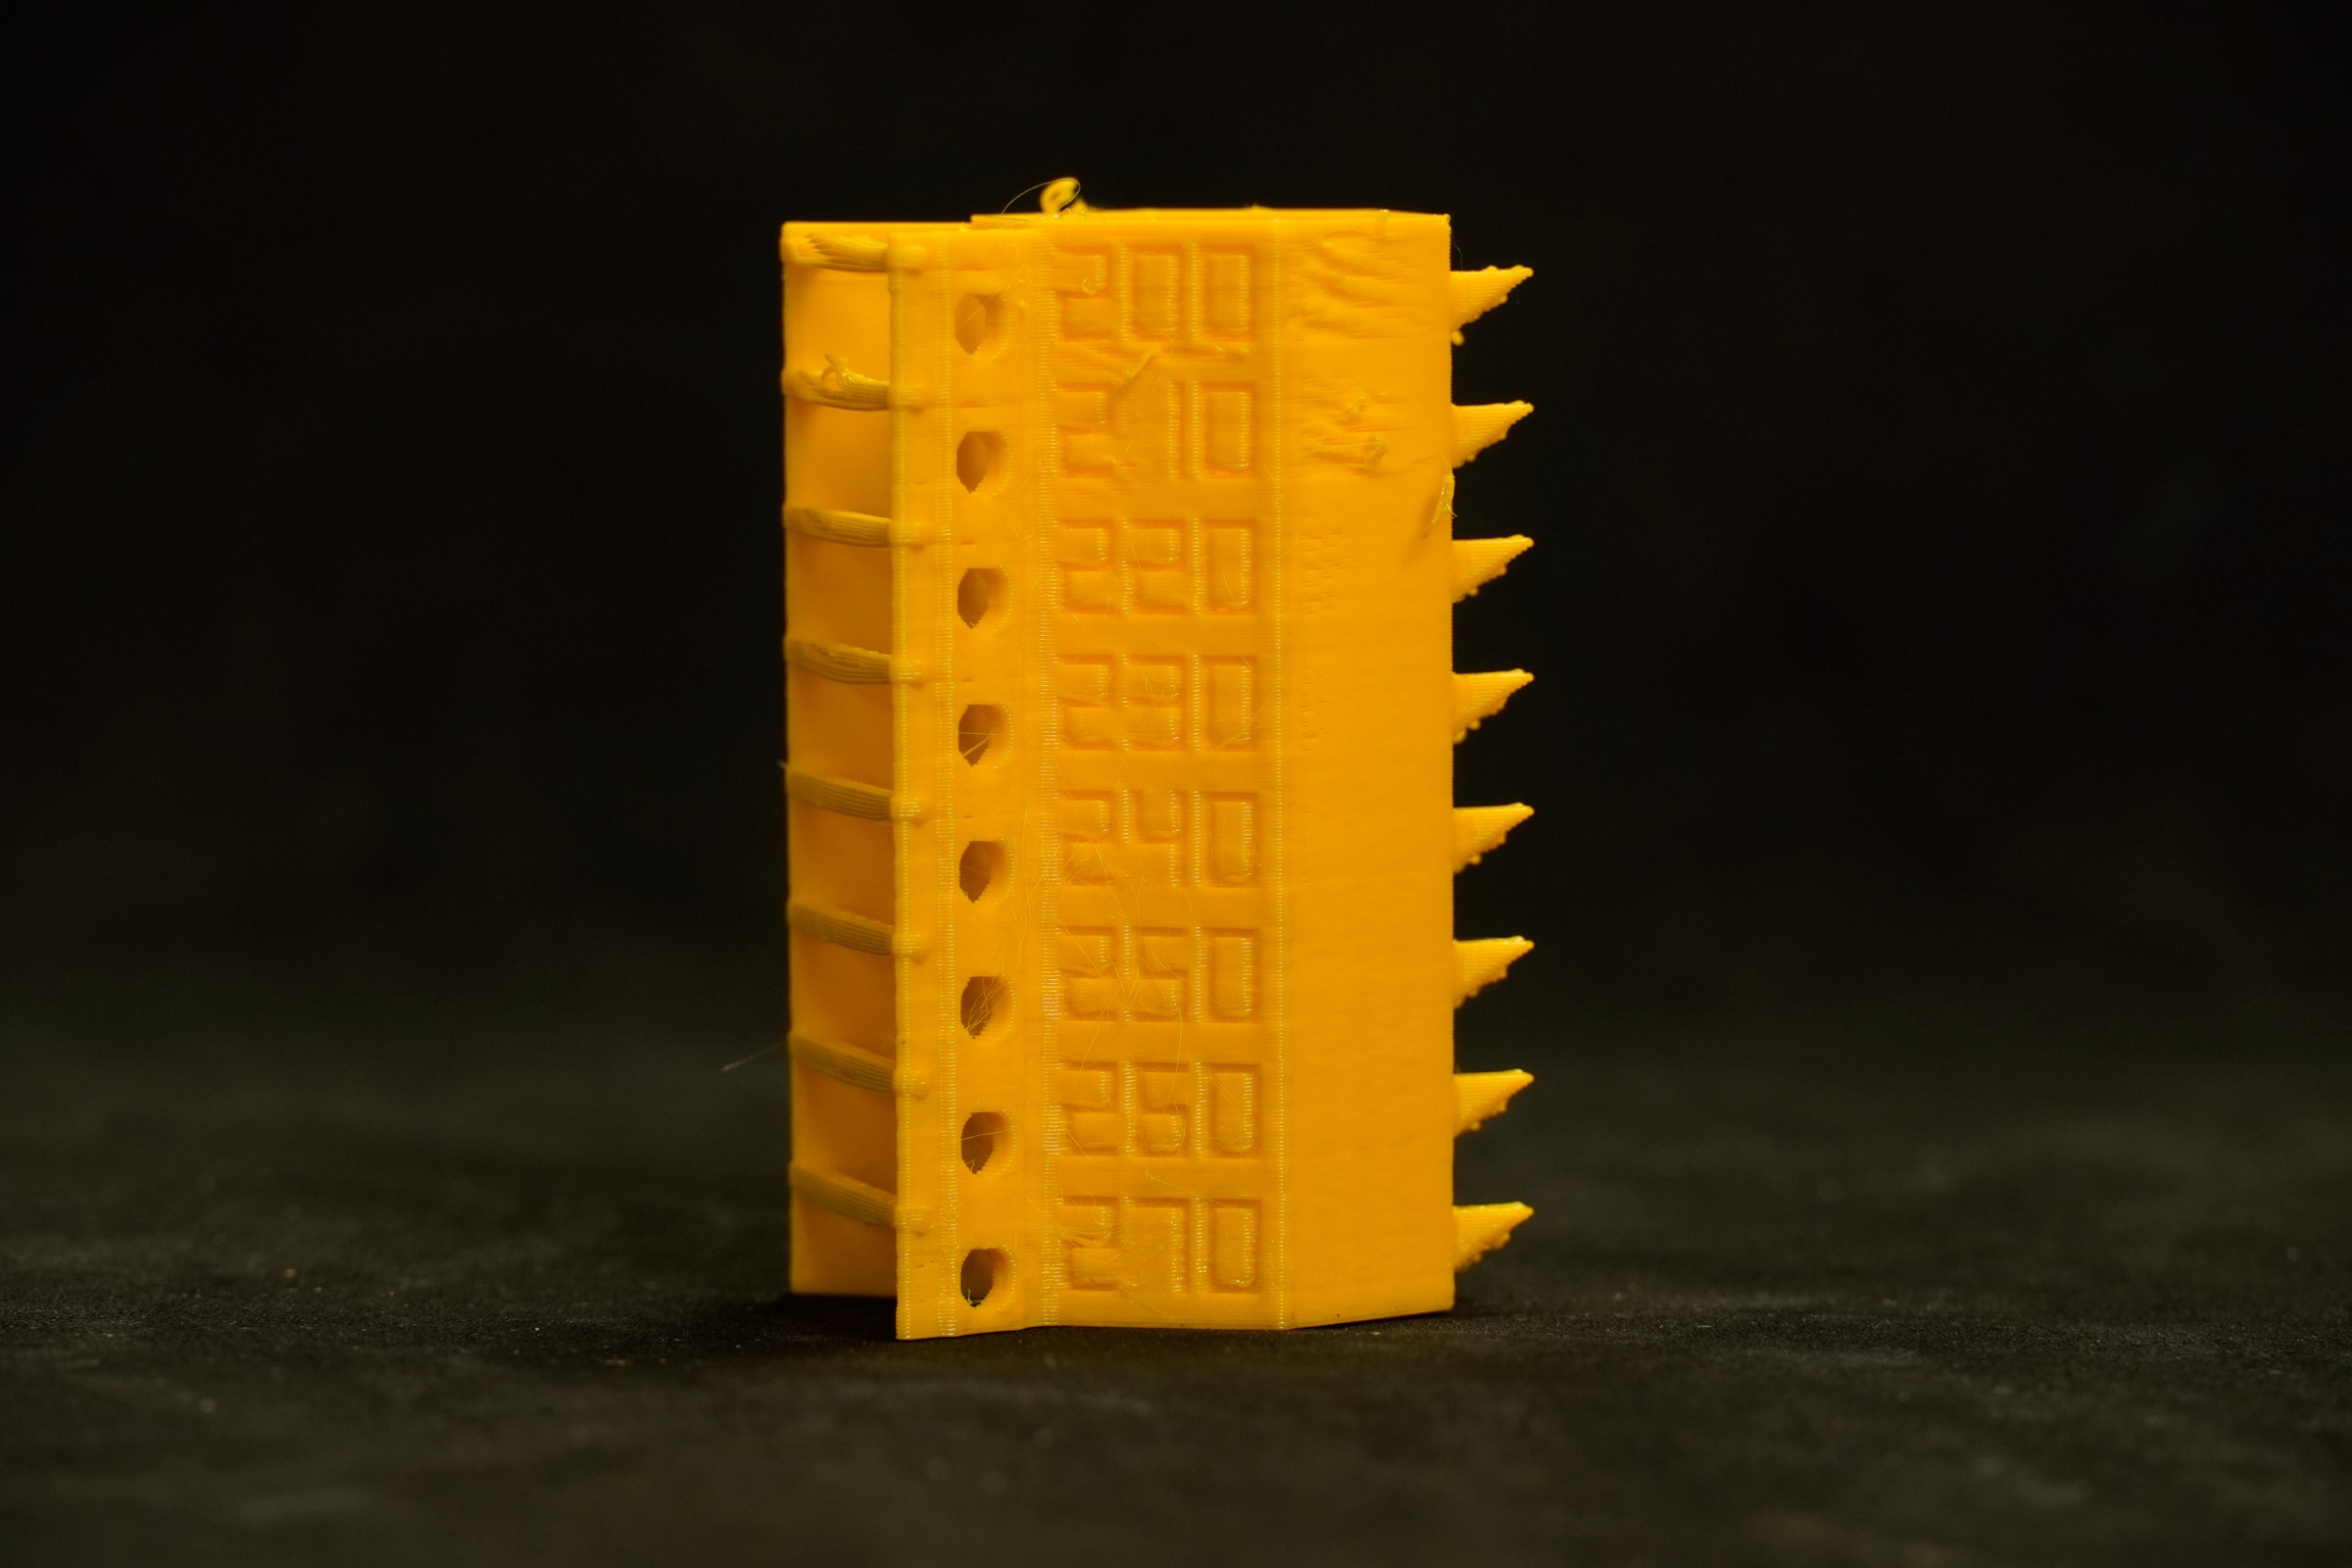
- It finds the nozzle temperature that gives strong layers without strings, sagging or melted details, for your printer, your speed and this filament.
- Run it for every new filament type or brand, after the first layer and before pressure advance.
More
- Run it for every new filament type or brand, and when a colour behaves differently from the last spool.
- Run it again after changing the hotend, the nozzle size or material (a hardened steel nozzle usually wants it a little hotter), or when you start printing much faster.
- In the full sequence it comes after the first layer is right and before pressure advance, flow and retraction: those all depend on the temperature you choose here.
- BeginnerThe temperature printed on the spool is a range, often 40 °C wide. This test tells you where in that range your printer is happiest.
- ExpertThe result is valid for the flow and cooling the tower prints with: 10 mm³/s and your filament's big-part fan setting. If you print at a very different volumetric flow, the best temperature moves (usually hotter for faster).
Step 2 Coarse or fine: which file first
- Known brand and type: print the fine file (5 °C steps).
- New or unknown filament: print the coarse file (10 °C steps), then a fine pass around its best block.
More
Every material has two files. Print the coarse one only if you do not know the filament's range well.
- Fine (5 °C steps): the usual range for the material. Start here with a known brand and type, for example a PLA or PETG that prints like the ones you already use.
- Coarse (10 °C steps): a wider range, for a new brand, an unusual blend, a spool without a label, or any filament whose printing range you are not sure of. It tells you roughly where the filament is happy.
- Then a fine pass around the best coarse block: print the fine file for your material (5 °C steps, table below). If the best coarse block lies outside the fine file's range, take that block's temperature: the coarse result is your value.
- If the coarse tower's best block is at its top or bottom, the right temperature may be outside the range: check the manufacturer's range before going further.
Step 3 Download the right file
| Material | Coarse: bottom → top | Fine: bottom → top | Filament (coarse / fine) | Notes |
|---|---|---|---|---|
| PLA | temp-tower_PLA_coarse_240 → 180 °C, 7 blocks | temp-tower_PLA_fine_230 → 190 °C, 9 blocks | 8.0 / 10.2 g | The reference material; start with the fine file if unsure. |
| PETG | temp-tower_PETG_coarse_270 → 200 °C, 8 blocks | temp-tower_PETG_fine_260 → 220 °C, 9 blocks | 9.3 / 10.4 g | Both files go above 250 °C: all-metal hotend only. |
| ABS / ASA | temp-tower_ABS-ASA_coarse_280 → 220 °C, 7 blocks | temp-tower_ABS-ASA_fine_270 → 230 °C, 9 blocks | 6.9 / 8.7 g | All-metal hotend. Enclosure closed and warm before you start. The files add a 4 mm brim (included in the grams). |
| TPU | temp-tower_TPU_coarse_250 → 200 °C, 6 blocks | temp-tower_TPU_fine_240 → 210 °C, 7 blocks | 6.8 / 7.8 g | Prints at 3 mm³/s; direct drive recommended. The snap flag is not scored. |
| PC | temp-tower_PC_coarse_310 → 250 °C, 7 blocks | temp-tower_PC_fine_300 → 260 °C, 9 blocks | 7.9 / 10.0 g | Prints at 8 mm³/s. All-metal hotend rated for 310 °C, enclosure, hot bed. The files add a 4 mm brim (included in the grams). |
- Above about 250 °C, hotends with a PTFE (Teflon) tube down to the nozzle are not safe: the tube degrades and gives off harmful fumes. The PETG, ABS/ASA and PC files all go above 250 °C: print them only on an all-metal hotend, and check your hotend's maximum temperature first.
- Get it from the HexCalibr page on Printables (below).
- Download the single .3mf file named in the table, for example
temp-tower_PETG_fine_260-220_5C.3mf: the name must end in .3mf. Never "Download all" as a ZIP.
More
Two files per material family, coarse and fine. Each starts hot at the bottom and goes down one step per block.
- Every block is 7 mm tall, on a 0.6 mm floor, with a 0.6 mm cap on top: 7 blocks make a 50.2 mm tower, 8 blocks 57.2 mm, 9 blocks 64.2 mm.
- Print time: 16 to 19 minutes for a coarse tower, 20 to 24 for a fine one (TPU about 38 and 44). The file prints with 0.45 mm lines and 0.2 mm layers; the grams assume 1.75 mm filament and no skirt. Both are our own estimates, the time ±30 %: after slicing, PrusaSlicer shows the real figures.
- The files are named like
temp-tower_PETG_coarse_270-200_10C.3mfandtemp-tower_PETG_fine_260-220_5C.3mf: material, variant, the bottom and top temperatures, and the step. They are made for a 0.4 mm nozzle. - Download the single .3mf file, not "Download all" as a ZIP: PrusaSlicer opens a ZIP's 3MF as plain geometry and the temperature changes are lost.
- IDEX and multi-tool printers: print the whole tower with one tool: in PrusaSlicer, set the object's extruder to that tool. The temperature commands (
M104without a tool number) act on the active tool.temp-tower_PETG_coarse_270-200_10C_T0.3mfis a ready example already set to T0; for another tool, use the plain file and set the extruder. - Bambu Studio and OrcaSlicer: the files are made for PrusaSlicer. Other slicers may load the shape only, without the temperature changes.
Print it
Step 4 Open it as a project
Before you print: one marker per block
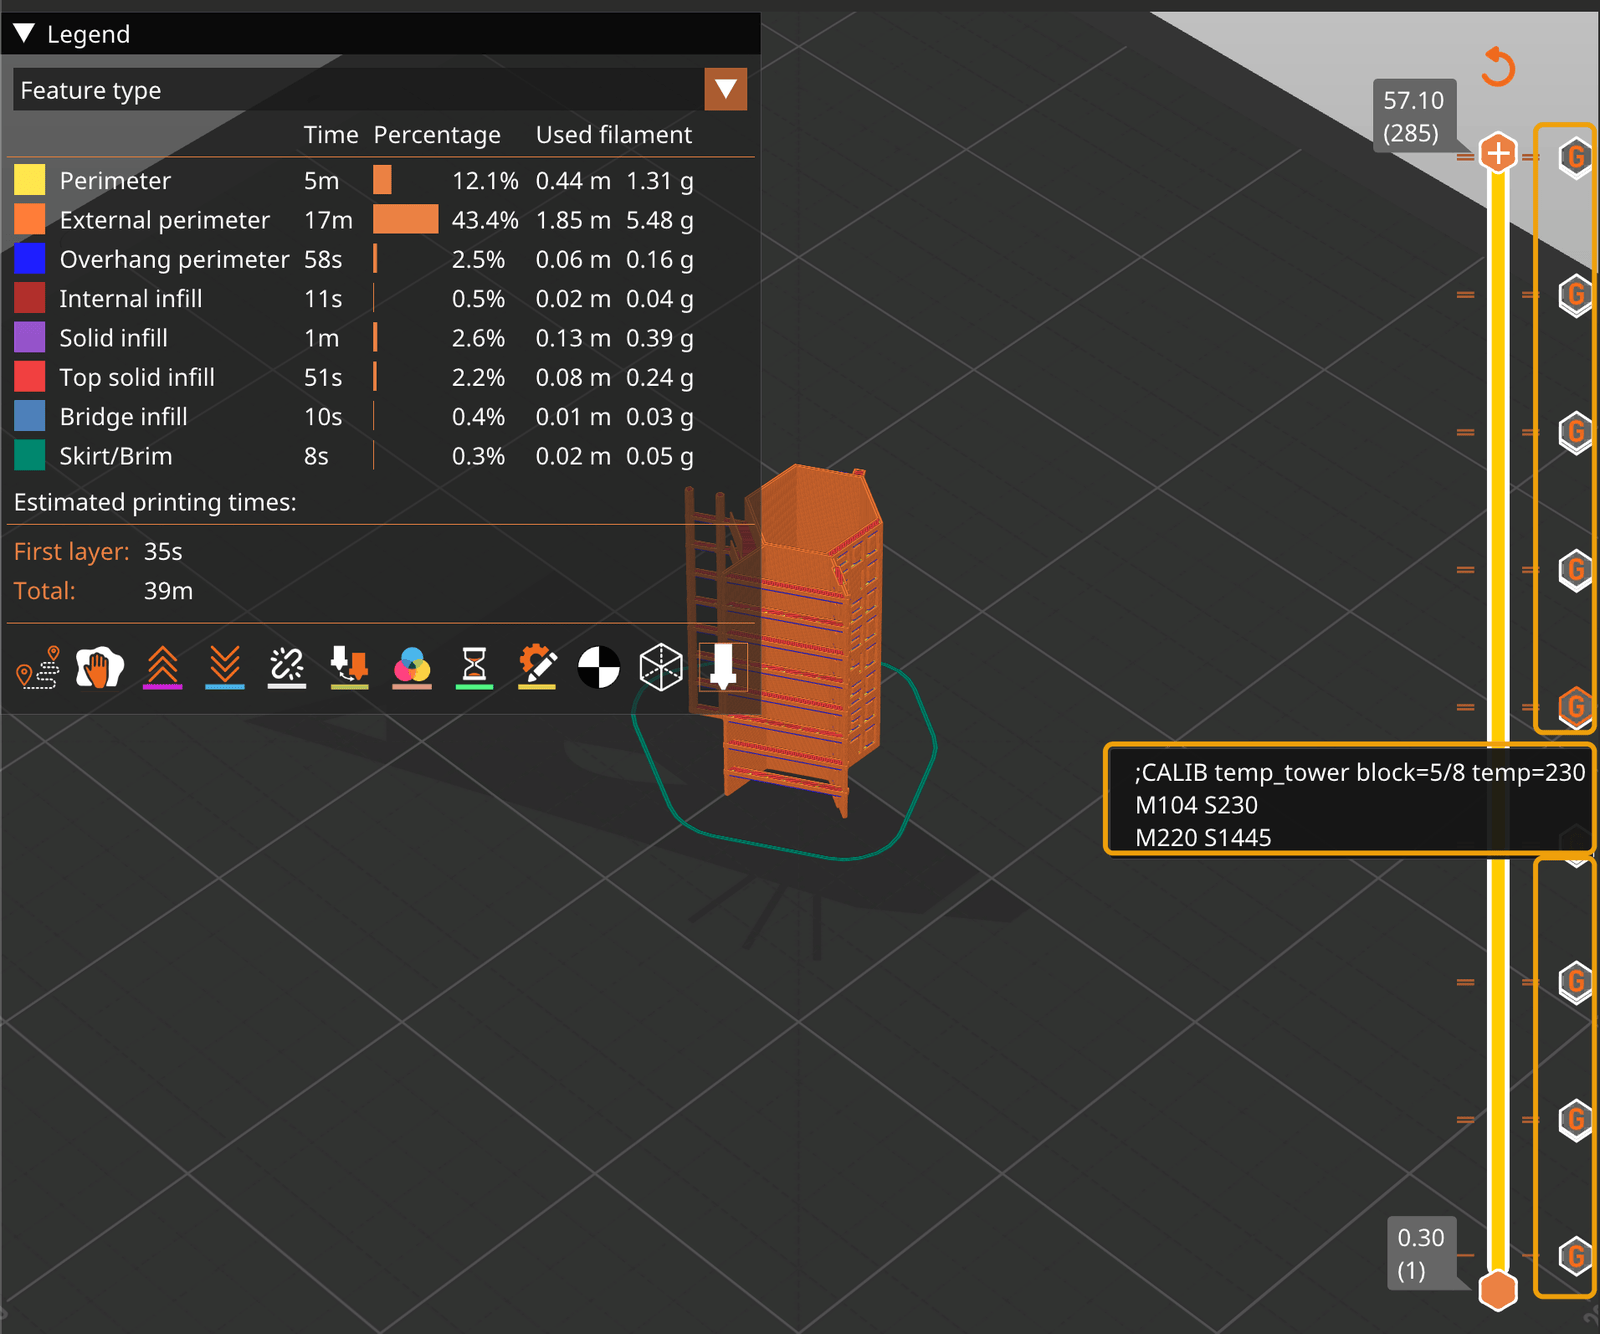
After opening, slice and look at the vertical layer slider in the Preview: it must show one marker per block. Hovering a marker shows M104 S<temp>.
- On multi-extruder printer profiles (IDEX, XL, MMU) there may be more than one marker per block. That is fine.
- No markers: do not print. Open the file again with File › Open project, and check in Preferences that the load project dialog is on (see below).
- Quick check: export the G-code and search it for "M104": details in the next step.
- In PrusaSlicer, File › Open project (Ctrl+O, or ⌘O on macOS) and choose the .3mf.
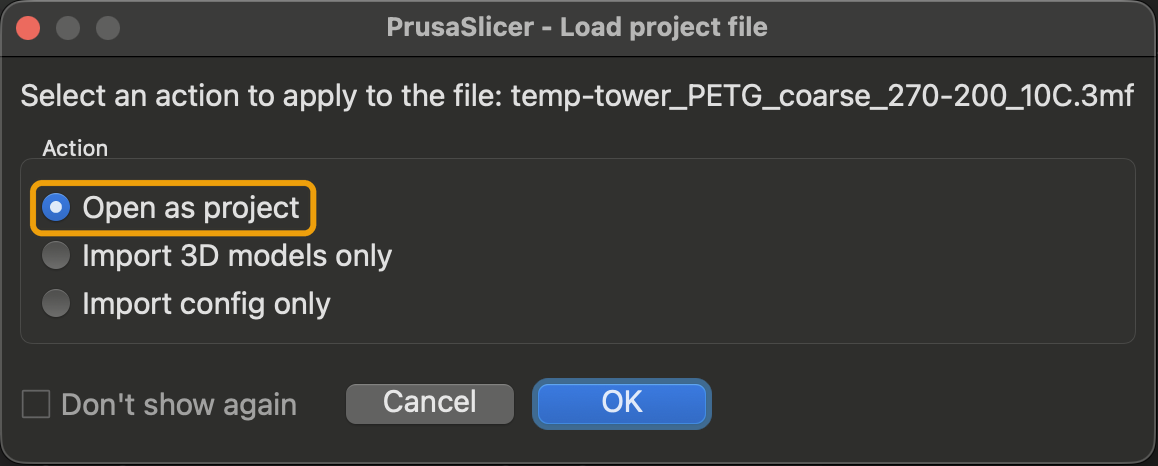
- Dragging the file in? Choose Open as project, never Import 3D models only.
- Do not scale, rotate, cut or sink the tower.
- Opening the project replaces anything already on the plate, and any custom G-code you had added there. The temperature changes belong to the plate, so print the tower on its own.
More
- If you drag the file onto the window instead, PrusaSlicer asks what to do: choose Open as project. Import 3D models only drops the temperature changes.
- If you once ticked "don't show again" with the wrong choice, dragging will import silently. Turn the question back on in Preferences › General › Show load project dialog.
- Downloads started from Printables inside PrusaSlicer go through the same question: answer Open as project.
- The project carries no printer, filament or print profile: PrusaSlicer keeps yours. It only carries the tower, a few per-object settings the test needs (0.2 mm layers, 0.45 mm lines, two perimeters, Arachne walls, 15 % infill, no supports, the seam at the back, the test flow) and the temperature changes.
- BeginnerDo not scale, rotate, cut or sink the tower. The temperature changes are fixed heights: if the tower changes size, the changes land in the wrong place.
Step 5 Check that the temperature changes are there
No markers, no print
The vertical slider must show one marker per block, at the first layer of each block. Hovering a marker shows M104 S<temp>.
- On multi-extruder printer profiles (IDEX, XL, MMU) there may be more than one marker per block. That is fine: they all carry the same temperature.
- If no markers are visible, do not print. The temperature changes were dropped and the whole tower would print at one temperature. Open the file again with File › Open project (not Import), and check Preferences › General › Show load project dialog so that dragging a file asks you again.
- Quick check before printing: export the G-code and search it for "M104". Every block's temperature must be there, going down by the file's step (10 °C coarse, 5 °C fine).
- Pick your printer, print and filament profiles, click Slice now and switch to Preview.
- Hover the markers on the layer slider: the
M104values must go down one step per block.
More
- Pick your printer, print and filament profiles in the right-hand panel, as for any print.
- Click Slice now and switch to Preview. On the vertical layer slider there is a small marker at the first layer of each block.
- Hover a marker: it shows the custom G-code, for example
M104 S240andM220 S1445(the test flow, see below). The values must go down by the file's step going up the tower: 10 °C on a coarse file, 5 °C on a fine one. The last marker, at the top, setsM220 S100back. - No markers on the slider? The file was imported, not opened: open it as a project.
- ExpertIn the exported G-code each block starts with a comment such as
;CALIB temp_tower block=3/8 temp=250followed byM104 S250andM220 S1445. The same line may appear more than once in a block (see why); that is harmless.M104without a tool number acts on the active tool, which is why the whole tower must be printed with one tool.
Step 6 The test flow: nothing to change
If you cancel the print, send M220 S100
The file speeds the printer up with M220, and the cap at the top sets it back with M220 S100. If you cancel the print before the top, type M220 S100 in the printer's console (or terminal): Klipper, Marlin and RepRapFirmware keep the factor, and your next print would run many times too fast. Prusa Buddy printers (MK4, Core One, XL, MINI) reset it at the next print start by themselves.
- No profile changes are needed: the blocks print at a fixed 10 mm³/s (TPU 3, PC 8).
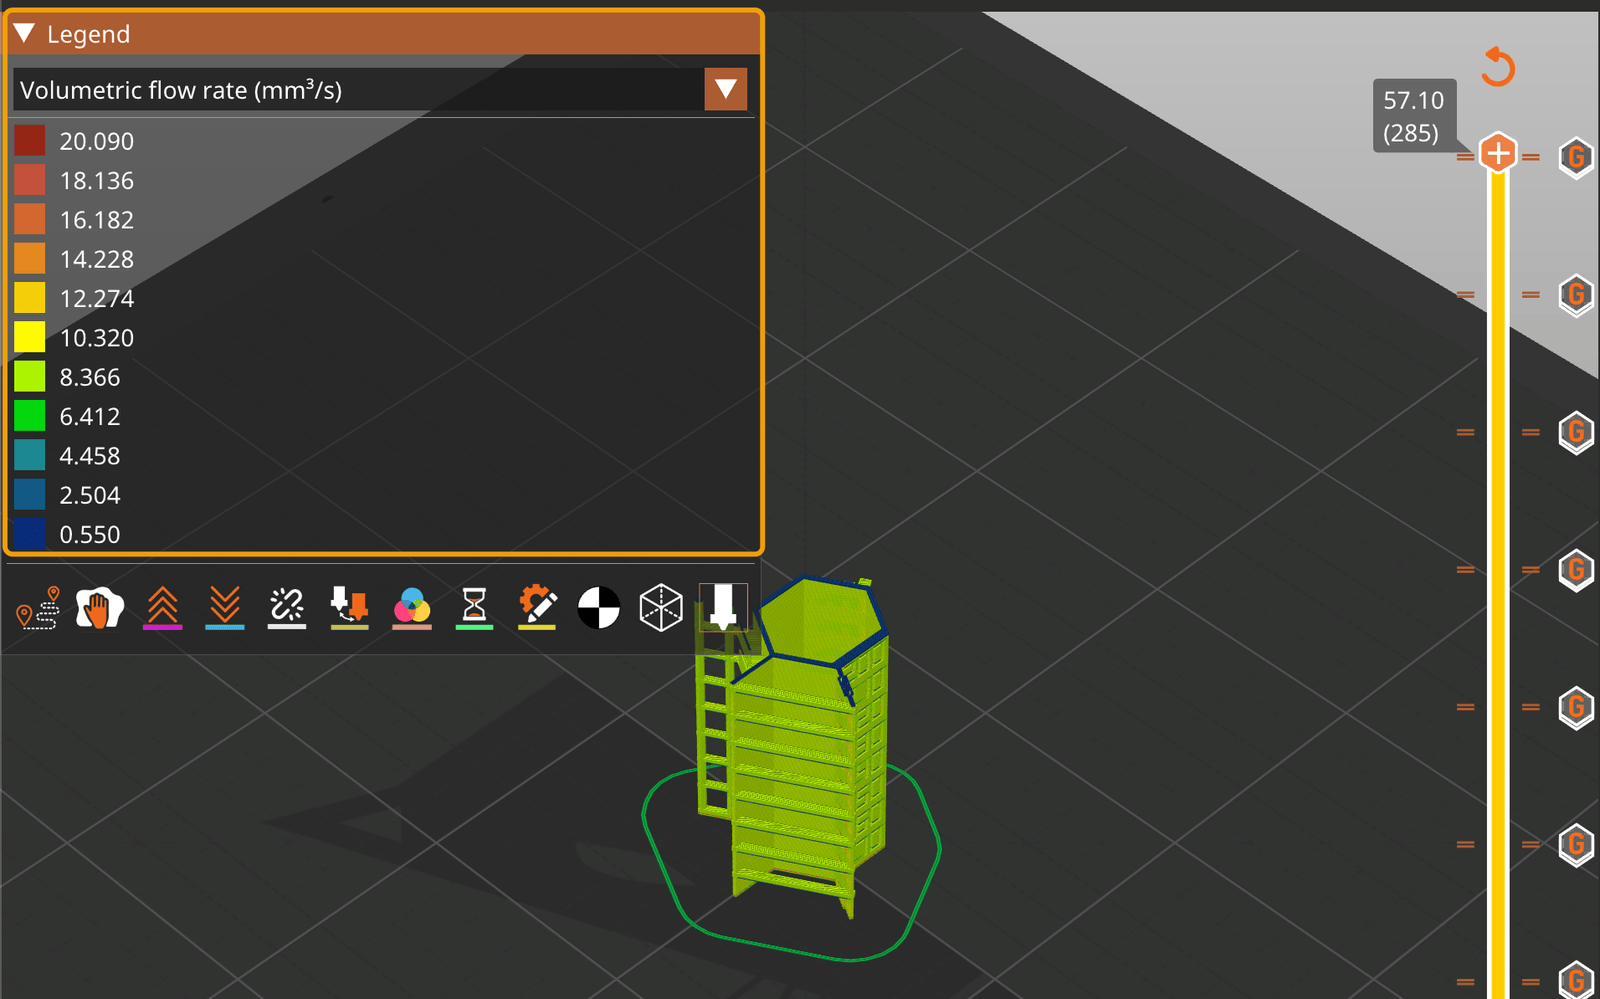
- To check, switch the Preview legend to Volumetric flow rate: about 10 mm³/s in every block.
More
- No profile changes are needed. The blocks print at a fixed flow of 10 mm³/s (123 mm/s with the file's 0.2 mm layers and 0.45 mm lines): a moderate, typical flow. TPU prints at 3 mm³/s, PC at 8.
- How: the file asks PrusaSlicer for a very low speed (about 8.5 mm/s), so the slicer sees long layers and never slows them down for cooling. Every block also sends a speed factor of about
M220 S1450that the printer applies (8.5 × 14.45 ≈ 123 mm/s; the exact value is in each file).M220works on every firmware, so the files stay universal. - The floor, the first layer and the 0.6 mm cap at the top print at 100 %, with your own speeds. Bridges and overhangs print at 25 mm/s.
- Check in the Preview: slice, and in the legend at the bottom left switch the view to Volumetric flow rate: the walls show about 10 mm³/s in every block (Speed: about 123 mm/s). The print time is the real one. This works with Klipper, Marlin and Prusa printer profiles.
- RepRapFirmware printer profiles: PrusaSlicer ignores
M220in the preview there. The legend shows the low base speed and the time is many times too long; the printer still prints at full speed. - Fan: big-part cooling. The slicer sees long layers, so the fan runs at your filament's minimum fan speed, with the bridge fan on the bridge, the ladder rungs and the overhang tongues: exactly how a big part is cooled. The real layers take only a few seconds, so the ladder posts and the flag get a little less time to cool than on a big part: their hot-side failures come slightly early, which points you to a slightly cooler, safer temperature.
Step 7 Set the filament profile
- In Filament Settings › Filament › Temperature, set First layer and Other layers both to the bottom block's temperature.
- Leave everything else as in your normal profile.
More
- In Filament Settings › Filament › Temperature, set Nozzle: First layer and Other layers both to the bottom block's temperature (240 °C for the PLA coarse tower, 230 °C for the fine one). The tower starts with a 0.6 mm solid floor, printed at that temperature too.
- Why both: PrusaSlicer switches to the "Other layers" temperature at the second layer. If that value is different, it overrides the first block and your bottom block is printed at the wrong temperature.
- Leave the bed temperature, fan and everything else as in your normal profile: the file sets the flow, your profile does the rest.
- BeginnerSkirt loops at 0 save filament (see Before you start). A brim is fine if the tower tends to come loose.
Step 8 Slice and print
- Slice again after any change, export the G-code (or send it to the printer) and start the print.
- Watch the first block go down: it must stick well.
- Let the tower cool completely before you take it off the bed.
More
- Watch the first block go down: it must stick well. A tower that comes loose halfway is wasted filament.
- When the nozzle reaches each new block, the target temperature on the printer's screen drops by one step (10 or 5 °C). The printer does not stop to wait: it keeps printing while the hotend cools, so the first 1–2 layers of each block are in between.
- Let the tower cool completely before taking it off the bed, and before the snap test.
- BeginnerWrite the filament brand, colour, nozzle and print speed on a piece of tape on the tower. In a month you will not remember which tower was which.
Read it
Step 9 How to read it: score each block
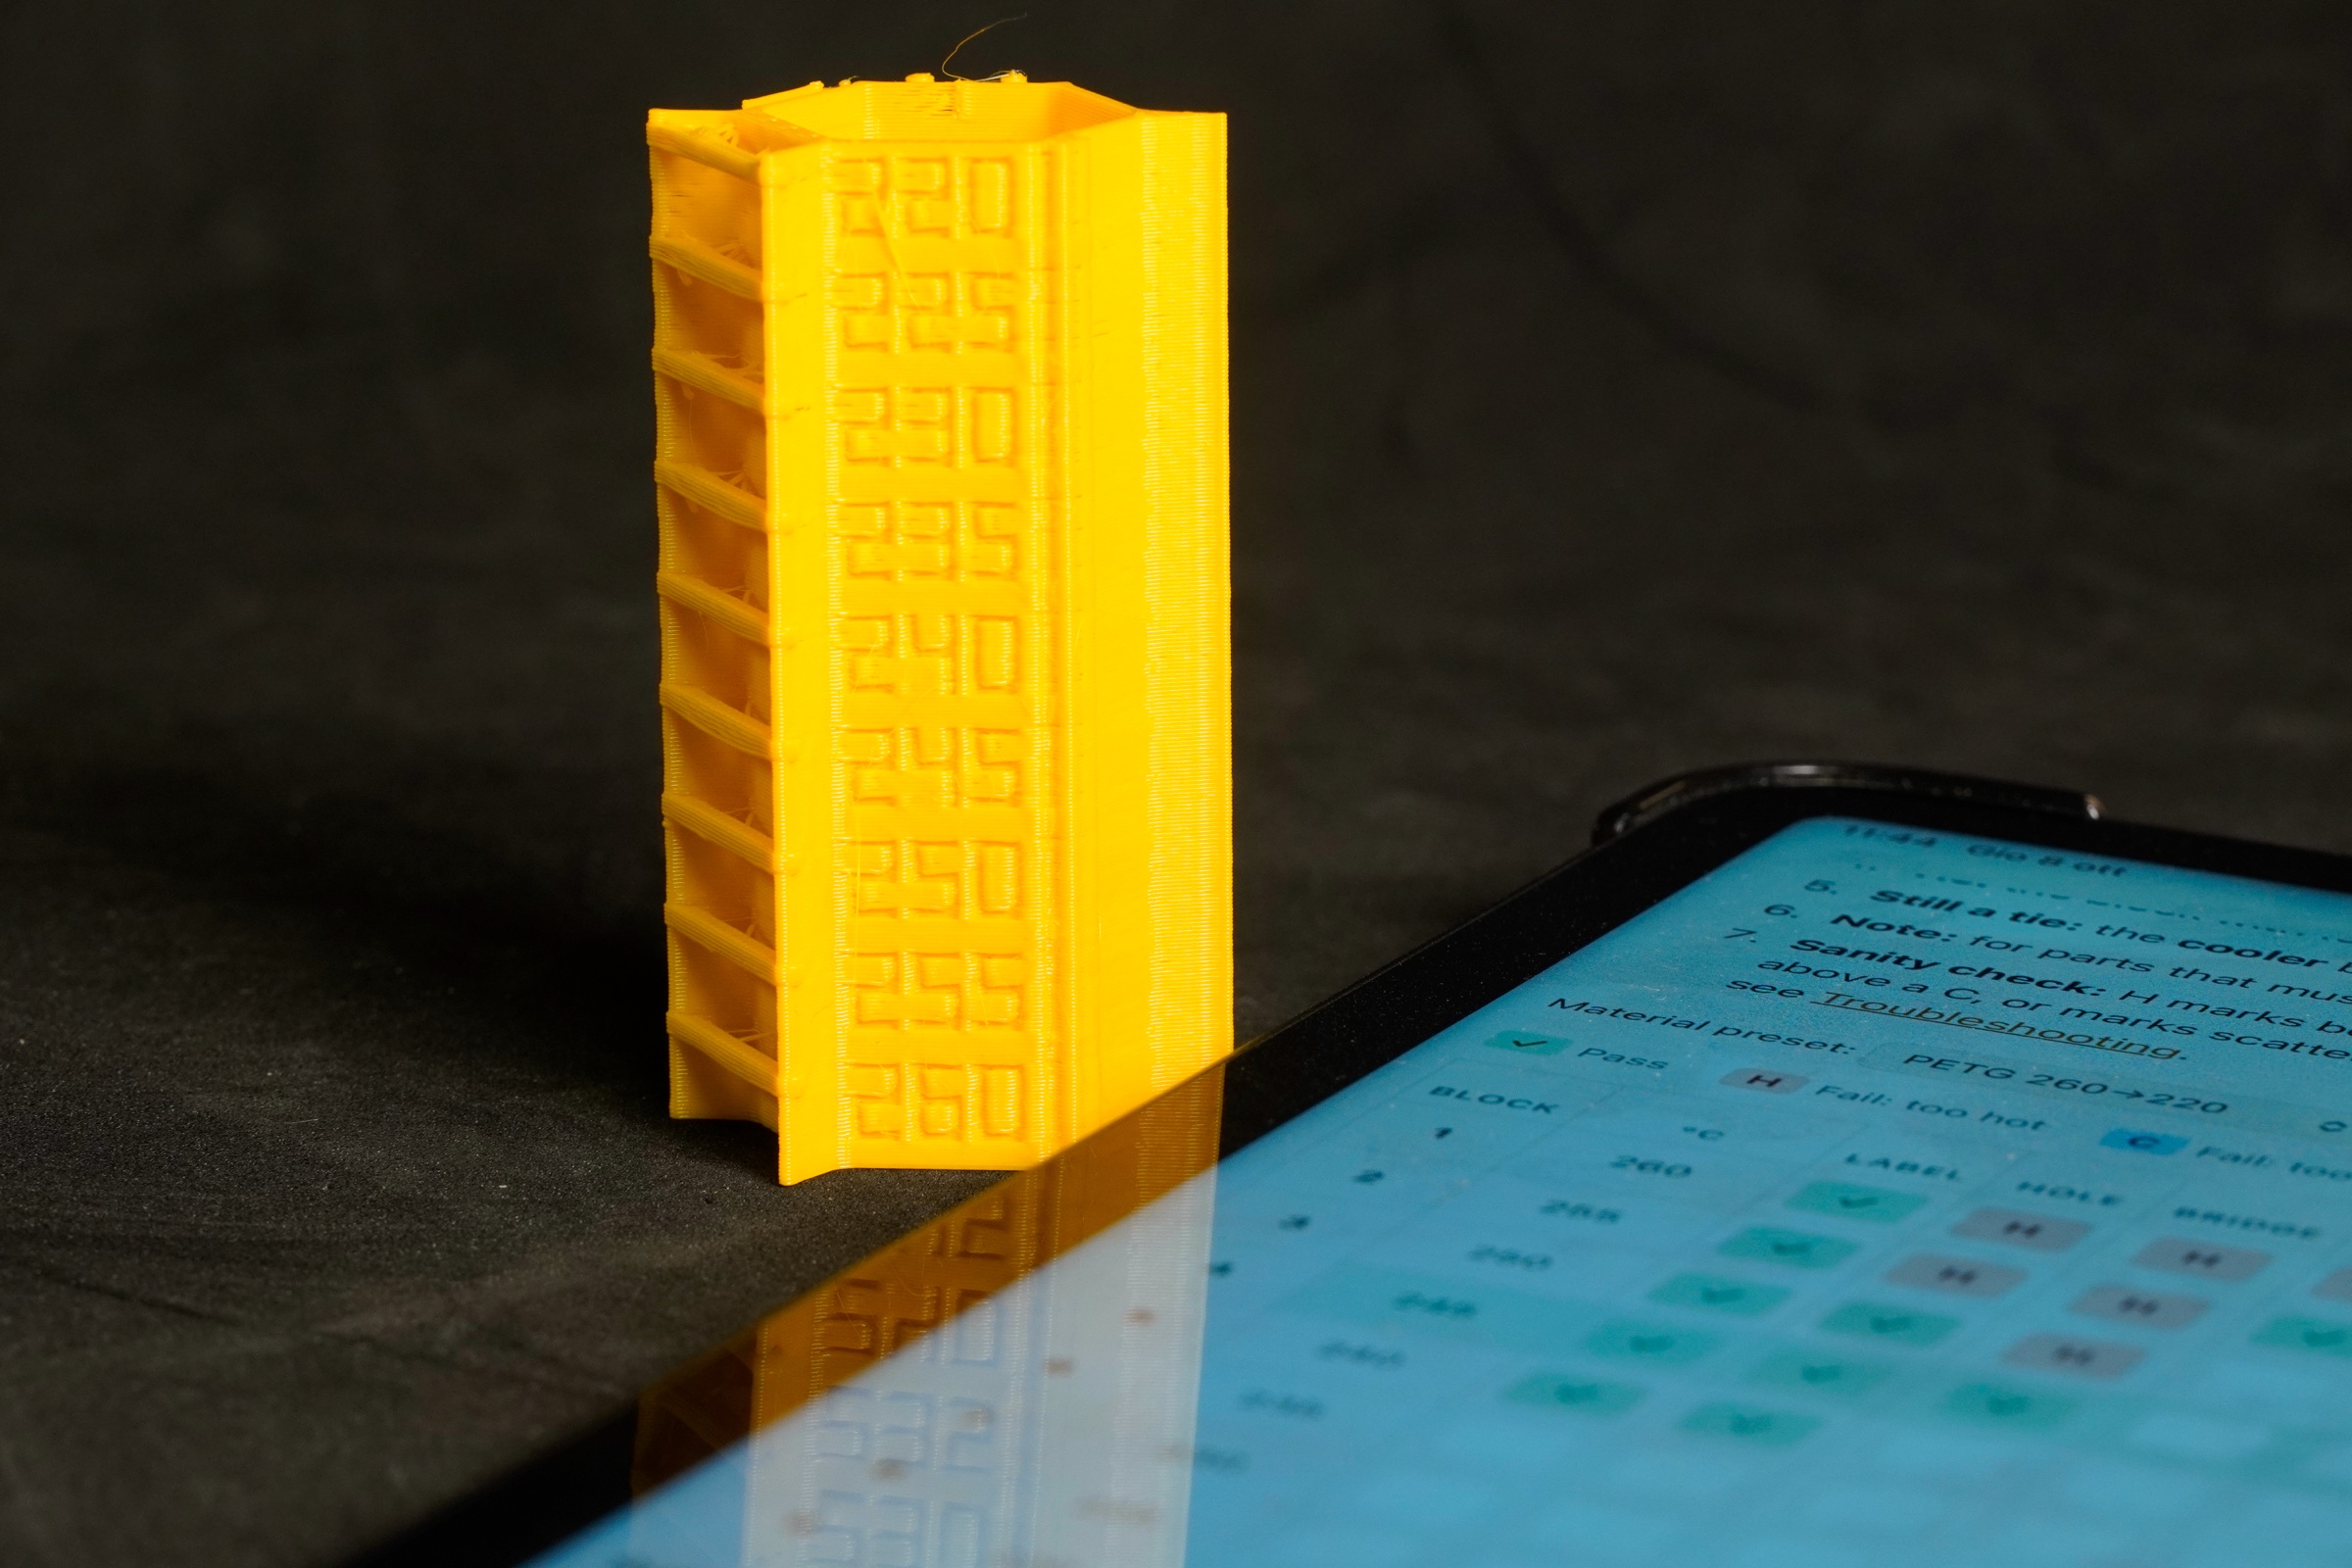
- Open the scorecard. Hold the tower with the engraved numbers facing you: block 1, at the bottom, is the hottest.
- Mark each feature of each block ✓, H (too hot), C (too cold) or –, judging above the block's bottom 1 mm.
- Score the strings first, before you touch the tower, and break the snap flags last.
More
- Open the scorecard (print it, or fill it on screen). One row per block, one column per feature.
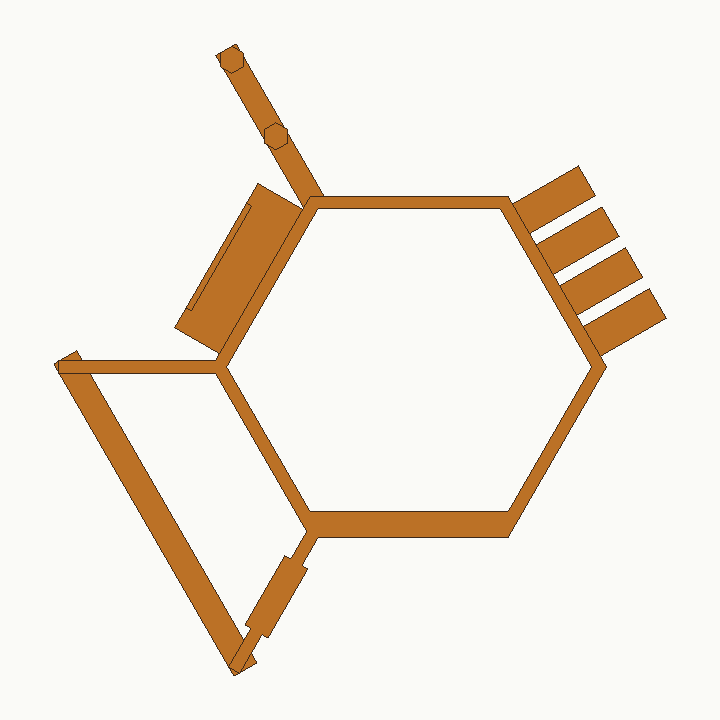
- Hold the tower with the engraved numbers facing you, then turn it clockwise (seen from above), one face at a time: front, the temperature; front-right, the plain smooth face; back-right, four overhang tongues; back, plain (the seam is there); on the back corner, the string ladder; back-left, a shelf with the thin snap flag at its outer edge; front-left, plain, with the long bridge beam in front of it; the beam's front rib, next to the numbers, has a round hole in every block.
- Block 1 is the bottom of the tower, the hottest. Each block's temperature is engraved on its front.
- For each block and each feature, write ✓ (pass), H (fails because too hot), C (fails because too cold) or – (can't judge). The next steps show what each looks like.
- Judge each block above its bottom 1 mm: there the temperature was still changing, and no feature starts there.
- Score the features in the order of the steps below: the strings first, before you touch or brush the tower (photograph the ladder now if you want a record), and the snap flags last: once broken, they cannot be looked at again. Write the ramp angle in the Notes column.
- Not every feature changes from block to block. On the author's coarse PETG tower (270 → 200 °C, at the file's flow) the strings showed the hot end, and the smooth face and the top of the bridge beam showed the cold end; the label, the hole and the ramp tongues seen from the side looked the same on every block. A column that does not change gets ✓ on every block: the flags and the columns that do change decide. The label and the smooth face are marked *Confirms only*; the hole is marked *Confirms* and is not counted at all.
- Then apply the rules for choosing the block. The on-screen card applies them for you.
- BeginnerYou do not need to know why a feature fails. You only need to compare blocks: the descriptions tell you which way each failure points.
- Common misreadingReading the tower upside down, or counting from the top. Always find the engraved temperature before you score a row.
Step 10 String ladder (stringing)
Decides
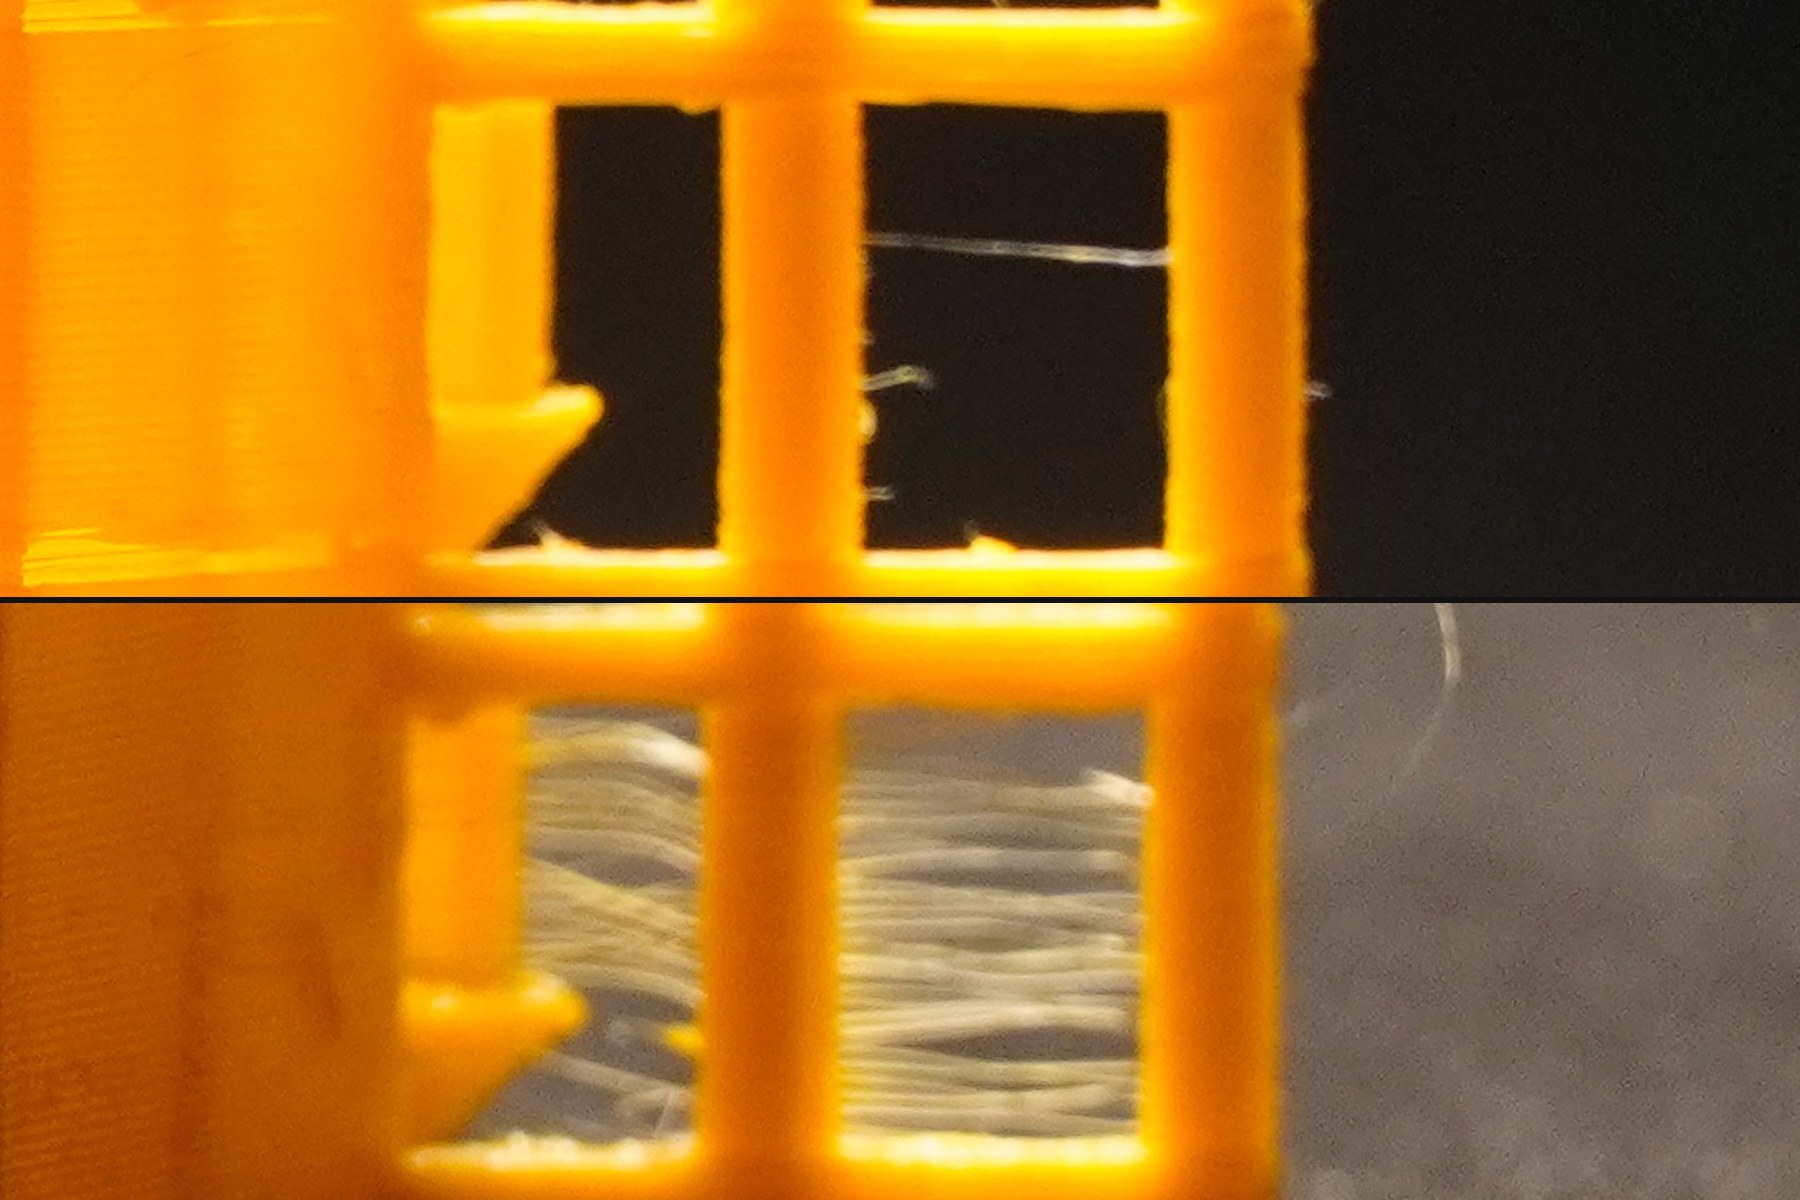
Back corner: two small posts tied to the corner by rungs, with an open window in every block. Look for strings across the windows. Mostly shows heat.
- Score this first, before you touch the tower, looking through the windows against a bright light.
More
The ladder stands between the back and back-left faces: two small hexagonal posts, each tied to the corner by a short rung at the bottom of each block. Every layer the nozzle travels from the corner to the posts and on to the flag; hot plastic oozes and leaves strings across the windows. Strings to the flag count here too.
- Score this first, before you touch the tower. Brushing, handling or even a careful look with your fingers removes most strings.
- Look through the windows from the side, along the back face or along the back-left face, with a lamp or a bright window behind the tower: the strings show as dark threads against the light.
- BeginnerPhotograph the ladder before brushing too: in the author's tests the strings were obvious on the nozzle cam and in photos taken before brushing, and gone afterwards.
- ExpertRetraction is not tuned yet at this point of the sequence. Do not chase zero strings: mark H only when the strings are clearly worse than on the colder blocks.
- Common misreadingIf every block strings about the same, the filament is probably wet. Dry it before trusting this column.
Step 11 Overhang ramp (55/65/75/80°)
Decides
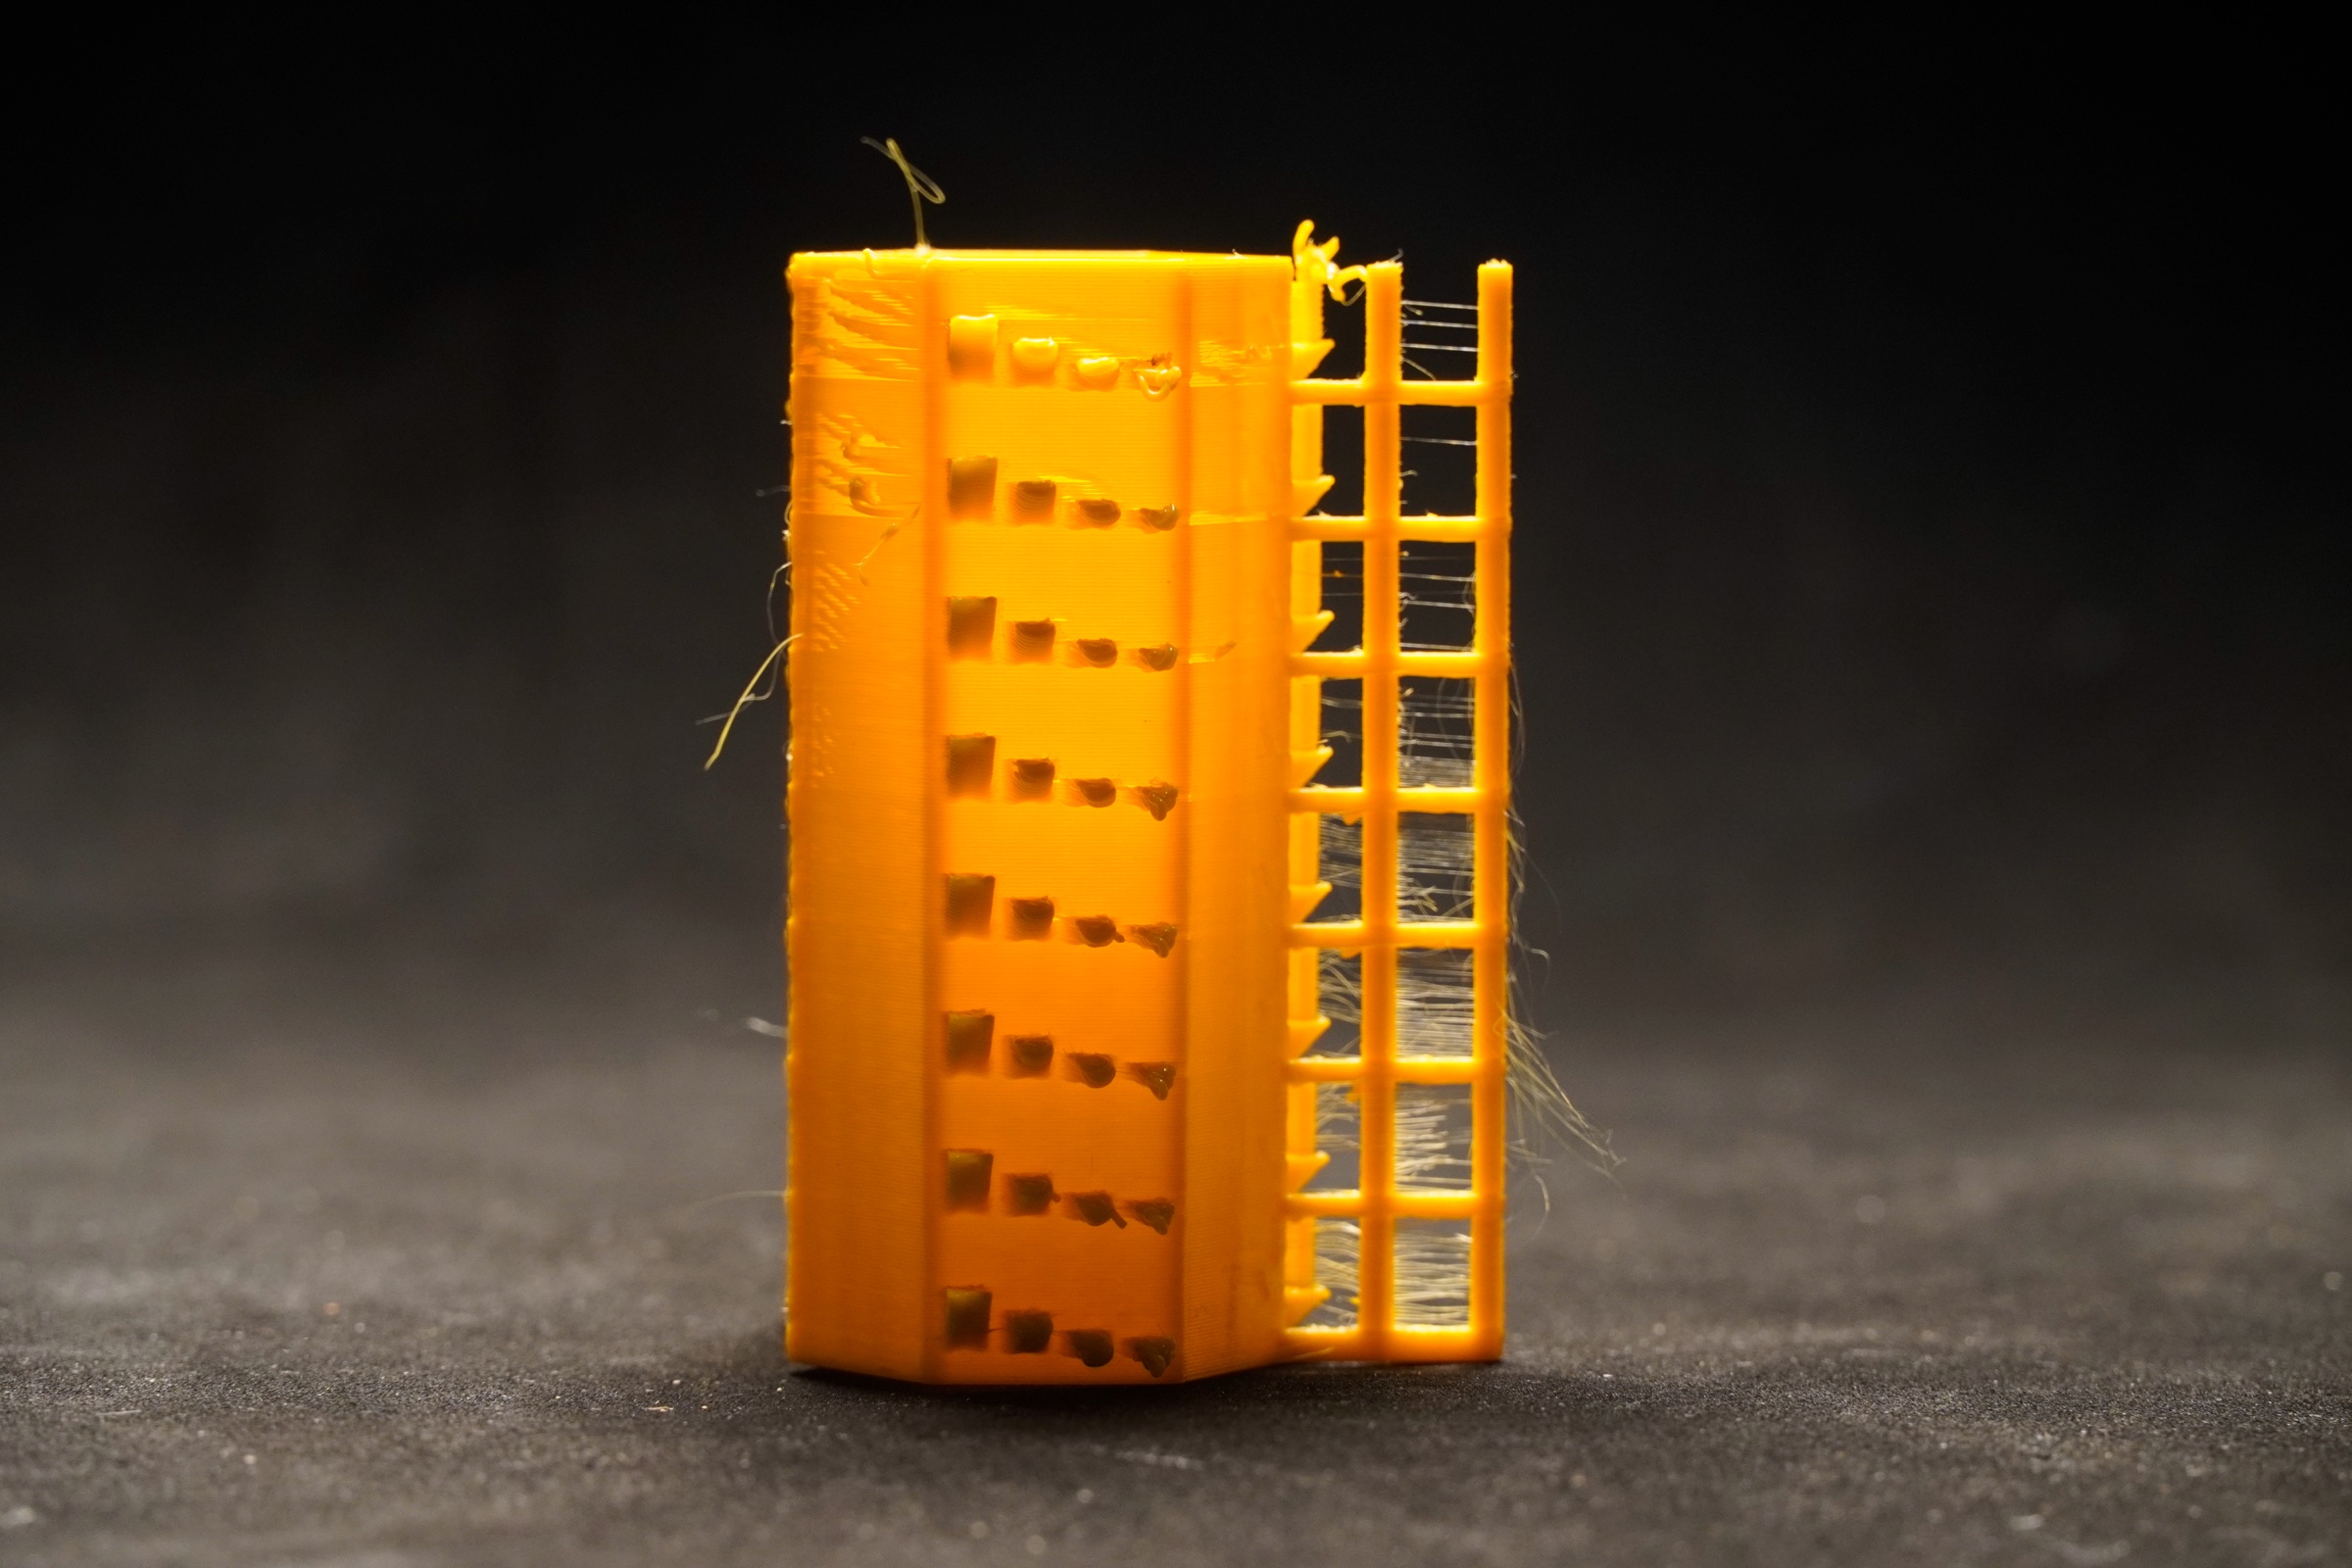
Back-right face: four overhang tongues, at 55°, 65°, 75° and 80°. Note the steepest tongue whose underside is still clean. Mostly shows heat.
More
55° is next to the right corner, then 65° and 75°, and 80° at the back. They all reach 5 mm out, so only the angle changes: at 75° and 80° each layer hangs almost entirely in the air, where hot plastic droops. Write the angle in the Notes column (55, 65, 75, 80, or 0 if none).
- BeginnerTurn the tower so you look up at the undersides of the tongues under a lamp. Start from the 55° tongue next to the right corner, go towards the back and stop at the first rough one.
- ExpertThe tongues print at the bridge speed (25 mm/s) with the bridge fan: the file turns on PrusaSlicer's *Detect bridging perimeters* for this object. The angle reached also depends on your fan; use the number to compare blocks: the angle at which the tongues start to fail drops as the temperature rises.
- Common misreadingThe 80° tongue is very flat and may droop a little on every block. That says nothing about temperature: compare where the droop starts from block to block.
- Common misreadingSeen from the side, the tongues may look the same on every block: on the author's PETG tower (270 → 200 °C) they did. Judge the undersides; if they too look the same, mark ✓ on every block.
Step 12 Long bridge (22 mm beam)
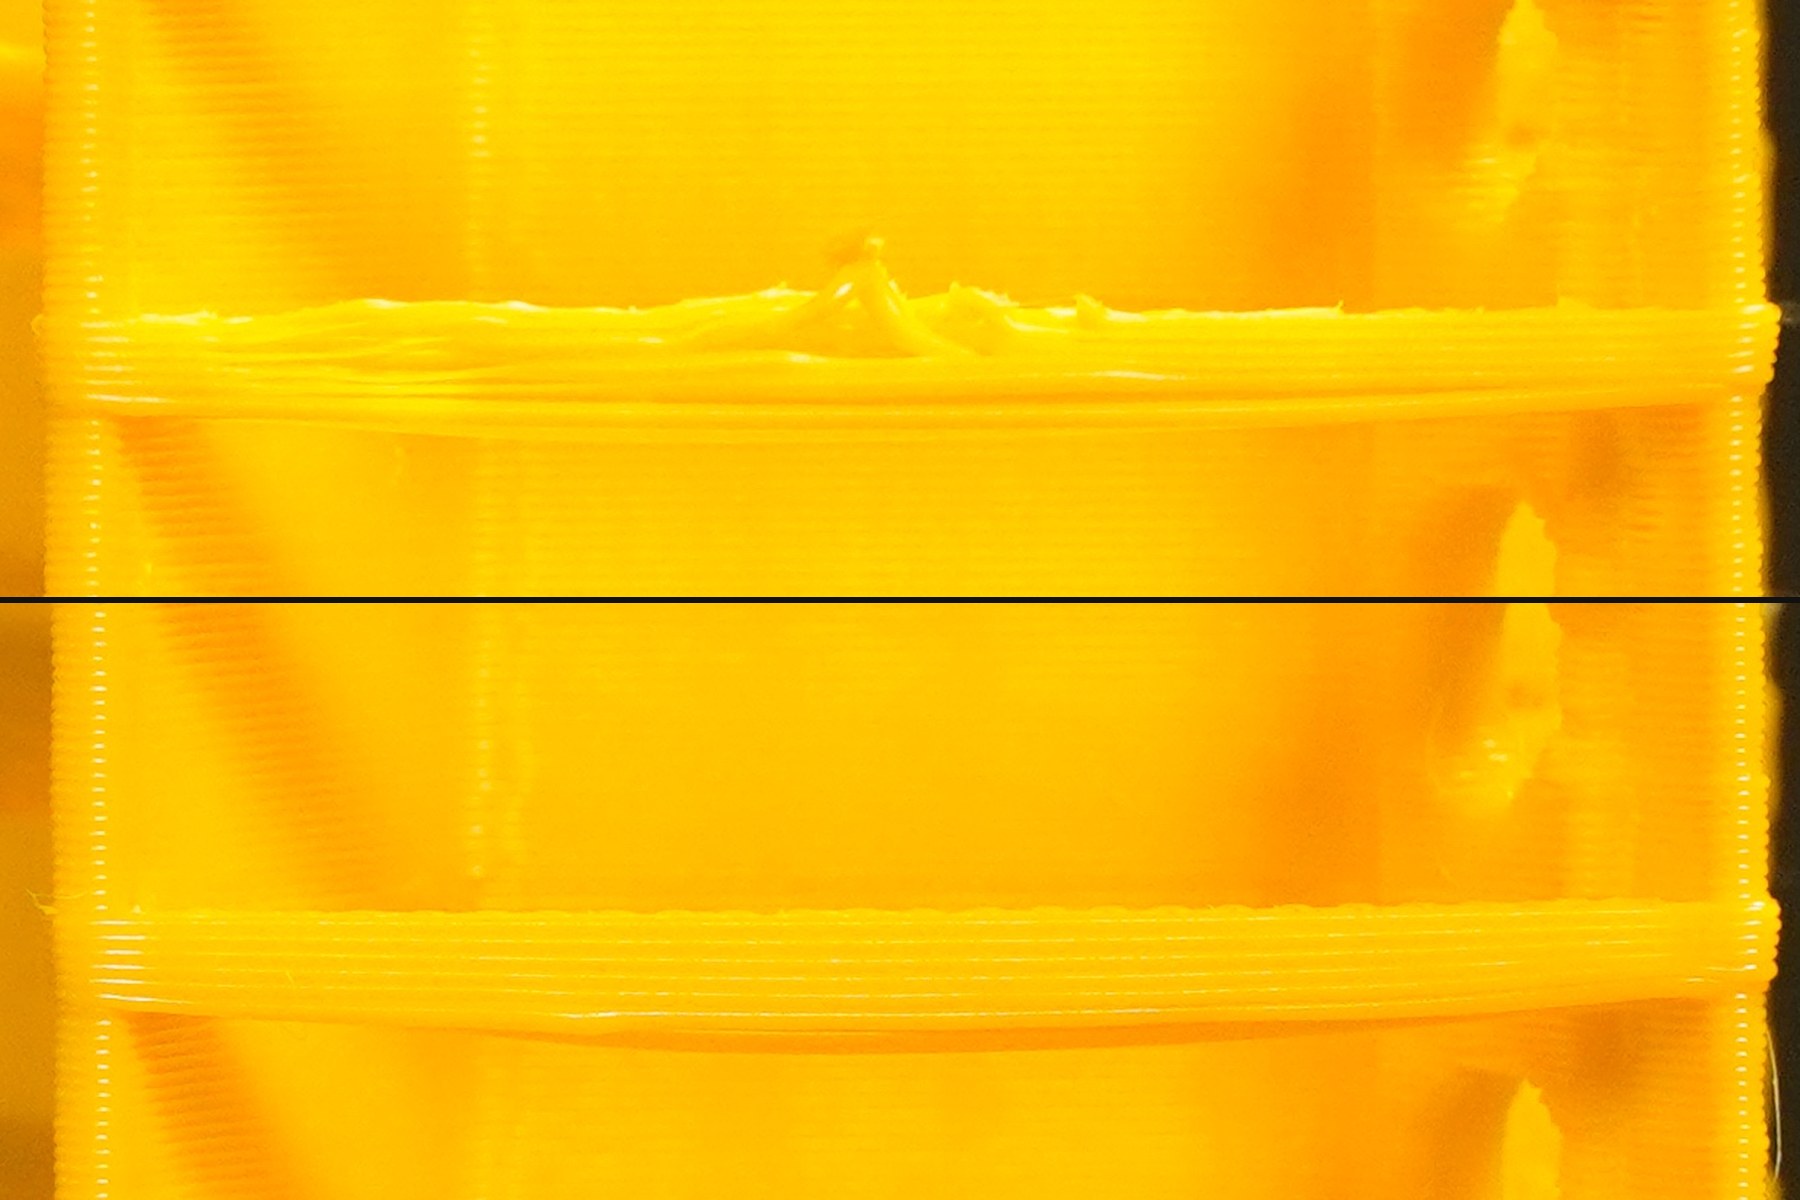
Decides
In front of the front-left face: a 22 mm bridge beam on two long ribs. Read it from the side and from below. Fails both ways.
More
The ribs stand one at each end of the face; the beam has 5.8 mm of open air under it and 7 mm of open space behind it. Hot plastic sags, cold plastic does not fuse.
- BeginnerFrom the side: look square at the front-left face at beam height, with the lamp lighting the face behind the beam. The beam's bottom edge then reads as a line against the lit face: compare it with the beam's straight top edge and with the beams of the blocks above and below. From below: tilt the tower back and look up at the underside, with the light skimming along the strands.
- ExpertThe span is long on purpose: sag grows quickly with span, so a 22 mm beam separates the hot blocks more clearly than a short bridge.
- Look at the top of each beam too. On the author's PETG tower (270 → 200 °C) the cold blocks showed there first: from 230 °C down the top was rough, with lifted strands; 240 °C was the cleanest.
- ExpertBridges depend strongly on the bridge fan speed and the bridge flow ratio. If every bridge looks the same, it tells you little about temperature: score them all ✓ or all –.
Step 13 Engraved temperature (fine detail)
Confirms only
Front face: the engraved block temperature. Check that the grooves stay crisp. Only confirms.
More
The temperature is centred on the face, engraved with 0.6 mm grooves. It tells you which block you are looking at; as a test it only confirms (it rarely changes from block to block). Mostly shows heat.
- BeginnerRead it at arm's length without a magnifier, then with your phone camera's zoom. If you have to guess a digit, it fails.
- Common misreadingScore the grooves, not whether you can still guess the number. A blurred 215 that you recognise because the blocks above and below are 220 and 210 is still a fail.
Step 14 Smooth face (surface quality)
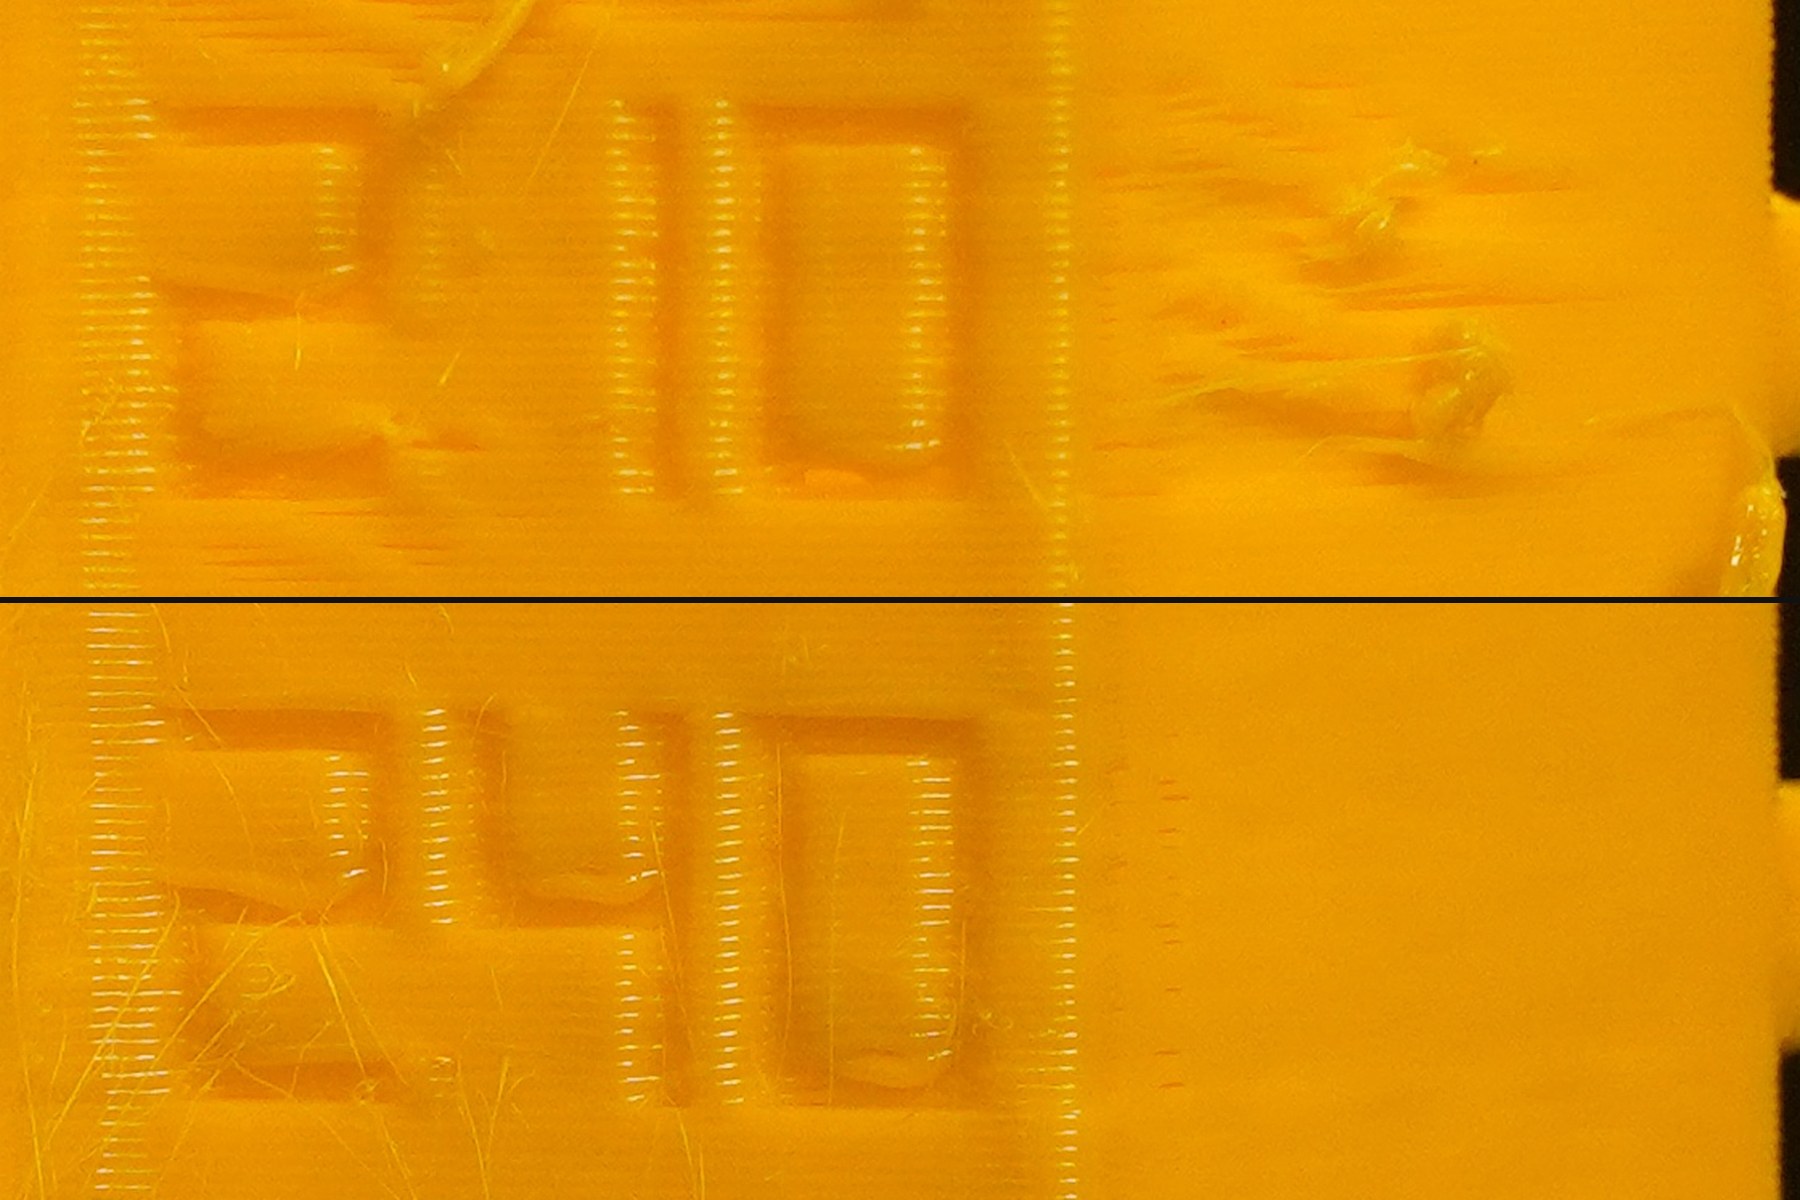
Confirms only
Front-right face: the whole face is plain. Look at the layer lines and the sheen. Only confirms.
More
Fails both ways: hot plastic smears and ripples, cold plastic looks dry and rough. On the author's coarse PETG tower (270 → 200 °C) it showed the cold end clearly: streaky, feathered layers from 220 °C down (a trace at 230), even from 240 °C up; the hot blocks looked no different.
- BeginnerTilt the tower under a lamp so the light skims the face: ripples and matte bands show up at once.
- Common misreadingSilk, matte and glitter filaments change their sheen on purpose. With them, judge only the ripples and gaps, not the gloss.
- Common misreadingWavy lines that look the same on every block are mechanical (ringing, wobble), not temperature.
Step 15 See-through hole (roof shape)
Confirms
Front rib, next to the numbers: a round 3.5 mm hole in every block. Look through it against the light: too hot, it turns into a teardrop. Not counted.
- Turn the smooth face towards you, light behind the tower, eye level with the holes.
More
The front rib is the rib at the corner between the front face (the numbers) and the front-left face. A round hole has to be closed over at the top, layer by layer: when the plastic is too hot, that roof sags. The hole only confirms what the other columns say. Mostly shows heat.
- Turn the tower so the front-right (smooth) face faces you, square. The front rib now stands out on your left, face-on, with one hole per block.
- Put a lamp or a bright window behind the tower and look through the holes level with them: the hole shows as a bright shape on the dark rib. Compare its top with the blocks above and below.
- BeginnerRound is good. A top that sags into a point, like a drop of water upside down, means that block was too hot.
- ExpertThe hole's last layers close over the gap as a short bridge: PrusaSlicer prints them at the bridge speed with the bridge fan, the same on every block. No other bridge or steep overhang prints in those layers (the long beam starts 1 mm above the hole), so the roof's shape depends on the block's temperature, not on another feature.
- Common misreadingLooking from above or below. From an angle, the inside of the hole and the beam behind it cut into the top of the light, and every hole looks flattened. Keep your eye level with the hole you are reading.
- Common misreadingEvery hole the same, round or slightly pointed. That is normal for many filaments and says nothing about temperature; it is why this column is not counted. Only a change from block to block is worth a mark.
- Common misreadingA tiny bump at the very top that looks the same on every block is where the last line closed the roof, not a droop. Judge the overall shape, block against block.
Step 16 Snap flag (layer adhesion)
Decides
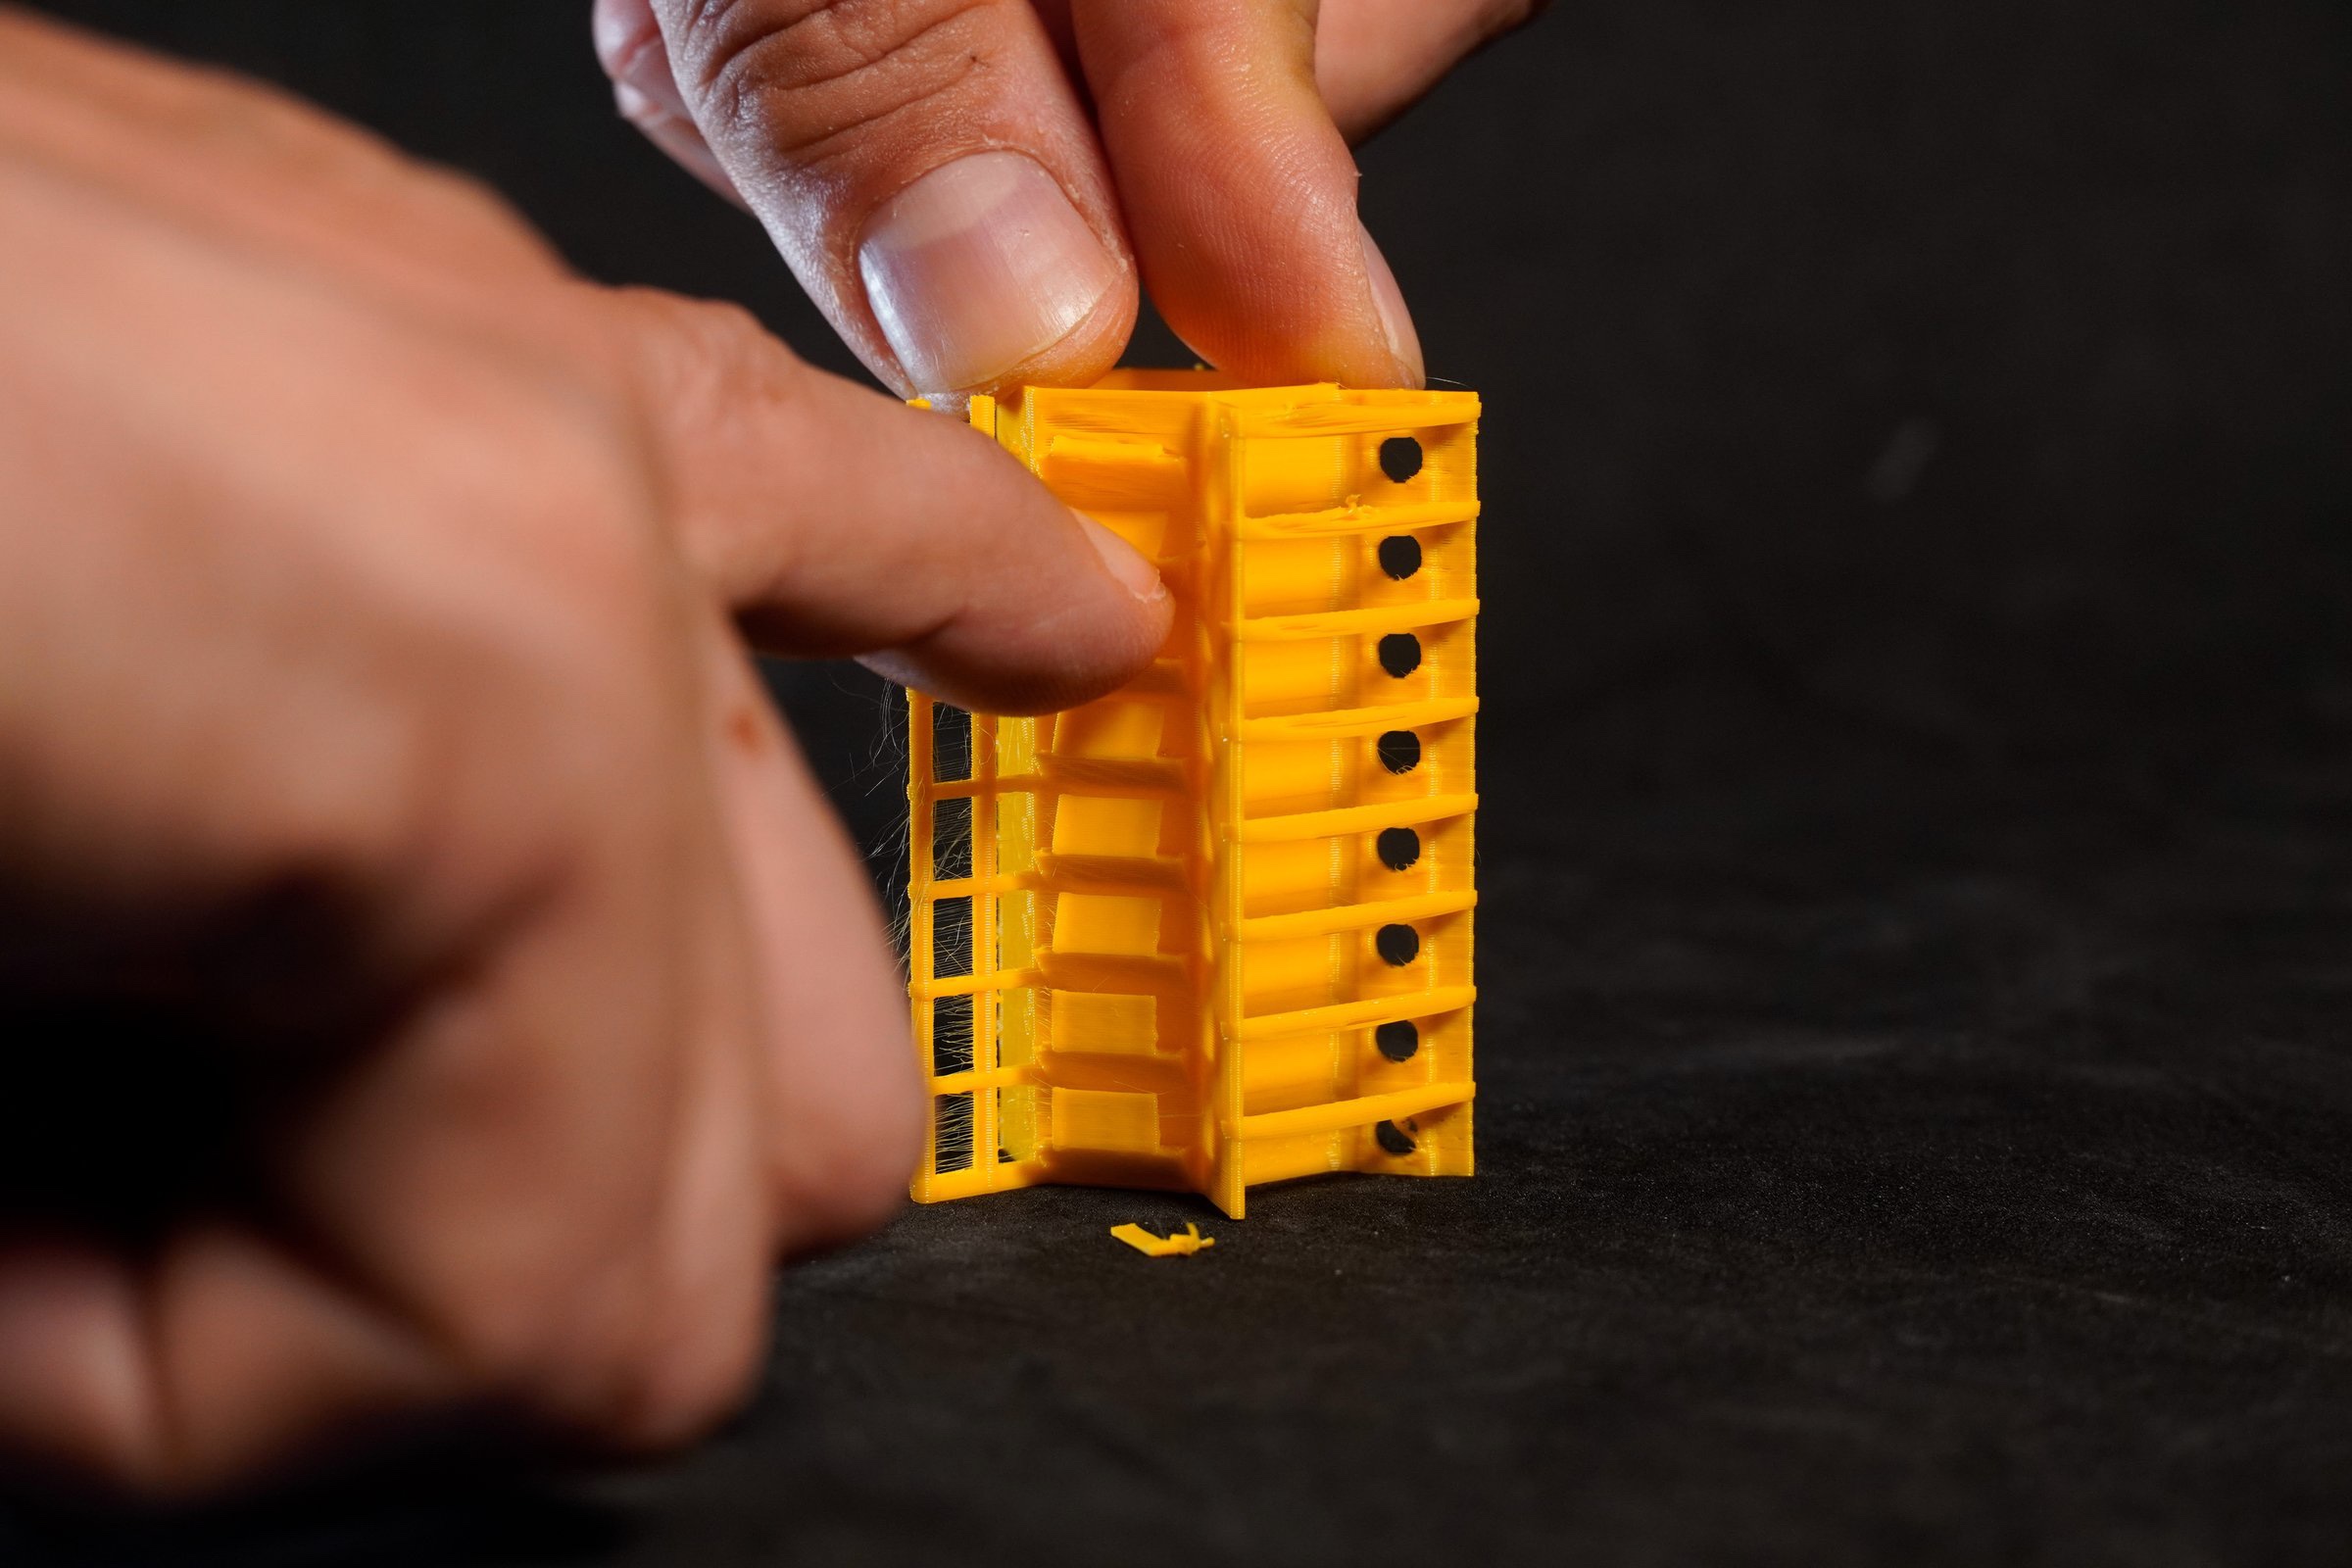
Back-left face, on the shelf: a thin flag at the shelf's outer edge. Break it with a fingernail: how it breaks tells how well the layers fused. Colder is never better here, and it decides first.
- Break the flags last, with the tower fully cooled: fingernail on the top edge, push towards the tower.
More
The flag is one line thick, about 3 mm from the wall, with nothing above its top edge. Shows cold.
- Break the flags last, after you have scored everything else on the block, and with the tower fully cooled.
- Put a fingernail on the flag's top edge and push it towards the tower until it breaks. Every block's flag can be reached this way; you do not need to pull.
- BeginnerGo from the top (coldest) block down. The first block where breaking feels clearly harder and the edge looks jagged or whitened is your coldest acceptable block.
- ExpertCompare the force between blocks rather than judging one flag alone; a single line is weaker than any real part. For parts that must be strong, choose at least one block above the coldest one that passes.
- TPU: the flag is not scored. TPU bends instead of snapping: mark it – on every block.
- Common misreadingWet filament also makes layers weak and brittle at every temperature. If no flag passes, dry the spool and print again.
Step 17 Also worth a look (not scored)
- Not scored, but worth a glance: the layer lines, the tower's outline, colour and gloss.
More
- Layer lines: uneven or wobbly lines that look the same on every block are a mechanical or extrusion problem, not temperature.
- The whole tower leaning or with a wavy outline: the tower is slim; a loose bed, a wobbly gantry or a weak first layer shows up here first.
- Colour and gloss bands: many filaments get glossier when hotter. A useful hint, already scored under the smooth face.
Step 18 Choose the temperature
Apply the rules in this order; the on-screen card does it for you.
- Cross out every block whose snap flag failed (not for TPU).
- Of the rest, the block with the most ✓ wins.
- Tie: fewer failures (H + C) wins. Still a tie: the cooler block wins.
More
- For parts that must be strong, go one block hotter than the block the rules picked.
- Example: PLA fine tower, blocks 220, 215 and 210 °C all score 5 ✓ with one failure each, block 205 fails the snap flag. The cooler of the tied blocks wins: 210 °C. For strong parts, use 215 °C.
- Example from the author's coarse tower, PETG 270 → 200: the strings are clearly worse at 250, 260 and 270 °C (H); the top of the bridge is rough at 230 °C and colder, the smooth face streaky from 220 °C down (C). 240 °C is the only block with neither; if its flag holds, the rules pick 240 °C, and a fine pass 250 → 230 then settles it to 5 °C.
- Common misreadingChoosing the block with the cleanest ladder. The coldest blocks string the least and are the weakest: on the author's PETG the 200–220 °C blocks had almost no strings, but a streaky face and rough bridges. That is why the snap flag comes first.
- Common misreadingTaking the coldest block with no strings. Stringing is also a retraction problem, tuned later in the sequence.
- ExpertIf the H marks do not all sit below the C marks, something other than temperature is varying across the tower: cooling, wet filament, or transition layers read as blocks. Fix that before trusting the result.
Apply the result
Step 19 Put it in your filament profile
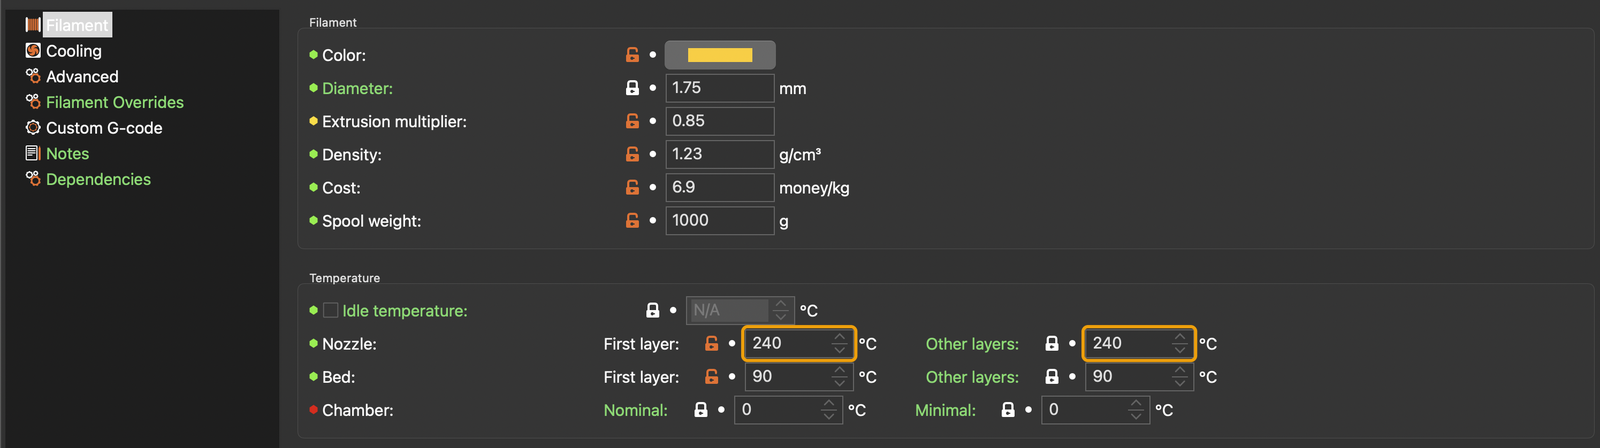
- In Filament Settings › Filament › Temperature, set Nozzle › Other layers to the chosen block's temperature.
- Save it as a new profile, for example
Brand PLA White – 215.
More
- Open Filament Settings › Filament › Temperature.
- Set Nozzle › Other layers (
temperature) to the chosen block's temperature. - Set Nozzle › First layer (
first_layer_temperature): see the next step. - Save the profile under a new name with the save icon next to the preset name, for example
Brand PLA White – 215. Keep the original as it was. - The temperature lives in the filament profile, not in the printer or print profile, so it follows the spool to any printer profile you use it with.
Step 20 First layer and other layers
- Set First layer about 5 °C hotter than the other layers, never above the hottest block that scored well.
More
- The tower tells you the temperature for all layers after the first.
- For the first layer, a common choice is 5 °C hotter than the other layers: the plastic flows a little better into the bed and sticks better. Prusa's own PLA profiles do this.
- Do not go above the hottest block that scored well, and keep it the same if your first layers already stick fine.
- PETG often prints its first layer up to 10 °C hotter; TPU usually needs no difference.
- ExpertIf you also use
idle_temperature(only active with Ooze prevention), set it from a standby-temperature test (planned), not from this tower.
Step 21 IDEX and multi-tool printers
- Give the updated profile to every extruder that uses this filament.
- Different hotends or nozzles each need their own tower.
More
- The result belongs to the filament and the hotend you tested. Two identical hotends with the same filament usually agree within a block; different hotends or nozzles each need their own tower.
- In PrusaSlicer each extruder uses its own filament profile: make sure every extruder that will use this filament gets the updated profile.
- Standby temperatures for the idle tool are a separate test (planned): this tower only sets the printing temperature.
Step 22 When to run it again
- A new brand or type of filament, or a colour that behaves differently.
- A new hotend, heater, thermistor or nozzle (size or material).
- A big jump in print speed or volumetric flow.
More
- Then, in the sequence: maximum volumetric flow, then pressure advance, then flow. Pressure advance in particular must be redone whenever the temperature changes a lot.
Troubleshooting
Step 24 Every block looks the same
- No markers on the slider: open the single .3mf with File › Open project, not Import.
- Strings and weak flags on every block: wet filament. Dry it and print again.
- The next print runs far too fast: send
M220 S100(Klipper: orRESTART).
More
- No markers on the slider: the file was imported instead of opened, came from a ZIP, was dropped together with other files, or PrusaSlicer is older than 2.7. With Import instead of Open project, PrusaSlicer loads the shape and silently drops every temperature code: nothing warns you. Open the single .3mf with File › Open project.
- Why each temperature code is repeated: in the file, every block's
M104is repeated on a 0.01 mm grid over the first few tenths of a millimetre of the block. On multi-extruder printer profiles (IDEX, XL, MMU), PrusaSlicer keeps a custom G-code only if it lands exactly on the top of a layer, and the file cannot know your layer height. The grid makes sure that one copy always lands on a layer top, for any layer height in steps of 0.01 mm. On a single-tool profile the copies merge into one marker per block; on a multi-extruder profile you may see two, with the same temperature. - Markers are there but the printer never changed temperature: look at the printer's screen while it prints. Some start or tool-change macros reset the temperature; with a single tool and no tool changes this should not happen.
- The bottom block was printed at the wrong temperature: the filament profile's First layer and Other layers temperatures were different (see why).
- Changes at the wrong heights: the tower was scaled, cut, sunk or rotated. Open the file again and leave it as it is.
- The blocks printed slowly: check the Volumetric flow rate view (the test flow). If it shows much less than 10 mm³/s, the file was imported instead of opened (no
M220markers), or your filament's Slow down if layer print time is below is above 28 s: lower it for this print only, without saving. - The next print runs far too fast: the tower was cancelled before its top, and the speed factor is still set. Send
M220 S100(Klipper: orRESTART).
Step 25 Other problems
- An error or the wrong tool heating at a block change (IDEX): use the file for the tool the object is assigned to.
- "Temperature out of range": do not raise the firmware limit; use the fine file or a cooler range.
More
- The printer stops with an error at a block change (for example "heater not found", or a Klipper error about an extruder): on an IDEX or multi-tool printer you printed a file for another tool. Use the file for the tool the object is assigned to.
- The other tool on an IDEX printer heats or cools: the object is assigned to the wrong extruder. In the object list, set its extruder to the one the file is for.
- "Temperature out of range" / above maximum: the hottest blocks are above your hotend's limit. Do not raise the firmware limit for this test: it exists to protect the hotend. Use the fine file if only the coarse one is too hot.
- Everything fails hot, even the top block: check that the part cooling fan works and is on. If it is, the best temperature may be below the tower's range: take the coldest block that passes the snap flag and check the manufacturer's range.
- No flag passes: wet filament, an extruder that under-extrudes (do the first-layer and extruder checks), or a speed far above the hotend's melting capacity (see the maximum volumetric flow test).
- The tower came loose or a ladder post broke off: clean the bed, check the first layer, and use a brim. Score the damaged features –.
- PrusaSlicer 3.x alpha: not tested with these files yet. PrusaSlicer 3.0 also has its own built-in temperature tower in its Calibration menu.