
Test 4
Pressure advance
A small hexagonal tower printed in bands of 4.6 mm, each with its own pressure advance value. Score the blade tips band by band, pick the winner with a fixed rule, and type one number into your setup.
More
A small hollow hexagon with three blades, printed in bands of 4.6 mm. Each band has its own pressure advance value, and the band number is engraved on the front. The blades end in sharp 45° and 90° tips after long straights, the hardest corners a printer meets. Too little PA makes them bulge, too much makes them dull. You score each band, pick the winner with a fixed rule, and type one number into your setup. There are two files per firmware: a coarse one with a wide range, and a fine one with small steps.
The tower is 43 mm tall, uses about 4.5 g of filament and prints in about 11 minutes, with no changes to your profiles: the file sets the test speed itself. Times and grams are our estimates, ±30 % for the time; PrusaSlicer shows the real figures after slicing.
Open the file with File › Open project, never with Import: an import keeps the shape but drops the PA changes and the test speed.
What you need
To print
- The file for your firmware and extruder
- PrusaSlicer 2.9 (2.7 is the minimum that opens the project)
- Your own printer, print and filament profiles, already working
- The nozzle temperature found with the temperature tower
- The filament to test, dry, about 5 g of it
To read it
- A lamp you can move, and a dark card or cloth
- The scorecard, printed or on screen
- Optional: a phone camera, to zoom on the tips
Before printing
Step 1 What it is for, and when to run it
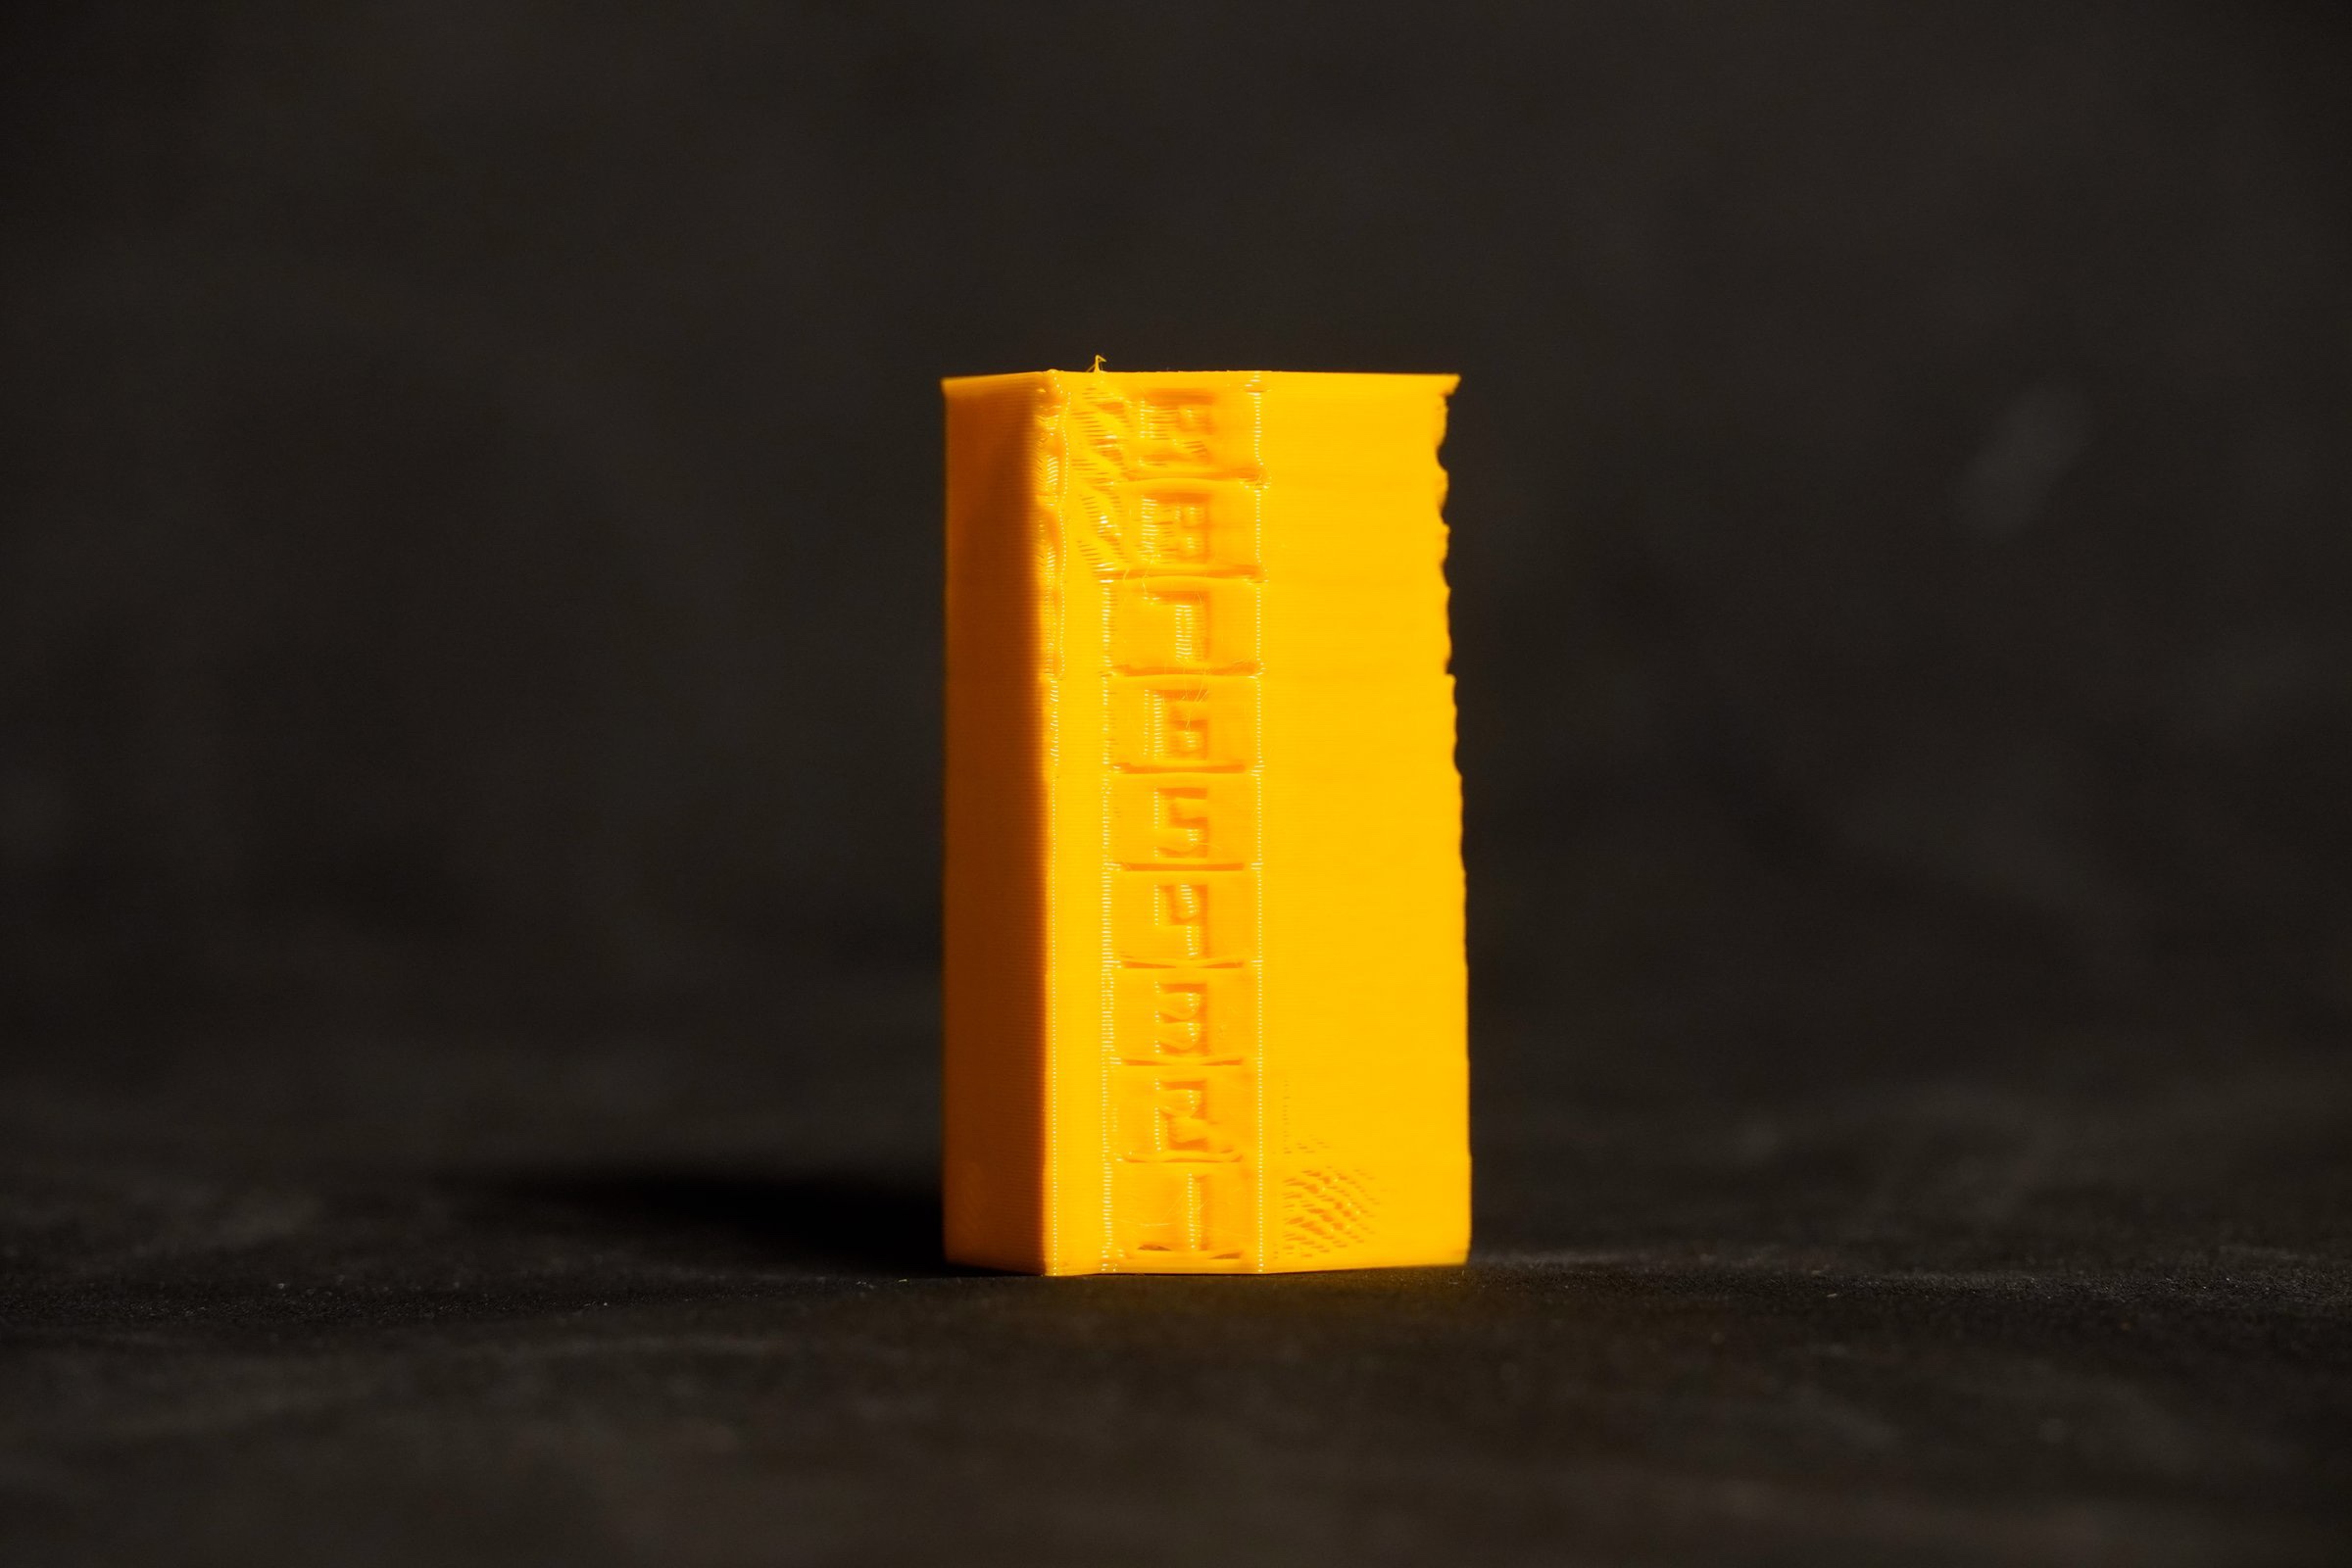
- Find the pressure advance (PA) value: sharp corners, no bulges, no gaps after them.
- Run it after the temperature tower, once per filament and once per toolhead.
More
- It finds the pressure advance (PA) value that keeps the line width even when the nozzle slows down and speeds up: sharp corners without bulges, and no gaps after them.
- BeginnerMolten plastic in the nozzle behaves a little like toothpaste in a tube: when you squeeze, it takes a moment to come out, and when you stop, it keeps oozing. When the nozzle brakes into a corner, plastic keeps coming and piles up: the corner bulges. After the corner the flow arrives late and the line is thin. PA tells the firmware to push a little earlier and ease off a little earlier. Too much of it and the corners come out rounded, dull or with small gaps.
- Klipper, Prusa and RepRapFirmware call it pressure advance; Marlin calls it linear advance (
Kfactor). It is the same idea, but the numbers are not interchangeable between firmwares. - Run it after the temperature tower: PA depends on how runny the plastic is, so tune it at the temperature you will print with.
- Run it per filament: every type, brand and sometimes colour needs its own value. And per toolhead on IDEX and multi-tool printers: each hotend and extruder gets its own tower and its own value.
- In the sequence it comes after maximum volumetric flow and before flow and retraction: good PA changes top surfaces and often removes most stringing by itself.
- ExpertThe result is valid for the test speed (98 mm/s, 8 mm³/s) and the external-perimeter acceleration of your profile, and it assumes input shaping is already tuned. Write both down with the value.
Step 2 Coarse or fine: which file first
- Print the fine file if you already have a PA value to start from.
- Print the coarse file if you know nothing about this filament or printer, then a fine pass around its best band.
More
Every firmware and extruder has two files, both with 9 bands and the same height. Print the coarse one only if you do not know your PA at all.
- Fine (the usual choice): the range most printers and filaments land in, in small steps (0.01 on Klipper and Prusa direct drive). If you have a value from your filament profile or an earlier test, start here.
- Coarse: a range two to five times wider, sure to reach clearly too high in its top bands (0 → 0.20 on Klipper and Prusa direct drive). Print it for a new filament or printer you know nothing about, or to see once, plainly, what both too low and too high look like.
- Then a fine pass around the best coarse band: print the fine file for your firmware and extruder. If the best coarse band lies above the fine file's range, take that band's value: the coarse result is your value.
- What too high looks like at the top of a coarse tower: the tips are rounded or "eaten", the wall thins just before each tip (the last 1–2 mm of the straight look starved), and gaps open at the line start on the seam bump at the back.
Step 3 Download the right file
| Firmware and printers | Extruder | Fine: band 1 → 9 (step) | Coarse: band 1 → 9 (step) | Command in each band |
|---|---|---|---|---|
| Klipper | direct drive | pressure-advance_klipper-dd_fine_0 → 0.08 (0.01) | pressure-advance_klipper-dd_coarse_0 → 0.20 (0.025) | SET_PRESSURE_ADVANCE ADVANCE=… |
| Klipper | bowden | pressure-advance_klipper-bowden_fine_0 → 0.8 (0.1) | pressure-advance_klipper-bowden_coarse_0 → 1.6 (0.2) | SET_PRESSURE_ADVANCE ADVANCE=… |
| Klipper IDEX (e.g. RatOS): one file per toolhead | direct drive | pressure-advance_klipper-dd_fine_ / _T1.3mf0 → 0.08 (0.01) | pressure-advance_klipper-dd_coarse_ / _T1.3mf0 → 0.20 (0.025) | SET_PRESSURE_ADVANCE EXTRUDER=extruder ADVANCE=… (T0) or EXTRUDER=extruder1 (T1) |
| Prusa Buddy firmware 5.0+: MK4, MK4S, MK3.9, MK3.5, Core One, XL | direct drive | pressure-advance_buddy-dd_fine_0 → 0.08 (0.01) | pressure-advance_buddy-dd_coarse_0 → 0.20 (0.025) | M572 S… |
| Prusa Buddy firmware 5.0+: MINI, MINI+ | bowden | pressure-advance_buddy-bowden_fine_0 → 0.48 (0.06) | pressure-advance_buddy-bowden_coarse_0 → 1.0 (0.125) | M572 S… |
| Marlin 2 with linear advance (LIN_ADVANCE); Prusa MK3/MK3S | direct drive | pressure-advance_marlin-dd_fine_0 → 0.16 (0.02) | pressure-advance_marlin-dd_coarse_0 → 0.40 (0.05) | M900 K… |
| Marlin 2 with linear advance | bowden | pressure-advance_marlin-bowden_fine_0 → 1.6 (0.2) | pressure-advance_marlin-bowden_coarse_0 → 2.0 (0.25) | M900 K… |
| RepRapFirmware 3 (Duet) | direct drive | pressure-advance_rrf-dd_fine_0 → 0.16 (0.02) | pressure-advance_rrf-dd_coarse_0 → 0.40 (0.05) | M572 D0 S… |
| RepRapFirmware 3 (Duet) | bowden | pressure-advance_rrf-bowden_fine_0 → 0.8 (0.1) | pressure-advance_rrf-bowden_coarse_0 → 1.6 (0.2) | M572 D0 S… |
- Find your firmware and extruder in the table and download that single .3mf file, not a ZIP.
- Get it from the HexCalibr page on Printables (below).
More
There is one pair of files (coarse and fine) per firmware family and extruder type: PrusaSlicer pastes the PA command into the G-code exactly as written, so each firmware needs its own file. Every file has 9 bands; band 1 is always PA 0.
- The files are named like
pressure-advance_klipper-dd_coarse_0-0.20.3mfandpressure-advance_klipper-dd_fine_0-0.08.3mf: firmware and extruder, coarse or fine, then the PA of the bottom and top bands. The value of every band is also in the slicer: see the markers. - Download the single .3mf file, not "Download all" as a ZIP: PrusaSlicer opens a ZIP's 3MF as plain geometry and the PA changes are lost.
- Every band is 4.6 mm tall, on a 0.6 mm floor, with a 0.8 mm cap on top: the tower is 42.8 mm tall. About 4.5 g of PETG (0.45 g per band); the file prints with 0.45 mm lines and 0.2 mm layers, and the grams assume 1.75 mm filament and no skirt.
- The ranges are made for a 0.4 mm nozzle. Bigger nozzles usually need less PA (Prusa's own values at 0.6 mm are about 60 % of those at 0.4), so the same files still cover them, at a coarser step.
- BeginnerDirect drive or bowden? Follow the filament from the spool. If the extruder motor sits on the print head and pushes the filament straight into the hotend, it is direct drive (Prusa MK4, Core One, XL, most Klipper machines). If the motor is on the frame and pushes the filament through a long PTFE tube to the head, it is bowden (Prusa MINI, Ender 3 and many older printers).
- BeginnerWhich firmware? Prusa MK4, MK4S, MK3.9, MK3.5, Core One, XL and MINI run Buddy. If you control the printer from Mainsail or Fluidd, it runs Klipper. Duet boards run RepRapFirmware. Most other printers, and the Prusa MK3/MK3S, run Marlin.
- XL and other Buddy multi-tool printers:
M572has no tool number on Buddy; it applies to the active tool, which is the one printing the tower. So the samebuddy-ddfile works for every XL tool: assign the object to the tool you want to tune (IDEX and multi-tool).
Print it
Step 4 Open it as a project
Before you print: one marker per band
After opening, slice and look at the vertical layer slider in the Preview: it must show one marker per band, plus one at the top. Hovering a marker shows the PA command, for example ;CALIB pressure_advance band=3/9 pa=0.020, SET_PRESSURE_ADVANCE ADVANCE=0.020 and M220 S1651.
- On multi-extruder printer profiles (IDEX, XL, MMU) there may be a short cluster of markers per band. That is fine.
- No markers: do not print. Open the file again with File › Open project, and check in Preferences that the load project dialog is on (see below).
- Quick check: export the G-code and search it for
;CALIB pressure_advance: details in the next step.
- In PrusaSlicer, File › Open project (Ctrl+O, or ⌘O on macOS) and choose the .3mf.
- Dragging the file in? Choose Open as project, never Import 3D models only.
- Opening the project replaces anything already on the plate. The PA changes belong to the plate, so print the tower on its own.
More
- If you drag the file onto the window instead, PrusaSlicer asks what to do: choose Open as project. Import 3D models only drops the PA changes.
- If you once ticked "don't show again" with the wrong choice, dragging will import silently. Turn the question back on in Preferences › General › Show load project dialog.
- The project carries no printer, filament or print profile: PrusaSlicer keeps yours. It only carries the tower, a few per-object settings the test needs (0.2 mm layers, 0.45 mm lines, two perimeters, both external, classic perimeter generator, no gap fill, no infill, the seam at the back, the test speed) and the PA changes.
- BeginnerDo not scale, rotate, cut or sink the tower. The PA changes are fixed heights: if the tower changes size, they land in the wrong place.
Step 5 Check the markers
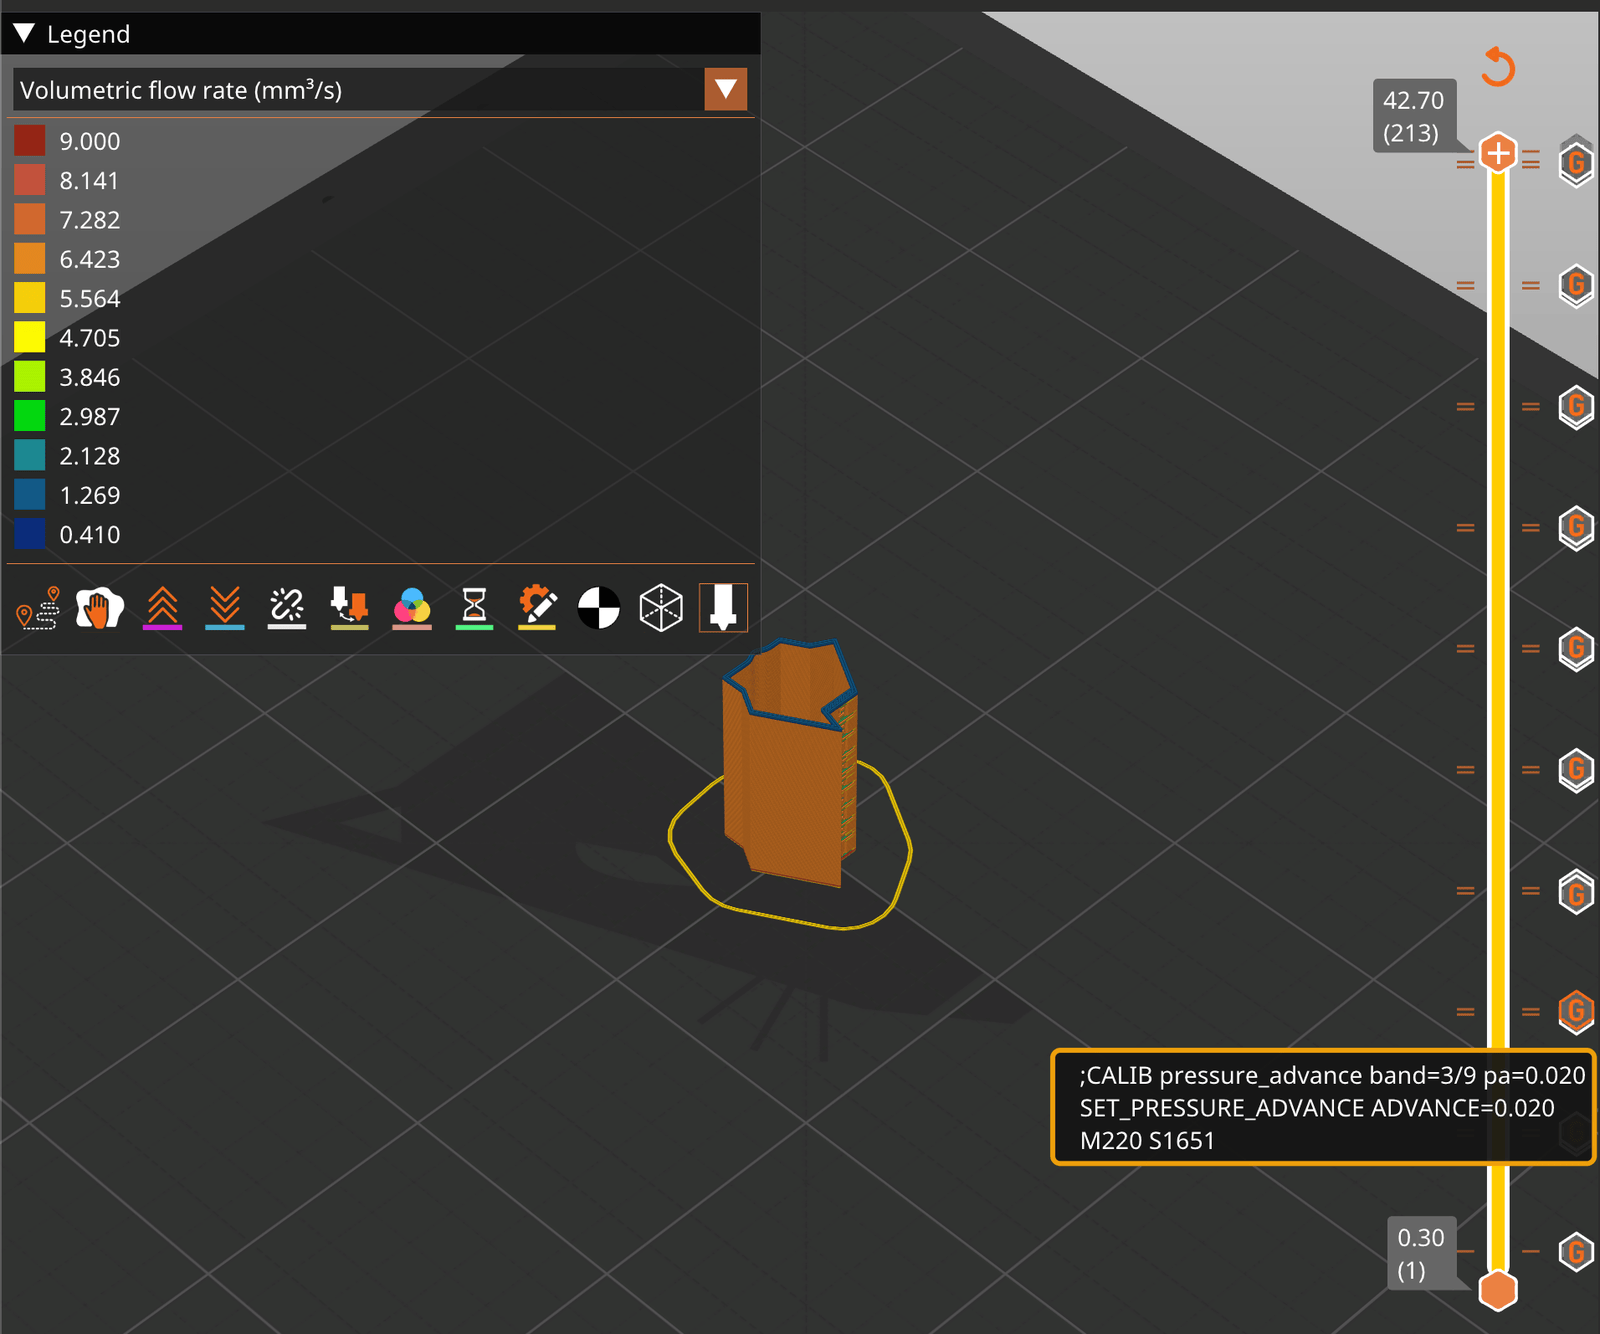
No markers, no print
The vertical slider must show one marker per band, at the first layer of each band. Hovering a marker shows the PA command for that band.
- On multi-extruder printer profiles (IDEX, XL, MMU) there may be more than one marker per band. That is fine: they all carry the same value.
- If no markers are visible, do not print. The PA changes were dropped and the whole tower would print with one value. Open the file again with File › Open project (not Import), and check Preferences › General › Show load project dialog so that dragging a file asks you again.
- Quick check before printing: export the G-code and search it for
;CALIB pressure_advance. All nine bands must be there, fromband=1/9 pa=0.000up.
- Select your profiles, click Slice now and switch to Preview.
- Hover a marker: the PA value must go up one step per band.
- Check that the command matches your firmware:
SET_PRESSURE_ADVANCE(Klipper),M572 S(Prusa Buddy),M900 K(Marlin),M572 D0 S(RepRapFirmware).
More
- Pick your printer, print and filament profiles in the right-hand panel, as for any print.
- Click Slice now and switch to Preview. On the vertical layer slider there is a small marker at the first layer of each band.
- Hover a marker: it shows the custom G-code, a comment such as
;CALIB pressure_advance band=3/9 pa=0.020, the command for your firmware andM220 S1651(the test speed, next step). The values must go up one step per band. The last marker, at the top, setsM220 S100back. - Check that the command matches your firmware:
SET_PRESSURE_ADVANCEfor Klipper,M572 Sfor Prusa Buddy,M900 Kfor Marlin,M572 D0 Sfor RepRapFirmware. A wrong family is ignored by the printer, or stops it with an error. - ExpertThe same line may appear more than once per band: on multi-extruder profiles PrusaSlicer keeps a custom G-code only if it lands exactly on a layer top, so each command is repeated on a 0.01 mm grid. That is harmless. Unlike temperature, PA acts at once, so there is no transition zone: each band is valid from its first layer.
Step 6 The test speed: nothing to change
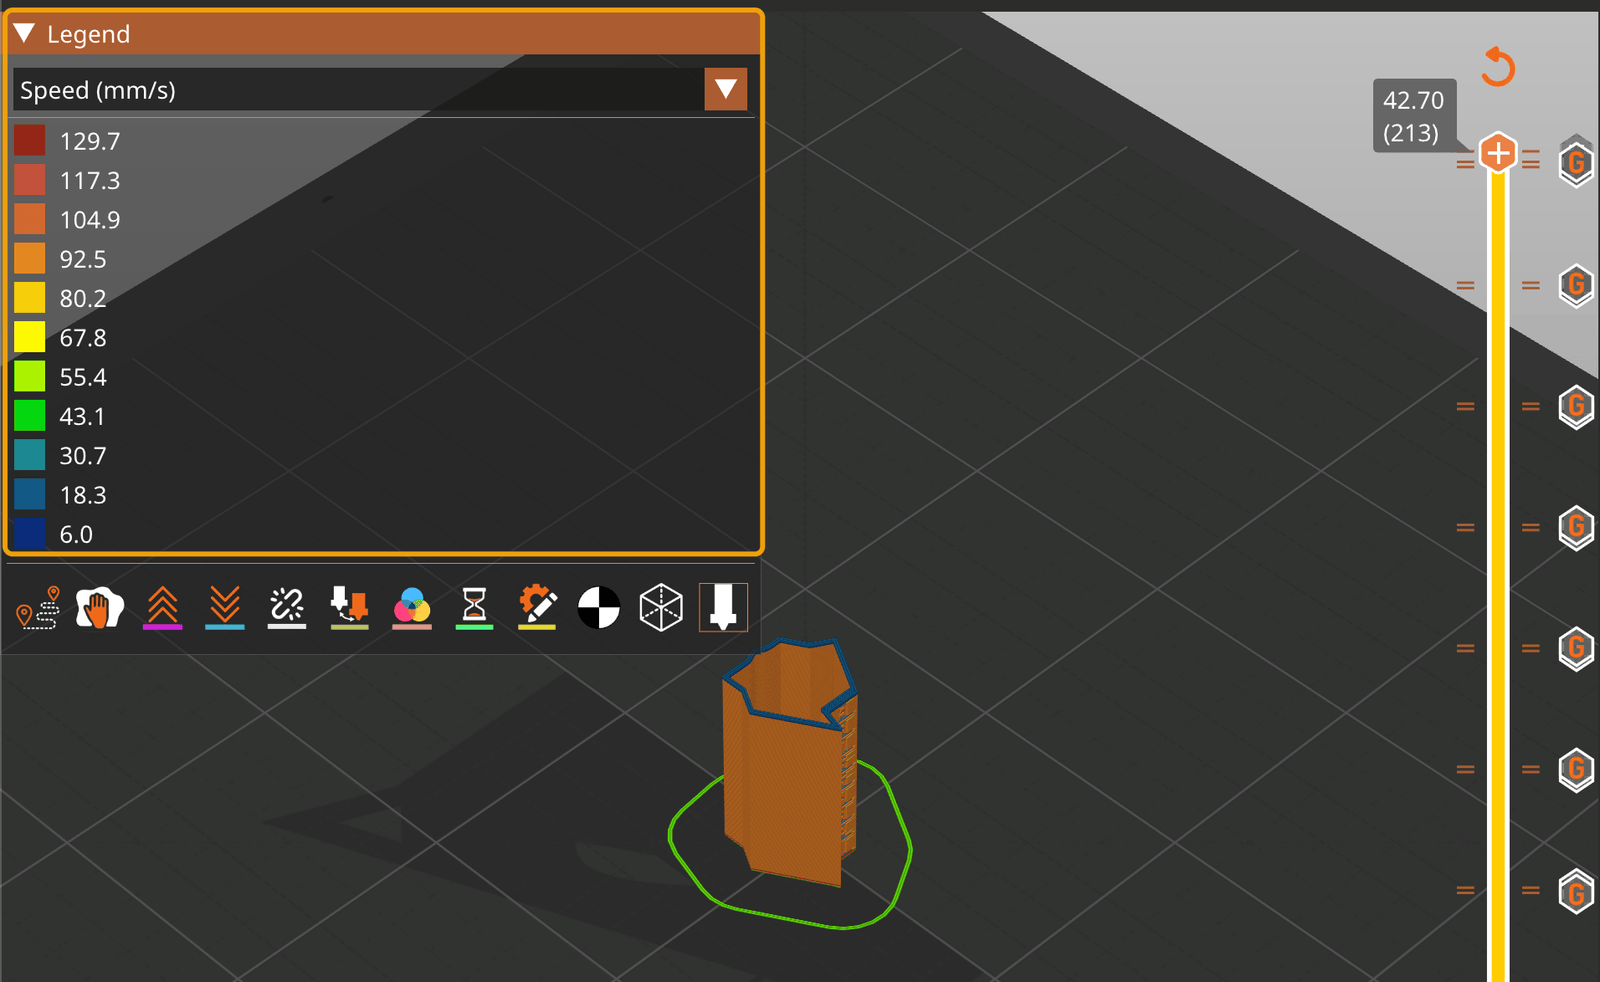
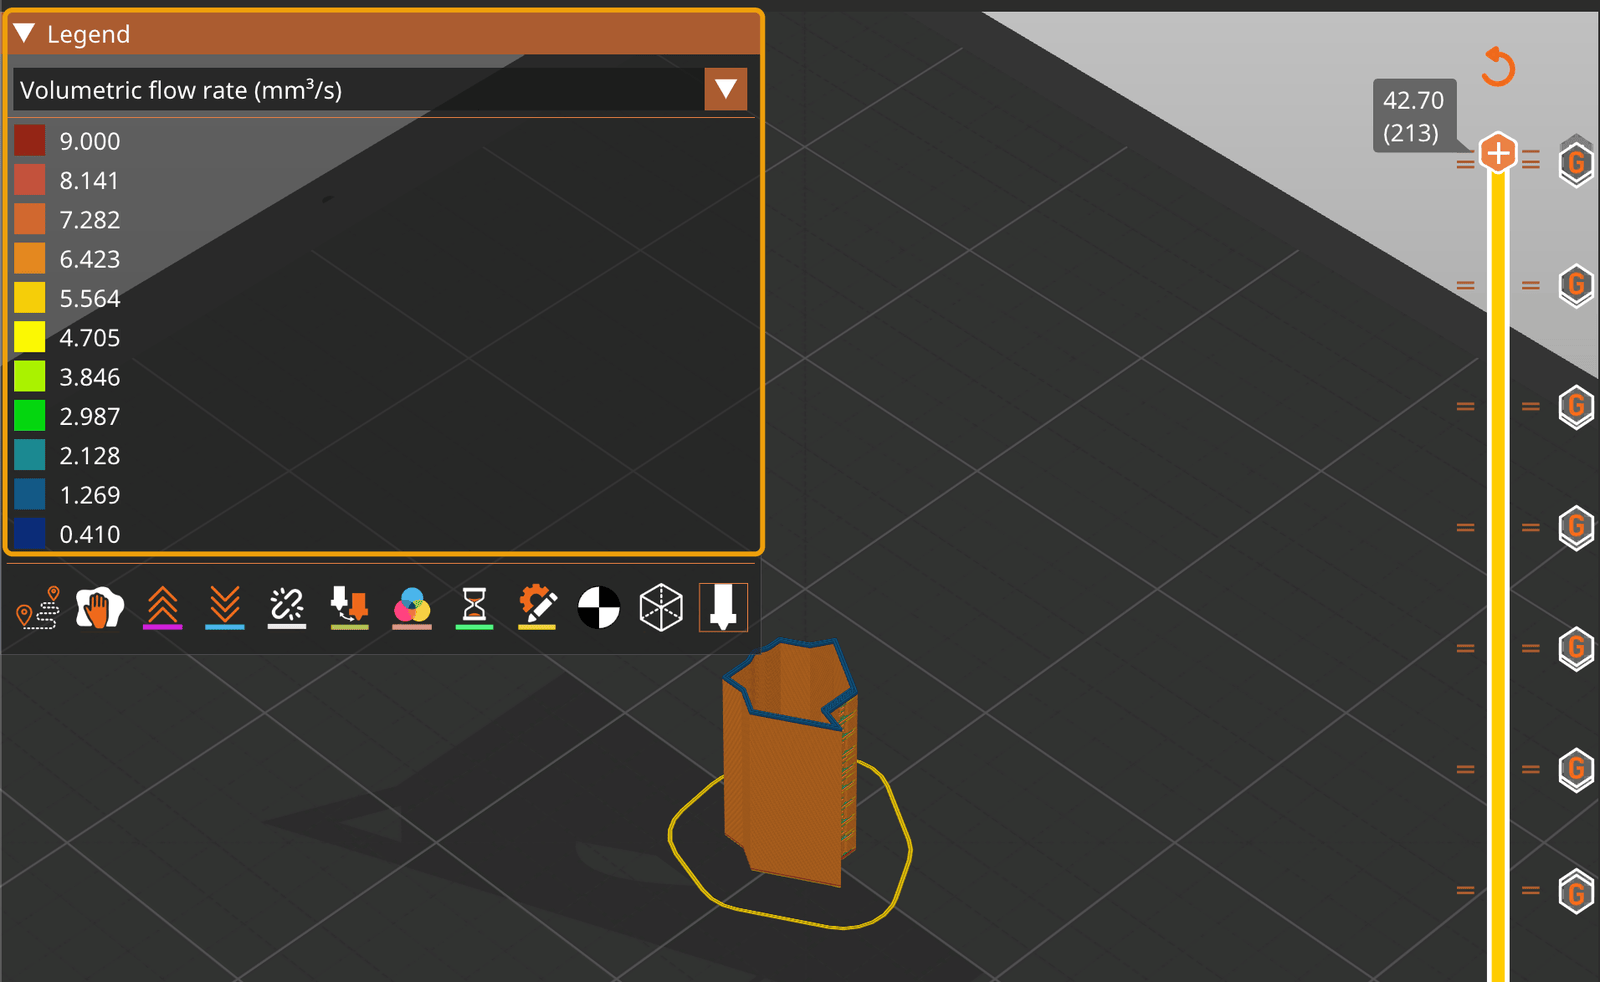
If you cancel the print, send M220 S100
The file speeds the printer up with M220, and the cap at the top sets it back with M220 S100. If you cancel the print before the top, type M220 S100 in the printer's console (or terminal): Klipper, Marlin and RepRapFirmware keep the factor, and your next print would run many times too fast. Prusa Buddy printers (MK4, Core One, XL, MINI) reset it at the next print start by themselves.
- No profile changes are needed. The walls print at 98 mm/s, about 8 mm³/s, with your own acceleration.
- Check it in the Preview: switch the legend to Speed; the walls show about 98 mm/s in every band.
More
- How: the file asks PrusaSlicer for a very low wall speed (about 6 mm/s), so the slicer sees long layers and never slows them down for cooling. Every band also sends
M220 S1651, a speed factor that the printer applies: 6 × 16.5 ≈ 98 mm/s.M220works on every firmware, so it adds no new file variants. - The floor, the first layer and the 0.8 mm cap at the top print at 100 %, with your own speeds.
- Check in the Preview: slice, and in the legend at the bottom left switch the view from Feature type to Speed: the walls show about 98 mm/s, the same from the bottom band to the top. In Volumetric flow rate they show about 8 mm³/s. The print time is the real one. This works with Klipper, Marlin and Prusa printer profiles: PrusaSlicer applies
M220in its preview. - RepRapFirmware printer profiles: PrusaSlicer ignores
M220in the preview there. The legend shows the low base speed and the time is many times too long; the printer still prints at 98 mm/s. - Fan: the slicer sees long layers, so the fan runs at your filament's minimum fan speed, with the bridge fan on the few short overhangs of the engraved numbers. That is how your big parts are cooled.
- BeginnerWhy a fixed speed: PA only shows when the nozzle changes speed. Before, the slicer slowed a small tower like this one down to 15 mm/s, where even PA 0 looks fine.
- ExpertIf the Speed view shows less than 98 mm/s, your filament's Slow down if layer print time is below is above 28 s, which is rare. Lower it for this print only, and do not save the change.
Step 7 Check the rest of the settings
- Print at the temperature you chose with the temperature tower.
- Use the print profile you really print with, and write down its external-perimeter acceleration.
- Make sure nothing else sets PA during the print.
More
- Set the nozzle temperature to the one you chose with the temperature tower. PA found at another temperature is not the right one.
- Use the print profile you really print with: the file sets the speed, but the external-perimeter acceleration is your profile's. Write it down with the test speed (on Klipper also
square_corner_velocity): the value is valid for them. - No other PA source during the print. The Before / After layer change G-code must not set PA. A PA line in the filament start G-code is fine: band 1's command comes later and wins.
- Sequential printing off (it disables the per-layer commands), spiral vase off, variable layer height off. The file sets 0.2 mm layers; any first layer below 0.6 mm works.
- Skirt 0 or 1 loop. Wipe tower and ooze prevention off.
- ExpertKlipper's documentation tests at low acceleration (
SQUARE_CORNER_VELOCITY=1 ACCEL=500), which exaggerates the corners but tunes PA for conditions you do not print at. If you want them, type the command in the console before printing andFIRMWARE_RESTARTafterwards: the file itself sends no motion settings.
Step 8 Slice and print
- Slice again after any change, export the G-code (or send it to the printer) and start the print.
- After the print, the printer keeps the top band's PA until something sets it again. On the last layer the printer's screen shows PA test done: restore your PA. On Klipper,
RESTARTorFIRMWARE_RESTARTtyped in the console, or the nextSET_PRESSURE_ADVANCE; on Marlin, a reset, and do notM500before your own value is set; on Prusa Buddy, the next print's filament start G-code sets it again. - Close the dialog before you restart. Mainsail rebuilds the window from the console history when it reconnects, so after a
RESTARTtyped with the window still open, the window comes back. Click Close first, then typeRESTARTonce the print has finished: a restart during the print stops it.
More
- Watch the value change at each band. Klipper: every
SET_PRESSURE_ADVANCEanswers in the Mainsail or Fluidd console with the newpressure_advancevalue. RepRapFirmware: sendM572with no value in the console to read it. Marlin: many screens show theKvalue in the advanced settings menu. Prusa Buddy: the screen does not show it; follow the print height against the markers instead. - The bands are short: a band takes about a minute. Watching the corner of the right blade in the first bands, you can often see the bulge with your own eyes.
- Klipper: a dialog in Mainsail or Fluidd. On the last layer, a few seconds before the end, the Klipper files open a window once: HexCalibr: PA test finished. It only informs you. The top band's PA is still active; it goes back to your
printer.cfgvalue afterRESTARTorFIRMWARE_RESTART, typed in the console when the print has finished, or at the next print if your filament start G-code sets PA. The only button, Close, closes the window. - ExpertOne-click restore (optional). Paste this macro into your
printer.cfg, save, and restart Klipper once:[gcode_macro HEXCALIBR_RESTORE] gcode: RESPOND TYPE=command MSG=action:prompt_end RESTARTAfter a test print, typeHEXCALIBR_RESTOREin the console: it closes the dialog, then reloadsprinter.cfg, with thepressure_advanceof every extruder and the speed factor at 100 %. The test files never run it: you run it, when the print has finished. - ExpertThe dialog uses Klipper's
RESPONDcommand ([respond], already in RatOS and in the Mainsail and Fluidd configuration). Without it Klipper only writesUnknown commandin the console and the print goes on; Mainsail 2.9 or later shows the window. The macro needs[respond]too. - BeginnerWrite the filament brand, colour, nozzle, test speed and acceleration on a piece of tape on the tower. In a month you will not remember which tower was which.
Read it
Step 9 How to read it: score each band

- Open the scorecard and choose your file in the firmware menu.
- Hold the tower with the numbers facing you: band 1, at the bottom, is PA 0.
- Follow each convex tip from band 1 up under raking light, and mark ✓, L (too low), H (too high) or – for each probe.
More
- Open the scorecard (print it, or fill it on screen). One row per band, one column per probe. Choose your file in the firmware menu: it fills in the PA value of every band.
- Hold the tower with the engraved numbers facing you. Band 1 is at the bottom and is always PA 0. Each band's number is engraved on the front face, above a groove that marks where the band starts.
- Read the convex probes: PA shows there. They are the blade tips (the right and back-left 90° tips, the front-left 45° tip), the last millimetre of each straight just before a tip, and the seam bump on the back face. The inside corners where the blades fold back, and the three plain 120° corners of the hexagon, are only references.
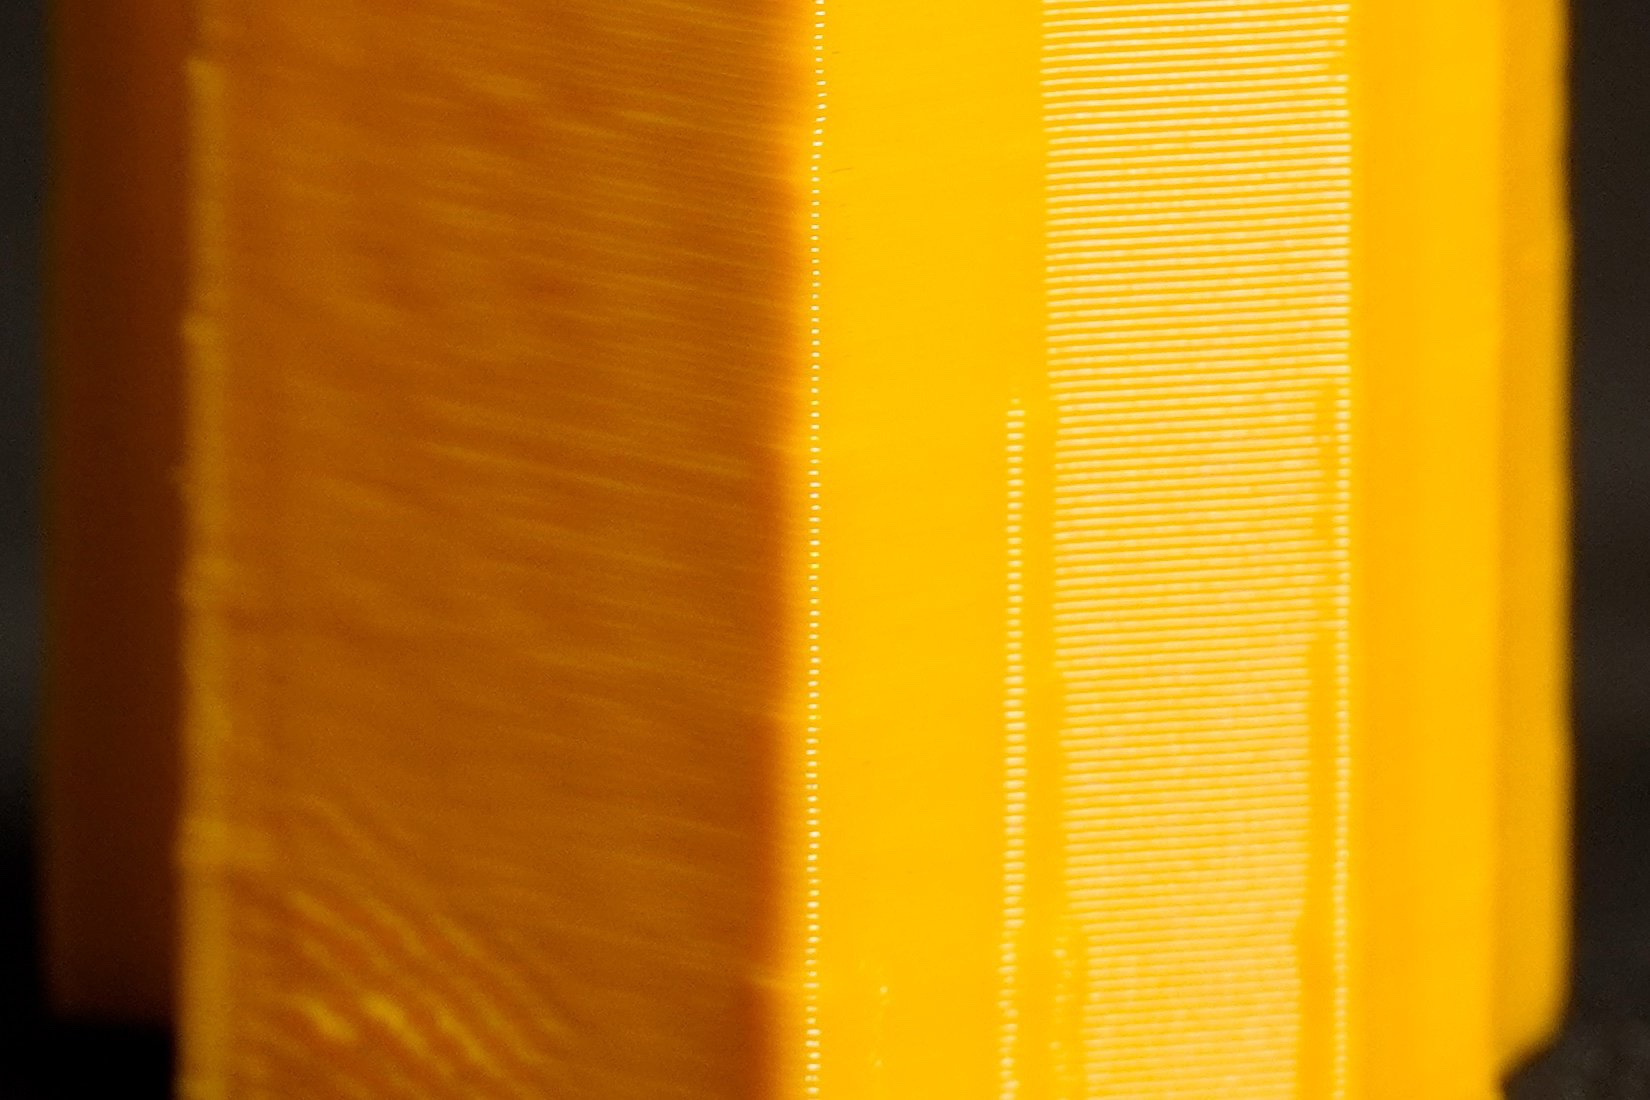
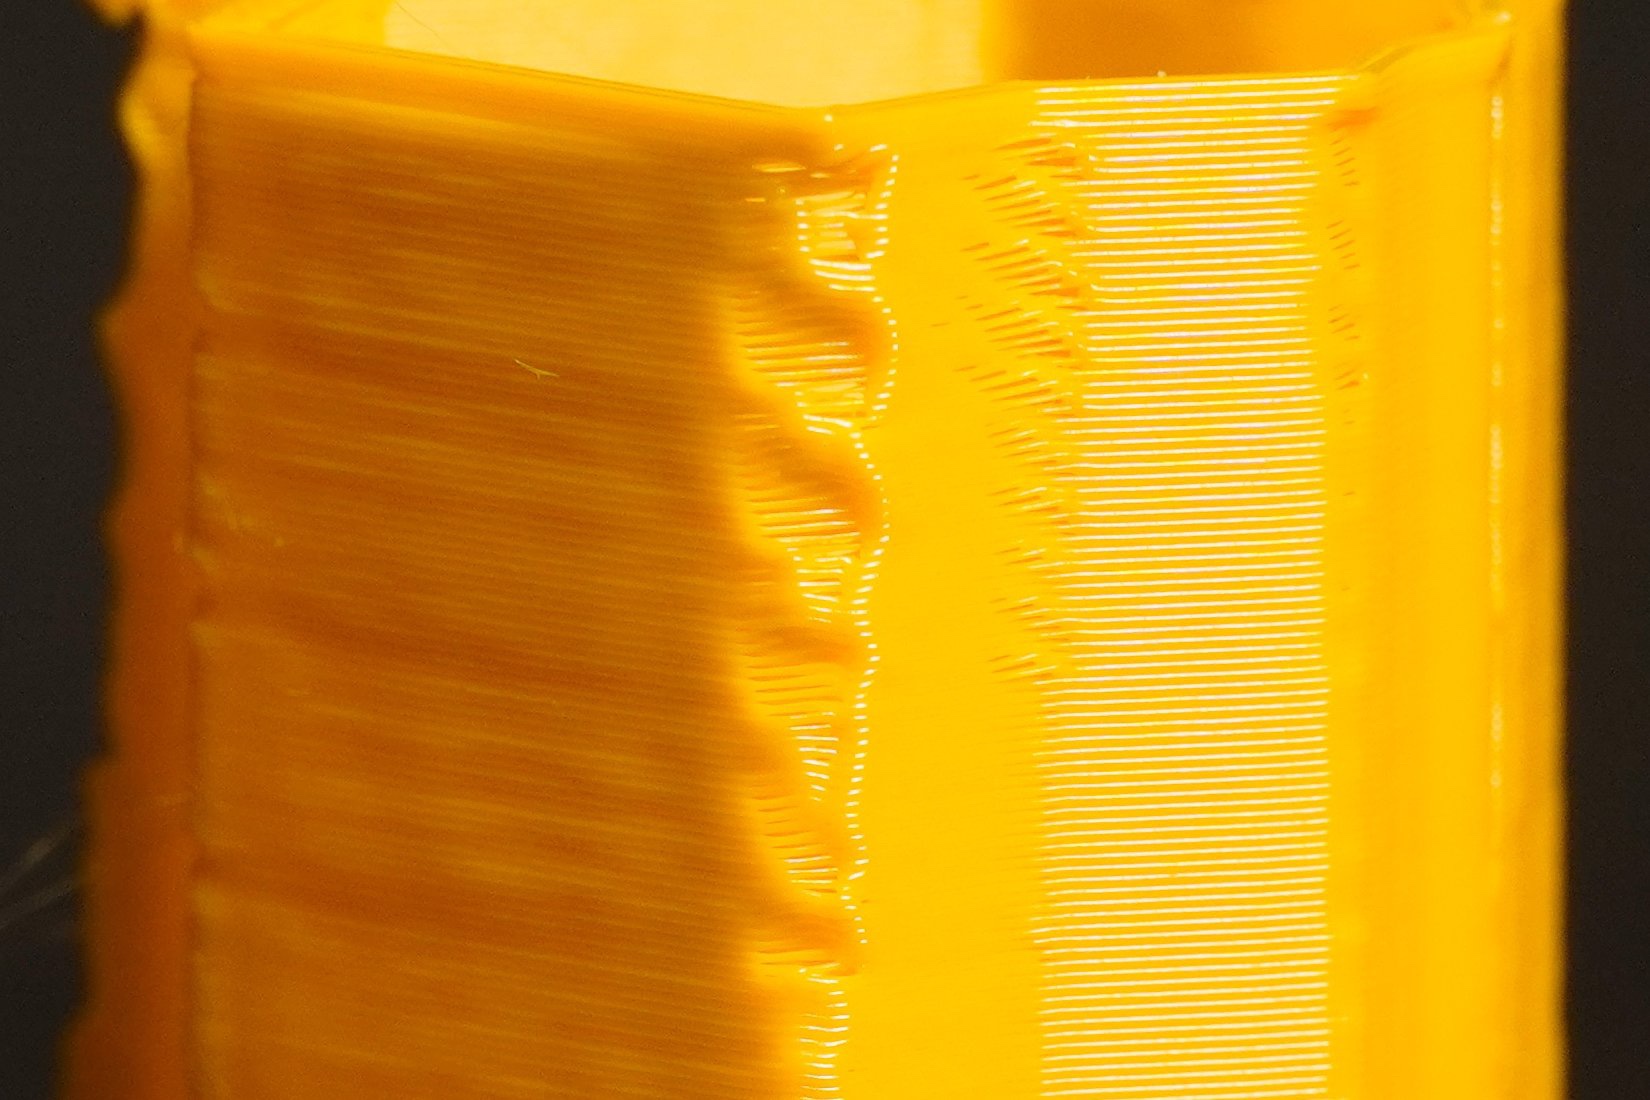
- Follow one convex corner from band 1 upward, with the light raking along the face. With PA too low its edge carries a vertical row of small blobs; the row fades out at the right band. On the first real print (PETG, Klipper, fine file) the blobs were there in bands 1–3 and gone from band 4 (0.03) up.
- Use raking light: a lamp low and to the side, so the light skims along the face. Do not judge under light from above.
- BeginnerLook at the corner edge-on, against a light background: hold the tower so the tip edge is a silhouette against a window or a sheet of white paper, or photograph it like that. Blobs show as a bumpy outline; the band where the outline turns straight is your area.
- Where they are, turning the tower: on the front-right face, a 15 mm straight into the right 90° tip; on the back face, the rear seam bump, then a short straight into the back-left 90° tip; on the front-left face, an 18 mm straight into the 45° tip.
- For each band and each probe, write ✓ (pass), L (fails because PA is too low), H (fails because PA is too high) or – (can't judge). The next steps show what each looks like.
- One rule for every probe: too low piles plastic up at and just before the corner (bulge, blob) and leaves the line thin after it; too high starves the corner (rounded, dull, "eaten", small gap) and leaves the line slightly fat after it.
- Ignore the floor and the first layer. Judge each band in its middle, away from its divider groove.
- Common misreading"The inside corners are filled in every band, so PA must go higher." Do not judge PA at an inside corner: on the outside of a print a concave corner is always slightly rounded, by about half a line width, whatever the PA. On the first real print they looked the same in all nine bands while a tip had already found the value. That column of the scorecard is not counted.
- Common misreadingBulge and gap in the same band, at the same place, is not a PA problem. Check the extruder first: a loose idler, backlash or slipping filament.
- Common misreadingThe wrong temperature or wet filament mimic PA errors. Too hot plastic swells every corner; wet filament gives rough, uneven lines and blobs in every band. Print at the temperature chosen with the tower, with dry filament, before trusting this test.
- Common misreadingRinging (ghosting) is not PA: waves that repeat after each corner and fade along the face come from vibrations, and are fixed with input shaping.
- Common misreadingThe band boundary is not a defect: the divider groove, and a faint line where the value changes, are there on purpose.
Step 10 90° blade tips
Decides
Right tip (end of the front-right face) and back-left tip (end of the back face): the main reading. Follow each one from band 1 up, under raking light.
- Mark ✓ only when both tips pass.
More
Two tips: the right blade, at the end of the long front-right face, and the back-left blade, at the end of the back face. The nozzle arrives at full speed along a straight, brakes hard and turns 90°. These convex tips are the main reading: they behave like the 90° corners of your real parts, and PA shows on them first.
- Follow one tip from band 1 upward, with the light raking along the face. With PA too low its edge carries a vertical row of small blobs; the row fades out at the right band. Then check the other tip.
- Look straight down the tip edge, as if sighting along a ruler. Then look from the side and imagine a set square on the tip.
- Mark ✓ only when both tips pass. If one bulges and the other does not, mark L: the back-left tip has a shorter straight, so it often reacts a little later.
- BeginnerLook at the tip edge-on against a light background (a window, a sheet of white paper), or photograph it that way: the blobs stand out as a bumpy outline, and the band where the outline turns straight is easy to spot.
- BeginnerCompare with band 1 first. It is printed with PA off, so its tips show you exactly what "bulge" looks like on your printer. Then go up until the tips look like the corner of a sheet of paper.
- ExpertThe reading is valid for the test speed (98 mm/s) and your external-perimeter acceleration (and, on Klipper,
square_corner_velocity). Write them down with the result: a different acceleration moves the optimum. - Common misreadingWrong temperature: plastic that is too hot also swells corners, in every band. If even the top band bulges, check that you printed at the temperature chosen with the temperature tower before raising PA.
Step 11 45° blade tip
Decides
Front-left blade tip, at the end of the 18 mm front-left face: the most sensitive probe.
- Compare its point with the bands above and below, rather than judging it alone.
More
Front-left blade, at the end of the long front-left face (18 mm). The nozzle almost stops here before turning back, so this is the most sensitive probe: the last to stop bulging as PA rises, and the first to blunt when it is too high.
- BeginnerIt is normal for the 45° tip to still swell slightly in the band where the 90° tips already pass. Do not raise PA just for it.
- ExpertUse it as the early warning for too high: when it starts to look blunt or gapped, the band above your choice is already too much.
- Common misreadingA blob on the tip in every band, the same size, is usually not PA: look at the seam settings, or at a wipe or retraction move ending there.
Step 12 Inside corners
Confirms
Three inside corners, where each blade folds back onto the hexagon. Not counted: do not judge PA here.
- Glance at them last, after the tips. If the crease looks the same in every band, that is what it should do: move on.
More
Three inside corners, where each blade folds back onto the hexagon: on the back-right face (behind the right blade), on the back-left face, and on the front face, left of the numbers (behind the 45° blade). Do not judge PA here, and they are not counted. On the outside of a print a concave corner is always slightly rounded, by about half a line width: the bead cannot form a sharp inward crease, whatever the PA.
- Common misreading"The inside corners are filled in every band, so PA must go higher." No: a concave corner is always rounded by the bead width. On the first real print they looked the same in all nine bands while the tips had already found the value (0.04). Read the convex tips instead.
- Common misreadingA slit in every band, also in band 1, is not PA too high: it is under-extrusion or a gap between the two wall lines. Check the flow and the filament diameter.
Step 13 Long straights (speed change)
Decides
Front-right face (15 mm) and front-left face (18 mm): compare the line width at both ends, in light that skims along the face.
More
Front-right face (15 mm, into the right tip) and front-left face (18 mm, into the 45° tip). The nozzle speeds up after the previous corner and slows down into the tip: PA shows as a change in line width at both ends of the face.
- Hold the face almost edge-on to a lamp, so the light skims along it. Look at the two ends, not the middle. The last millimetre before the tip is the most telling: it swells with PA too low and thins with PA too high.
- ExpertOn fast profiles with high acceleration the acceleration phase is short: the effect at the start of the face can be faint. Score what you see; the tips decide.
- Common misreadingRinging or ghosting is not PA. Ripples that repeat after each corner and fade along the face are vibrations of the printer: they are fixed with input shaping, not with PA. PA changes the width of the line, it does not make waves.
- Common misreadingWet filament gives a rough, uneven, sometimes bubbly surface in every band. It mimics the thin starts of PA too low. Dry the spool and print again.
Step 14 Seam: line start and end
Confirms only
Rear bump, in the middle of the back face: every layer starts and ends there. It only confirms the corner reading.
More
Rear bump, in the middle of the back face: a convex probe. Every layer starts and ends on its apex. Retraction and wipe also act on this spot, so the seam only confirms the corner reading: it never decides on its own.
- BeginnerLook at the bump from straight behind, with the light from one side. The seam is the thin vertical line on the top of the bump.
- Common misreadingA seam that looks the same in every band is set by retraction, wipe or the seam settings, not by PA. Score it – and move on.
Step 15 Plain 120° hex corners (reference)
Confirms only
Three gentle corners: front-right (next to the numbers), back-right and left. They should look fine over a wide range of PA: use them as a sanity check.
- If the 120° corners already fail in the band you are about to choose, your choice is far off: look again at the tips.
More
- Common misreadingThe divider groove is not a defect. At the bottom of every band a groove runs across the front face, and the wall changes slightly right where the new value starts. Judge each band in its middle, never at the groove.
Step 16 Choose the value
Apply the rule in this order; the on-screen card does it for you.
- Go up from band 1 to the lowest band where both 90° tips stop bulging.
- Take it unless it shows too-high signs (rounded tips, gaps). Tie with the band above: take the higher.
- Best band is band 1 or the top band? The value may lie outside the range: print the other file (coarse after fine, fine after coarse).
More
- Go up the tower from band 1. Find the lowest band where both 90° tips have stopped bulging (the row of blobs on the edge is gone). Ignore the inside corners: they are rounded in every band.
- In that band and the one above, look for too-high signs: tips rounded, dull or "eaten", a gap on the 45° tip, a thin end before a tip, a gap at the seam.
- Your value is the lowest band with no bulge at the 90° tips and no gap anywhere. The 45° tip may still swell very slightly there: that is normal.
- Tie: if two neighbouring bands look equally good, take the higher one. When in doubt, lean higher.
- If the best band is band 1 or the top band, the right value may lie outside the range: print the coarse file, which reaches much higher.
- Example: Klipper direct drive, PETG, fine file. Bands 1 to 4 (PA 0 to 0.030) show a row of small blobs on the right 90° tip. Band 5 (0.040) has a straight, sharp edge; the 45° tip swells a little. Band 6 (0.050) looks just as good. Band 7 shows a thin end before the 45° tip. Tie between 5 and 6: take the higher, 0.050.
- After a coarse tower: print the fine file for your firmware and extruder and score it the same way. If the coarse result lies above the fine range, keep the coarse value.
- Write down, next to the value: firmware, nozzle, filament, temperature, test speed (98 mm/s) and acceleration.
- Common misreadingChoosing the band whose 45° tip is perfectly sharp. That is usually one band too high for your 90° corners, which are the corners of your real parts.
- ExpertIf L and H marks do not sit neatly with L at the bottom and H at the top, something other than PA varies along the tower. Check the Speed view in the Preview again: every band must show the same speed.
Apply the result
Step 17 Put it in your setup

- Add the value to your filament start G-code (Filament Settings › Custom G-code › Start G-code) and save it as your own preset.
- The command: Klipper
SET_PRESSURE_ADVANCE ADVANCE=…, Prusa BuddyM572 S…, MarlinM900 K…, RepRapFirmwareM572 D0 S…. - Klipper IDEX: name the extruder. A filament start G-code without
EXTRUDER=applies to whichever tool is active when the line runs, which is not always the tool that will use this filament. WriteSET_PRESSURE_ADVANCE EXTRUDER=extruder{if filament_extruder_id > 0}{filament_extruder_id}{endif} ADVANCE=0.050, or keep one filament preset per tool. RatOS IDEX routes a plain command to the active toolhead.
More
Where PA lives depends on the firmware. Setting it in the filament profile is usually best: the value follows the spool.
- Klipper, for one value on the printer: in
printer.cfg, under[extruder], setpressure_advance: 0.050(on IDEX,[extruder1]for the second toolhead), thenFIRMWARE_RESTART. - Klipper, per filament (recommended): in PrusaSlicer, Filament Settings › Custom G-code › Start G-code, add
SET_PRESSURE_ADVANCE ADVANCE=0.050. Save it as your own filament preset. - Prusa Buddy (MK4/MK4S, MK3.9/3.5, Core One, XL, MINI): Prusa's own filament presets already contain a line such as
M572 S{if nozzle_diameter[0]==0.4}0.03{elsif …}. In Filament Settings › Custom G-code › Start G-code, change the number for your nozzle, then save the preset as your own. OldM900 Kvalues are converted by the firmware, but useM572. - Marlin 2: per filament, add
M900 K0.08to the filament start G-code. Or once on the printer: sendM900 K0.08, thenM500to store it. - RepRapFirmware: add
M572 D0 S0.05toconfig.g(one line per extruder drive:D1for the second), or put it in the filament start G-code. - PrusaSlicer 3.0 (upcoming) has native filament settings for PA (
pressure_advanceandpressure_advance_value), and it writes the right command for your G-code flavour. When you switch to it, remove any hand-written PA line from the filament start G-code, so that the value is not set twice. PrusaSlicer 2.9 does not have these settings. - BeginnerThe numbers above are examples. Use the value of the band you chose, written exactly as on the scorecard.
Step 18 IDEX and multi-tool printers
- One tower per toolhead. Each hotend and extruder has its own PA, even when two toolheads are identical: print one tower with each tool, never in copy or mirror mode.
- Store the result per tool:
[extruder]and[extruder1]in Klipper, or one filament preset per tool in PrusaSlicer, or theEXTRUDER=line above.
More
- Klipper IDEX: use
pressure-advance_klipper-dd_fine_0-0.08_T0.3mf(or…_coarse_0-0.20_T0.3mf) for the first toolhead and the…_T1.3mftwin for the second. Each file is already assigned to its extruder, and its commands name it (EXTRUDER=extruder/EXTRUDER=extruder1). - Prusa XL and Marlin: use the normal file and assign the object to the tool you are testing (right-click the object › Change extruder). The command applies to the active tool, which is the one printing.
- RepRapFirmware: the
rrffiles setM572 D0, extruder 0. Per-tool files for other extruders are not published yet. - ExpertTwo identical toolheads with the same filament often agree within one band. If they differ by more, look at the extruders: a worn gear or a different PTFE length shows up here first.
Step 19 When to run it again
- After a new filament, nozzle, hotend, extruder or bowden tube, a large temperature change, or new input shaper, speed or acceleration settings.
More
- A new filament type or brand, sometimes a new colour.
- A new nozzle (size or material), hotend or extruder, or a different bowden tube length.
- A large change in printing temperature.
- A change of input shaper settings, or a big change of external-perimeter speed or acceleration.
- Then, in the sequence: flow, then retraction. Both read better once PA is right.
Troubleshooting
Step 21 Every band looks the same
- No markers on the slider: the file was imported instead of opened, came from a ZIP, was dropped together with other files, or PrusaSlicer is older than 2.7. Open the single .3mf with File › Open project.
- The walls printed slowly: check the Speed view (the test speed). If it shows less than 98 mm/s, the file was imported instead of opened (no
M220markers), or your filament's Slow down if layer print time is below is above 28 s: lower it for this print only. - The next print runs far too fast: the PA print was cancelled before its top, and the speed factor is still set. Send
M220 S100(Klipper: orRESTART).
More
- Markers are there but nothing changed: the printer ignored the command. Check that the file matches your firmware family. Marlin: linear advance is an option of the firmware build; without
LIN_ADVANCE,M900does nothing. SendM900alone from a terminal: if it does not answer with a K value, your firmware has no linear advance. - Something resets PA during the print: a Before / After layer change G-code, or a macro, that sets PA. Remove it for this print.
- The range is too narrow to see a change: all bands look good or all look bad. Print the coarse file.
- You were looking at the inside corners: they look the same in every band whatever the PA. Read the tips instead (how to read).
Step 22 Other problems
- The printer stops with an error at a band change (for example
Unknown commandor a Klipper error about an extruder): the file is for another firmware family, or, on IDEX, for another tool. Use the file for your firmware and for the tool the object is assigned to. - Even the top band bulges: the range is too low (print the coarse file), or the temperature is too high. Check the temperature first.
- Even band 2 shows gaps: the range is too high (print the fine file), or the extruder under-extrudes.
More
- Bulge and gap at the same place, in the same band: not PA. Check the extruder: idler tension, gear backlash, filament slipping or a partly clogged nozzle.
- The 45° tip broke off or curled up: score it –; the 90° tips decide.
- Lines in every band look rough or bubbly, or hiss when printing: wet filament. Dry it and print again.
- PrusaSlicer 3.x alpha: not tested with these files yet.